Do you want to automate your email marketing campaigns but aren’t sure which GetResponse tool you should use – Autoresponders or Marketing Automation? Then keep reading, and it’ll all be clear in just a few moments!
Autoresponders vs. marketing automation: quick summary
In a hurry? Here’s a quick table that highlights the key differences between the two solutions and what they’re best used for.
| Autoresponders | Marketing Automation | |
|---|---|---|
| Best used for | Autoresponders are perfect if you want to set up simple, linear email sequences, like: ✅ Welcome emails ✅ Email courses ✅ Email drip campaigns ✅ Lead nurturing sequences ✅ Sequenced promo campaigns Autoresponders will be a perfect choice if you’re a consultant, coach, affiliate marketer, or general marketer and only need to send your messages at specific intervals. | Marketing Automation is perfect if you want to build more advanced communication scenarios, like: ✅ Advanced lead nurturing sequences with tags and scoring ✅ Re-engagement campaigns to dormant subscribers ✅ Post-purchase follow-ups to your customers ✅ Multichannel nurturing sequences via email, SMS, push notifications, etc. You’ll want to use Marketing Automation if you’re a coach, consultant, agency owner, general marketer, or ecommerce marketer and want to communicate with your audience with sniper-like precision. |
| Pros | ⏺ Setting up autoresponder sequences is extremely easy and efficient ⏺ The calendar view helps better visualize the whole flow of your communication ⏺ The feature is available in the least expensive Email Marketing plan, which starts at $15/mo (billed annually) | ⏺ Automation workflows are not tied to lists. Thanks to that, you can freely add or move contacts between your workflows, no matter what list they’re on. ⏺ Automation workflows are extremely customizable. You can A/B test different sequences of messages and automatically tag and score contacts who perform specific actions. ⏺ You can use automation to send targeted communication via other channels besides email, like SMS and web push. |
| Cons | ⏺ Autoresponders only work with a specific list. If you’d like to send the same autoresponder cycle to multiple lists, you’d have to duplicate all your messages or merge your lists. ⏺ You can’t automatically tag contacts who engaged with your autoresponder messages ⏺ You can’t A/B test your autoresponder messages | ⏺ Setting up automation workflows can be slightly more complicated, especially if you’re new. ⏺ The full feature is available in the more expensive plans, which start from $49/mo (billed annually) |
To bring you this article, I’ve worked together with Jan Marcinkowski, our Customer Success Team’s Manager. Below you’ll find his tips and advice, as well as the story of how he migrated our employee onboarding course from Autoresponders to Automation.
Autoresponders
Using Autoresponders, you can efficiently set up email drip campaigns, follow-ups, and simple lead nurturing sequences.
This feature is available in all paid plans, starting from the Email Marketing plan.
💡 Learn how Sharvette Mitchell, the CEO of Mitchell Productions, uses Autoresponders to automate marketing communication and grow her marketing agency.
How it works
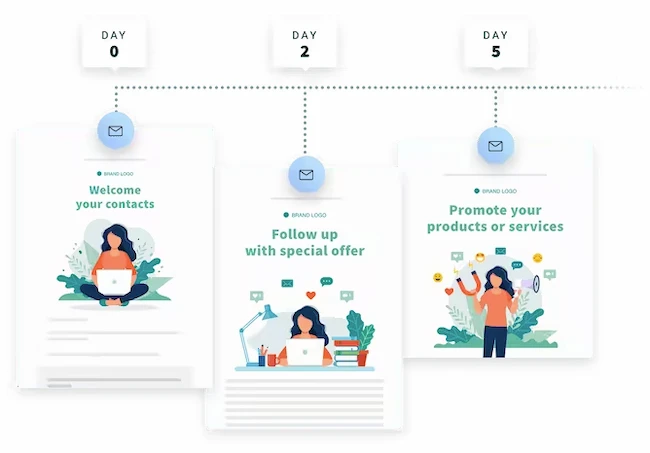
Let’s say you’re a consultant and want to create an email course on how to grow an email list in under three months. You’ve decided that the course will consist of one welcome email and 12 individual emails, each containing one lesson.
You can set up your email course using autoresponders so that your lessons will be sent one after another in specific time intervals.
For example:
- Your welcome email will be sent right after someone joins your course
- The first lesson will be sent 24 hours after the welcome email
- After that, the next lessons will be sent every seven days
Thanks to this setup, whenever someone joins your email course, they’ll receive the same sequence of emails. And it won’t matter if they join you this week or the next month. They’ll receive the same messages according to the schedule you’ve created.
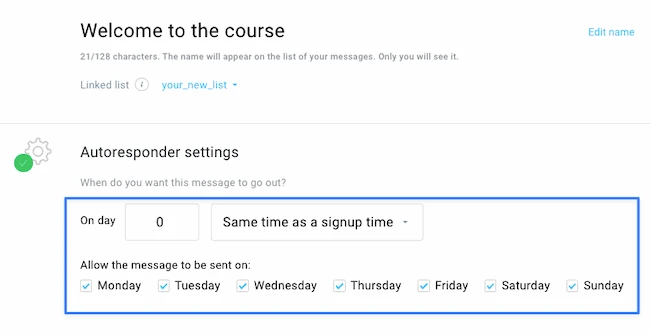
Below, you can see what this schedule would look like for the first 30 days. Note that if we want to send the welcome email immediately, we must set it for day 0.
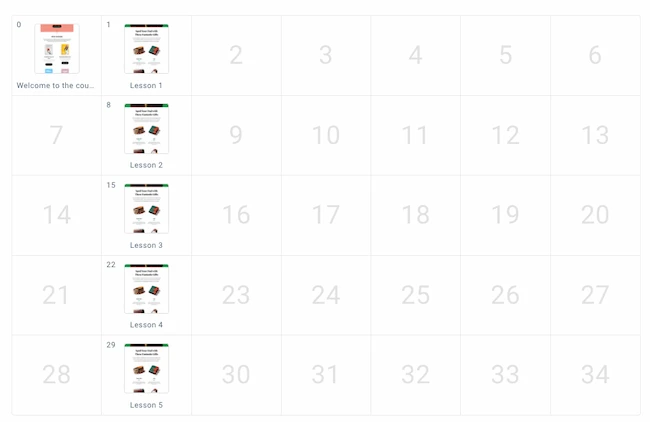
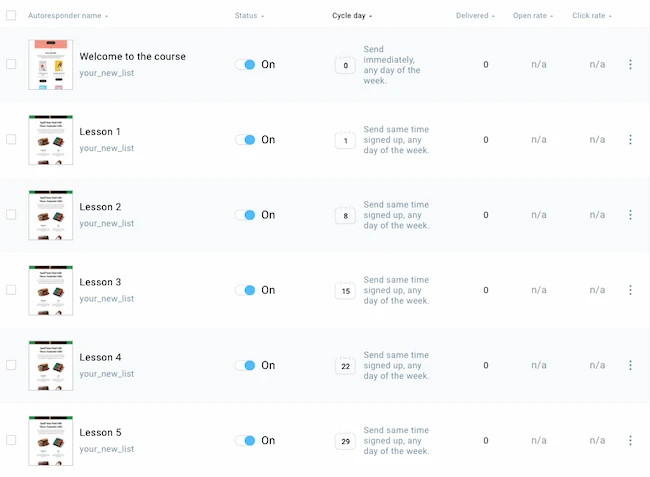
Important: If you want your contacts to enter your autoresponder sequence, you need to ensure you have assigned them an autoresponder day. Ideally, you’d do this upon adding them to your list.
If you’re using external integrations, ensure they’re set up correctly and the autoresponder day gets assigned. If that’s not possible, check out our help center to learn how to manually add a contact to the autoresponder cycle and troubleshoot if your autoresponder messages aren’t being sent.
Pro tip: When setting up your autoresponder messages, you can further adjust the timing of your emails. For example, you can decide that your messages won’t be sent on weekends or that they’ll be sent at a specific time of the day.
Pro tip: You can now create autoresponders faster, thanks to generative AI. Check out the following video to see the full process, step-by-step.
Pros and cons:
| Pros | Cons |
|---|---|
| ⏺ Setting up autoresponder sequences is extremely easy and efficient ⏺ The calendar view helps better visualize the whole flow of your communication ⏺ The feature is available in the least expensive Email Marketing plan, which starts at $15/mo (billed annually) | ⏺ Autoresponders only work with a specific list. If you’d like to send the same autoresponder cycle to multiple lists, you’d have to duplicate all your messages or merge your lists. ⏺ You can’t automatically tag contacts who engaged with your autoresponder messages ⏺ You can’t A/B test your autoresponder messages |
When it’s best to use Autoresponders
Autoresponders are perfect if you want to set up simple, linear email sequences, like:
- Welcome emails
- Email courses
- Email drip campaigns
- Lead nurturing sequences
- Sequenced promo campaigns
If you’re a consultant, coach, affiliate marketer, or general marketer and only need to send your messages at specific intervals, autoresponders will be the perfect choice.
For more advanced scenarios that involve tagging, filtering, or re-engaging your contacts automatically, you’re better off using Marketing Automation.
Additional resources:
Help Center: Autoresponder
What is an autoresponder
How do I create an autoresponder
How do I add another message to an existing autoresponder
Marketing automation
With Marketing Automation, you can do everything you can do with Autoresponders – and more! Whether you want to send lead nurturing sequences, re-engagement campaigns, or ecommerce-specific post-purchase follow-ups, you can accomplish that using automation.
This feature is available in the Marketing Automation, Ecommerce Marketing, and MAX plans.
💡 Learn how Ken Furukawa, an online coach and affiliate marketer, increased his revenue by more than 100% by using automation flows as his main messaging and contact management tool.
How it works
Unlike in Autoresponders, in Marketing Automation, you don’t just put your messages into a sequence and set the time intervals between them.
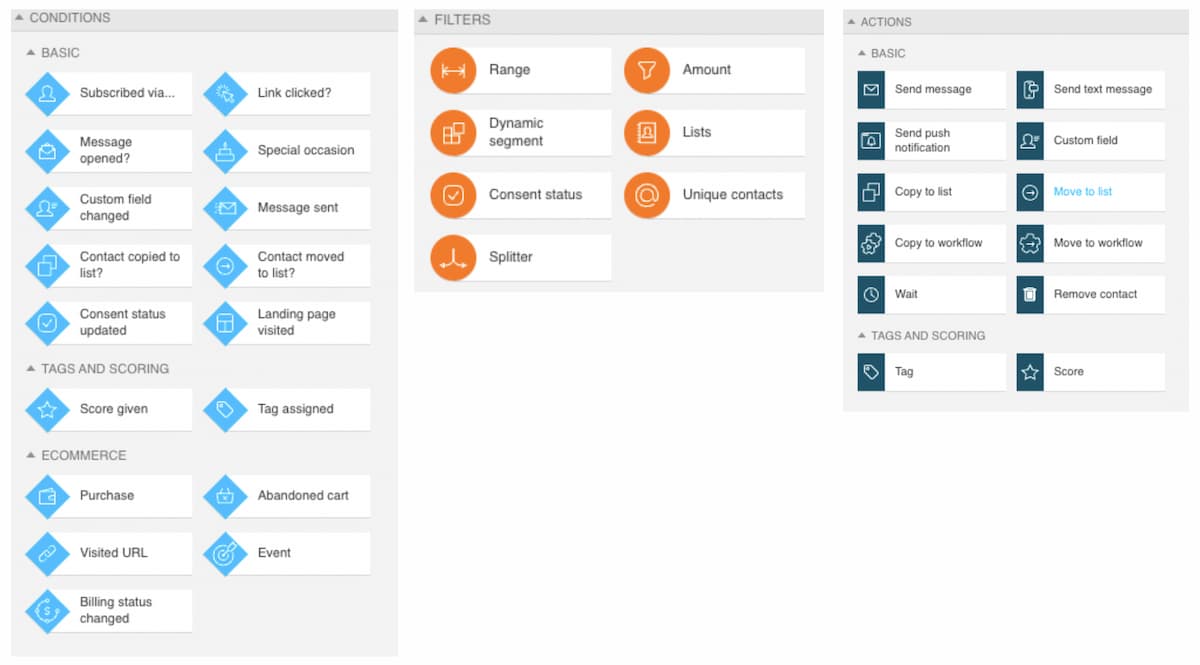
You build so-called automation workflows where using three kinds of blocks (conditions, actions, filters), you can:
- Conditions: Specify what will start the workflow, e.g., it could be the fact that someone joined your list, abandoned a shopping cart, or received a tag
- Actions: Specify what action should then take place, e.g., you could tag, score, send them a message, or even move them to a new workflow
- Filters: Specify what additional filters to apply. e.g., select a specific customer segment and only communicate to them
Here’s how it works:
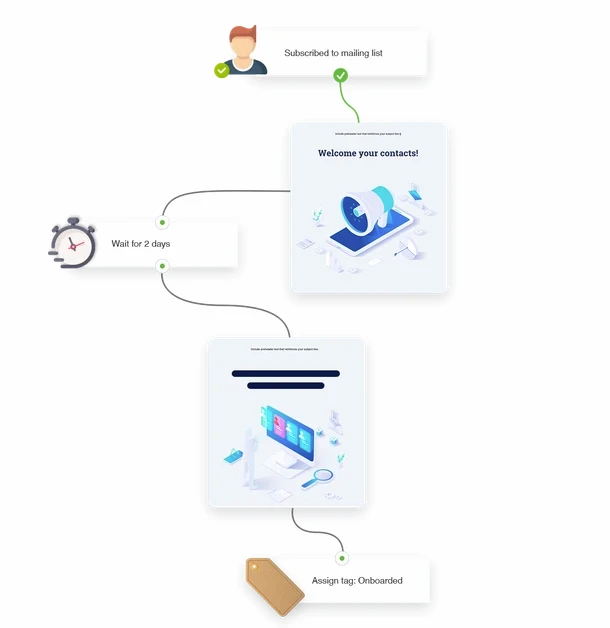
Let’s say you’re a business coach offering first-time managers a leadership program. The program consists of several emails, each leading to a different video lesson that talks about a specific topic.
Learn more about marketing automation from our podcast – Operation:Automation!
Using Marketing Automation, you can create a workflow that’ll:
- Send every email at specific time intervals
- Tag each contact who clicked on one of your lessons (e.g., topic_1, topic_2)
- Score each contact based on their engagement with your emails (e.g., 5 points for every clicked link)
- And much more!
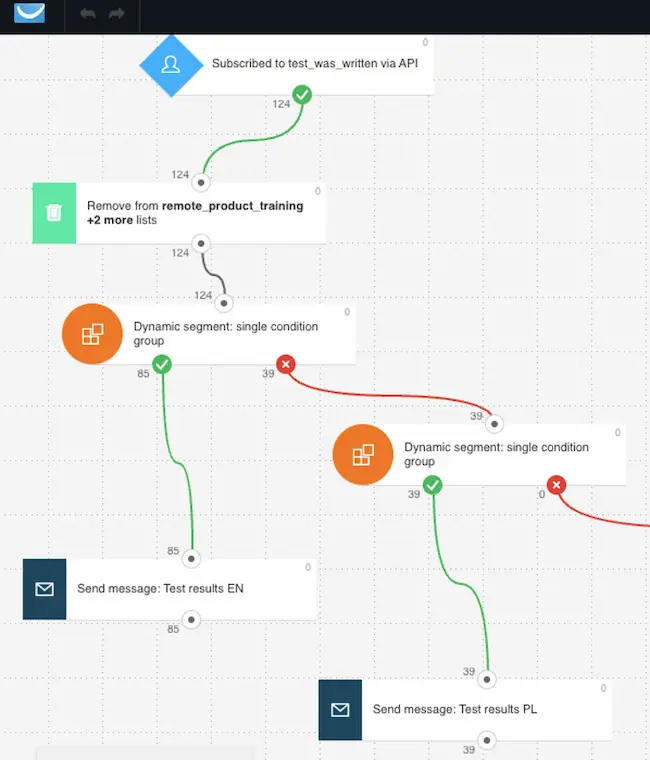
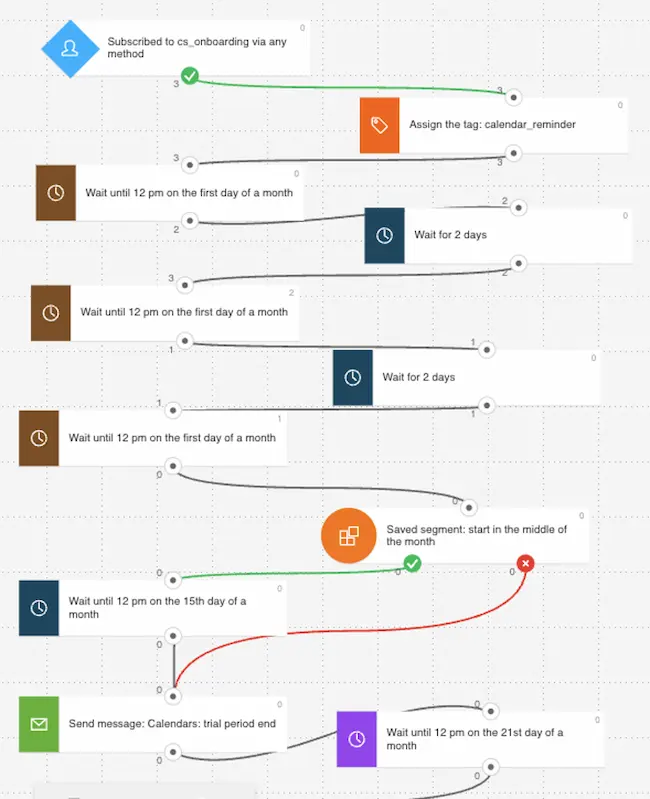
Here’s what this automation workflow would look like for the first two lessons:

What’s very useful is that you can connect different workflows together. So, for example, in the scenario above, we’ve been adding scoring points based on the recipient’s engagement. If someone reached a specific score, say 50 points, that could trigger another workflow targeting only these specific people.
Here’s what this second workflow would look like:

As you can see, thanks to Marketing Automation, you can target your audience with laser precision and make every message count.
Pro tip: There are many ways you can use Automation to automate your communication. If you’re just starting, I recommend you check out our prebuilt workflow templates and read our documentation.
Pros and cons
| Pros | Cons |
|---|---|
| ⏺ Automation workflows are not tied to lists. Thanks to that, you can freely add or move contacts between your workflows, no matter what list they’re on. ⏺ Automation workflows are extremely customizable. You can A/B test different sequences of messages and automatically tag and score contacts who perform specific actions. ⏺ You can use automation to send targeted communication via other channels besides email, like SMS and web push. ⏺ With Web Automation, you can trigger workflows based on how visitors interact with your website — even before they subscribe. | ⏺ Setting up automation workflows can be more complicated, especially if you’re new. ⏺ The feature is available in the more expensive plans, which start from $49/mo (billed annually) |
Pro tip: If you’d like to try Marketing Automation without making any commitments, you can do so in the first 14 days of creating your account. And if you’re already a paying user, currently on the Email Marketing plan, you can try out the prebuilt email templates or sign up for the 14-day higher plan trial.
When it’s best to use Marketing Automation
Marketing Automation is perfect if you want to build more advanced communication scenarios, like:
- Advanced lead nurturing sequences with tags and scoring
- Re-engagement campaigns to dormant subscribers
- Abandoned cart reminders for ecommerce
- Post-purchase follow-ups to your customers
You’ll want to use Marketing Automation if you’re a coach, consultant, agency owner, general marketer, or ecommerce marketer and want to communicate with your audience with sniper-like precision.
💡 Find out how Sabaton’s digital marketing team turns email subscribers across the globe into a legion of loyal fans.
💡 Discover how LandCafe.pl, an online store selling coffee beans and brewing accessories, achieves a 54% sales rate through their automated welcome series.
Additional resources:
What is Marketing Automation and how does it work
How to get started with Marketing Automation
Help Center: Marketing Automation
How to create an automation message
Course: Mastering Marketing Automation
Autoresponders vs. Automation: which one you should use
Autoresponders and automation can work together very well and can serve different purposes. It all depends on your needs and the possibilities of both features. It’s not like one feature is clearly better than the other. It all boils down to HOW you plan to communicate with your audience.
How to decide what you should use? To aid your decision, start by outlining frequency, circumstances, and recipients. How often do you want to send messages? In what cases do you want to send it? Who should receive your emails? Once you’ve got that, you can contact my wonderful Customer Success Team on LiveChat, and we’ll help you choose the right tool!
But as much as we’d love to talk to you, the point of this article isn’t just to send you to the chat. Let me share my advice with you here and now in super simple terms:
If you’re looking for simplicity in your communication, go with Autoresponders. They’ll be great for classic communication flow where you, for example, send one message a day or a week to one mailing list.
If you want an advanced communication plan based on different variables, choose Automation. You’ll save time on things you would normally need to do manually and have the flexibility that autoresponders simply don’t offer, such as reaching out to people on multiple lists.
For some scenarios, autoresponders are more than enough, but other, more specific plans might even require you to use automation if you want to make them happen smoothly.
Dogfooding: How we migrated our employee onboarding course from autoresponders to automation
At first, we were using Autoresponders in my team to distribute training content to new teammates. Every day, you would get a different email with a different lesson to ensure you have all the same information. That was fine for some time, but we needed a bit more as our team, training program, and training needs grew. And that’s when Automation came in.
I wrote a blog post on creating an onboarding course in Automation that won us an international award. Check it out here if you’re curious – How to Set up a New Employee Onboarding Process Using GetResponse.
Why did we move our Autoresponders to Automation? We wanted to use the possibilities of Automation to provide a more diverse and polished training experience to our new teammates. In that story, they were our customers, and we wanted to make sure they got the best experience possible while automating our part of the job.
What do you say we move to a more practical part? I’ll show you some basics on how to build workflows and how to migrate your autoresponders to Automation, and I’ll share some of the lessons I learned the hard way so that you don’t have to.
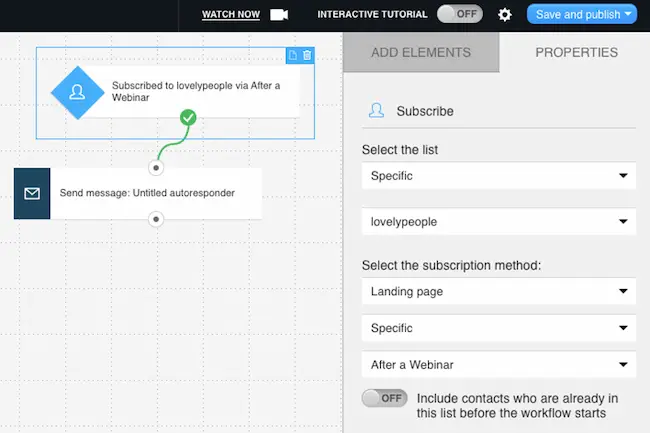
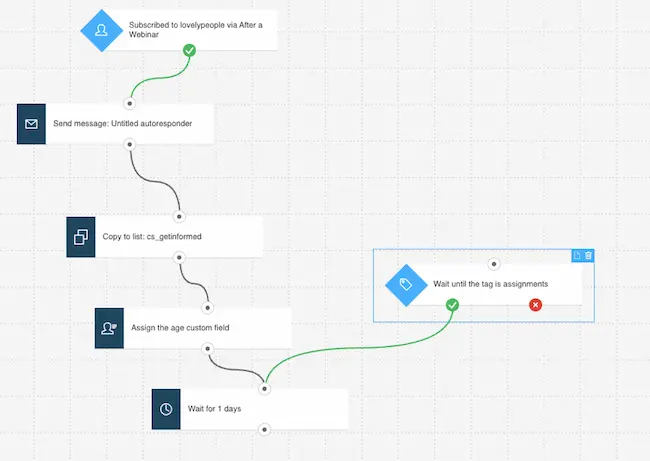
Let’s start with the basics of automation workflow building. You always start with conditions. They’re like a door to your house. And your house can have many different doors! That’s why it’s the first question we ask you when you open a workflow – based on what action would you like to start your automation process? In our house metaphor, what should people do so that you let them into your house? So, lesson #1: you always start with condition elements, not filters or actions.
A classic workflow example useful to anyone is a welcome message sent to someone subscribing to your list. In our metaphor, a friend comes over to your house – that’s the subscription process. But which list, which house is it? I can decide that in the Properties tab.
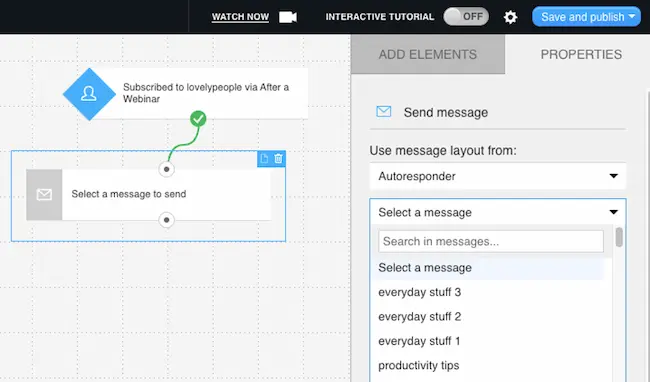
What’s the first thing you do when you have a guest over? Why, you welcome them, of course. In GetResponse terms, that would be like sending them a message, so adding a send message action in your workflow.
Now, you could do that with an autoresponder and, let’s say, a signup form. That requires some manual work, but with Automation, you can do everything in one place – that’s what I definitely prefer.
I mentioned migration from autoresponder – how we did it is super simple. Even if you created some autoresponder messages but prefer to have everything in Automation as we do, select properties of send message action. You can select your existing autoresponder from a dropdown or create a message from scratch. You can do it based on your existing messages or templates you already have.
Lesson #2 – use your previous designs and stay consistent. Remember that less content is sometimes more – keep your email short and use buttons to invite people to your website where you can explain more!
Now, lesson #3, and that one’s super important – to avoid sending the same message twice – both via Autoresponders and Automation, make sure to disable that autoresponder once you no longer need it. Using the autoresponder for your automation doesn’t remove the autoresponder – it’s just using its content to create a new message. The old one stays, though.
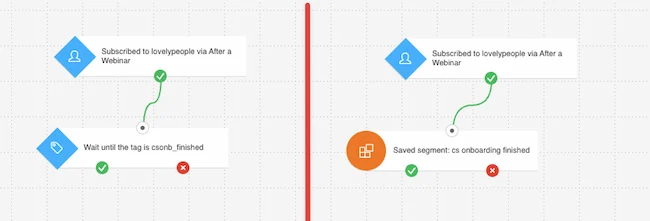
It’s a perfect moment to mention one of the biggest advantages of using Automation compared to autoresponders. In your communication flow, you might want to send different content to people based on some external conditions, like the age of your recipients, selected interest, or even the email domain they’re using! You can collect such data when people sign up on your list in the form of custom fields, and it’s pretty easy to make use of it in your workflow. Let’s give a warm welcome to dynamic segments! First, create your segment and give it a meaningful name you’ll understand. Then, add a dynamic segment to your workflow, and voila! The workflow will have a modified logic. People who join the workflow and meet its criteria will move through a different path than people who don’t meet the segment’s criteria.
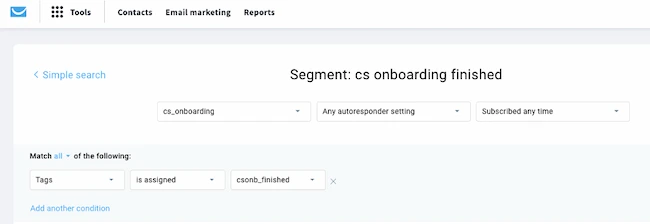
In our case, we used such a segment to ensure that only people with a certain email address ending can use our training program. It’s a nice way to ensure your content is reserved only for people within your company. That was lesson #4 – use your knowledge about your contacts thanks to dynamic segments. And if you don’t have such data, have a moment to think about what you would like to know about your contacts and include such fields in your subscription process or post-subscription forms.
One of the mistakes I often see when troubleshooting customer workflows is misusing conditions for tagging or custom fields change. Let’s have lesson #5, shall we, and that one is about how to use the right Automation element. For example, somewhere in the middle of your workflow, you’d like to check if your contacts have a particular tag assigned. It’s a common mistake to use the “tagging” condition in such a situation. Why? There can be many reasons, but in my opinion, the most common is that we think that in terms of tags and custom fields, we think of such conditions as “If I have a tag/custom field”, while in reality, these conditions work like “if I get a tag/custom field” or to be more precise “WHEN I get a tag/custom field.”
So, instead of using such conditions, use a dynamic segment instead if you want to check if your contacts already have a tag or custom field. Unless you want to actually have them wait until they finally get a given tag or custom field – in that case, use a condition.
Speaking of tags, we really like using them in my team. Especially when you’re designing a training program, you might want to know what stage of the training process your contacts are going through. Assign and remove tags for that purpose. Remember that when a person gets a tag, you can start a completely independent workflow with a completely different communication process. Use that to your advantage and personalize the experience for your contacts!
What worked for us in that scenario? First, we send a message to a new contact. To mark the stage they’re in, we assign them a tag. Each of our training messages has one special button. That button should be clicked when someone is ready for the next lesson from our course. Once clicked, we remove the tag for that stage, send another message, and assign a new tag – to represent the passage to the next stage in the learning course.
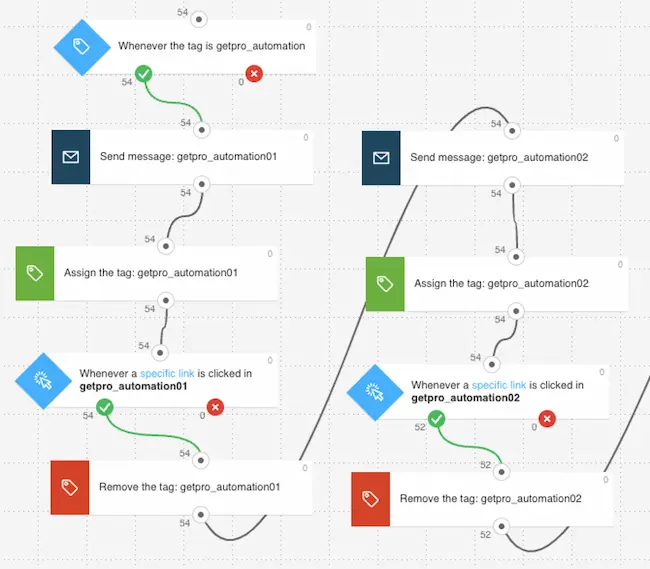
Here’s lesson #6 – you can reproduce such a scenario if you use a Link clicked condition and set it to wait indefinitely for someone to click a button. You can do that in condition’s properties. It’s a great way to increase your contact’s engagement in messages. Remember always to check all possible properties of your automation elements to get the most out of them. And if you need further help, we always place links to our Help Center to help you understand how they work.
So that’s the onboarding in my team if you put the whole thing on repeat. We end it with a tagging action that initiates a different workflow with a different training program. But it’s not the only type of workflow we use. We set up a newsletter program that starts independently from different trainings, and it informs our employees about different procedures in the workplace. You can think of it as, I don’t know, short, useful email tips on how to use your product. Or incentives to use your service. Here’s lesson #7 – use wait actions to time your communication just right. For example, we use wait actions to wait with our communication either to a specific day in a month, or it can be the last day of the month or the first day of the next month. We couldn’t achieve it with Autoresponders, but we can with Automation.
What’s nice to mention here is the fact that you can adjust the days of the week during which the waiting time will be applied. In our case, to separate the sending process of our messages, we used Wait actions that work only between Monday and Friday, and thanks to that, our communication isn’t sent during the weekends. What’s even better? In Automation, when sending messages, you can send them only during specific hours. It’s a nice combination of using the Wait actions I described.
We can go on and on, but at some point, your contacts will reach the end of your planned workflow. What happens then? Well, they end their journey. Even if you add new elements to the end of the workflow, they won’t work for contacts who already finished their journey. But I want to share with you lesson #8 – with Wait action, you can “freeze” contacts in your workflow. Add Wait action at the end of your workflow and set the action to, say, 999 days. Contacts who reach that element will wait for that number of days. If, in the meantime, you decide to expand your workflow, add some more elements to the end, save the workflow, enter it again, and decrease that waiting time from 999 days to, say 1 hour. If someone has already waited an hour, they’ll simply move to the next available workflow element.

If you discovered that your contacts might have prematurely finished your workflow or didn’t know about that trick I just talked about, don’t worry. There’s a way. Time for lesson #9 – how to get contacts back into your workflow. Create a new tag for that purpose. Open your workflow and add a tagging condition. Link its green path to the part of the workflow you want people to rejoin. Make sure to check if the linked elements have the “run multiple times” toggle enabled. Save your workflow and tag the contacts you want to reintroduce to your workflow, and voila.
We’re running out of time, so I’ll leave you with a final lesson #10 – test your workflow before going live with your customers. It’s always useful to get the perspective of your potential readers if you go through the same experience. You might make mistakes – and it’s okay! Make them in a safe environment of your own test email addresses, or invite friends or colleagues to test your process. How? You just need to make sure you are on your contact list and that you meet one of the initial conditions of your workflow. I’m sure you’ll find out during such tests that you can improve your workflows and ensure all links are working and the workflow works as per your plans.
And you know what’s great? Even if it doesn’t work and you need help figuring out why, let us know on chat. We’ll do our best to help you on the spot, and if need be, we’ll brainstorm within the team and provide a solution then.
Automate email marketing your way!
By now, you should be all familiar with both Autoresponders and Marketing Automation, and know when it’s best to use each tool.
If you’d like to learn more about them, I recommend that you create a GetResponse account and try them out yourself.
Even if you choose to stay on the free plan, you’ll have 14 days to make the most out of all our premium features.
If you ever have any questions or would like to explore other ways to use GetResponse tools, feel free to reach out to our award-winning Customer Success Team, or visit our Help Center, Resources, and Webinars Library.
Happy automating!
