Converting contacts to customers
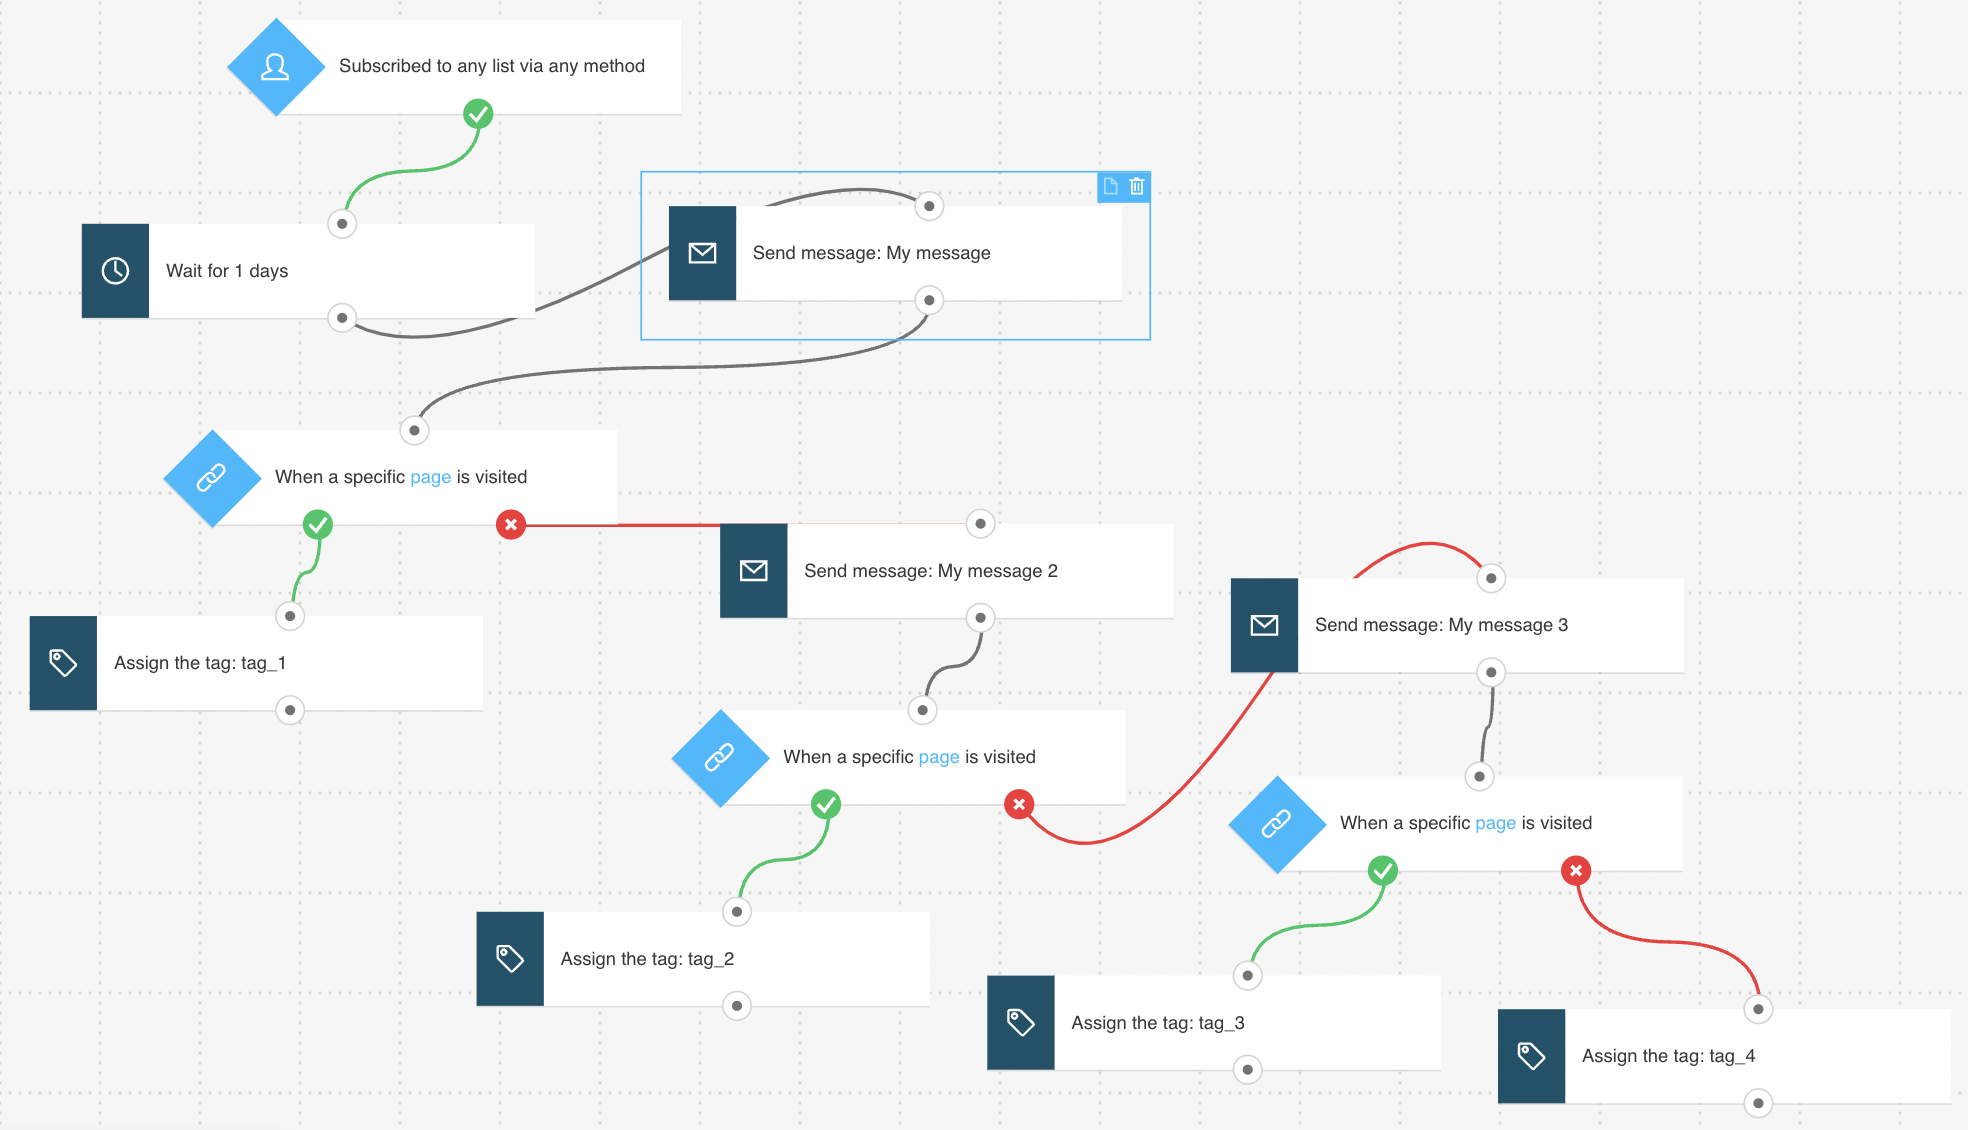
A good way to convert new contacts into paying customers is to send them a series of targeted messages. What (and how many) messages they receive is based on tracking whether or not the contacts visit your website. The Converting contacts to customers template is designed to:
- send a welcome email that includes a message about an offer they might be interested in
- check if your contact visits the website within 3 days and sends a follow-up message if they don’t
- tag contacts as converted to customers based on the website they visited (for tracking and segmenting purposes).
Template overview
Category: Sales promotions
Elements in template: 12
Minimum number of elements to configure: 10
Here’s what you’ll need to configure the elements and publish the template as a workflow:
- 3 automation messages or messages that can be used as automation messages,
- Tags (optional). You can create tags when building a workflow but it’s useful to have a tagging system to track contacts based on their visits to specific parts of your website. This will set them apart from your other contacts.
Configuring the template
If an element is greyed out, it means that you need to set its properties. Clicking on an element opens its Properties. The Wait element has been preset to the recommended delay.
- The Subscribed via condition is preset to any list and any method. You can modify the settings to better suit your needs. Under the Properties tab for the element, use the drop-downs to narrow it down by list and method. A day later, your contacts will start receiving messages inviting them to visit your website to view specific products and offers, or complete a purchase.
- For the first Send message action, use the drop-downs to select the first product offer you want to use.
- Configure the URL visited element to track if your contacts visited your product site. To do this, click the element. This will display the Get Web Connect button. Click the Get Web Connect button, copy the snippet to the clipboard and after that click on ‘Back’ on the top left. (At this point it’s best to save it to a temporary document in case you copy something else to the clipboard). Under Properties, enter the URL of the product site you want to track. Use a wildcard if you want to track all visits anywhere on your site. To learn more about configuring the element and using wildcards, go to How do I set properties for the URL visited condition?
Note: Once you’re done configuring the template, you’ll need to copy the snippet to your website’s management system or insert it directly into the HTML source code. For detailed instructions on installing the tracking code, please go to How do I add the tracking JavaScript code to my website?
- Configure the Tag action to assign a tag to the customers who visited the site, e.g. “viewed_product_A”.
- Repeat Steps 2-4 to configure the remaining elements.
- In the Tag action linked to the “if no” (red) connector of the final URL visited element, select a tag identifying these customers as not interested in any of your offers.
- Click Publish when you’re done setting up the template or Save and exit if you want to finish editing the template later (it will appear as a draft on the Manage workflows page).
Going beyond
If you don’t have a website, you can use the Link clicked condition instead of URL visited. You can also make the workflow shorter by reducing the number of messages sent.
Related workflows
You can use the tags at the end and beginning of workflows to trigger a series of workflows for your contacts. Once they are tagged, they’ll be added to another workflow that begins with a condition based on that tag. Here are the possible workflows you can use it with:
- Customer retargeting or Win back (for customers not interested in any of your offers)
- Online course promotion
- Webinar promotion
- Upselling
Related links
- What subscription settings can I include in a workflow?
- How does a marketing automation message work?
- How do I set properties for the URL visited condition?
- How do I add the tracking JavaScript code to my website?
- How can I use the Tag action in a workflow?
- How do I make use of tags?
- How does the Link clicked condition work?


