Marketing Automation is a powerful and customizable tool.
Once you have email addresses flowing into your GetResponse contact list, automation is what allows you to easily take care of them all.
The end goal is to increase your store’s revenue by building lasting relationships with clients. From the most precious returning customers to not-so-engaged visitors, creating personalized paths for each of them allows you to send more relevant messages that convert.
To help you start using automation right away, here are a few clever solutions for ecommerce. You’ll find downloadable templates for each scenario at the end of this document. Give them a go in your GetResponse account by simply importing them – no need to build the workflow from scratch!
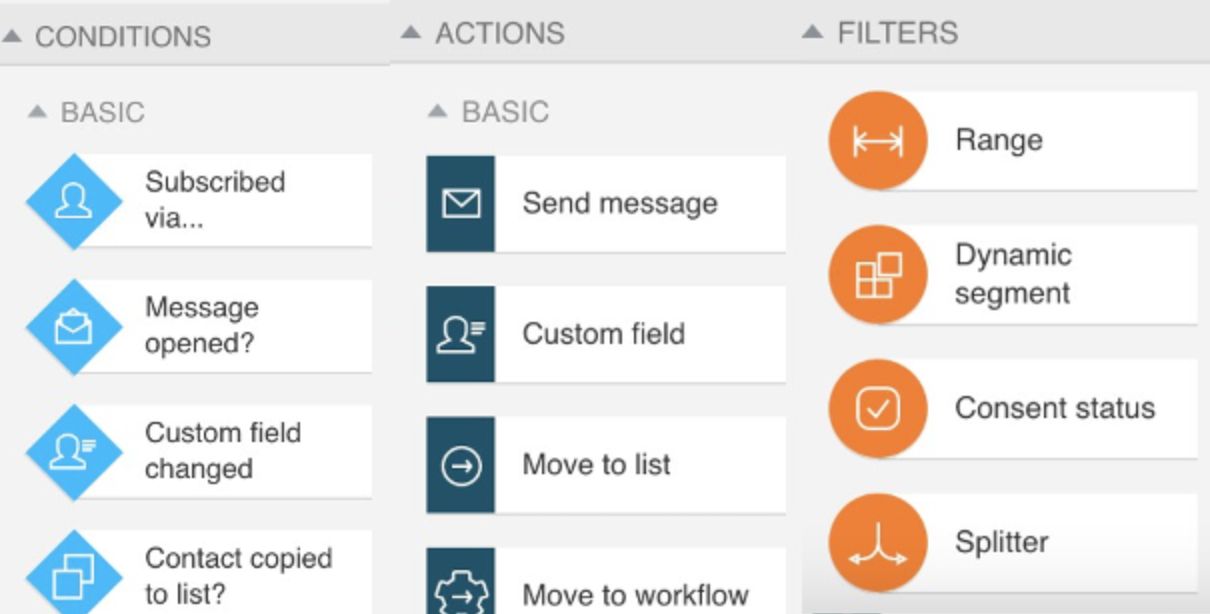
In this guide, each step shows the type (Condition/Action/Filter) and the name of every block. The colors of the words correspond with the colors in the automation editor:
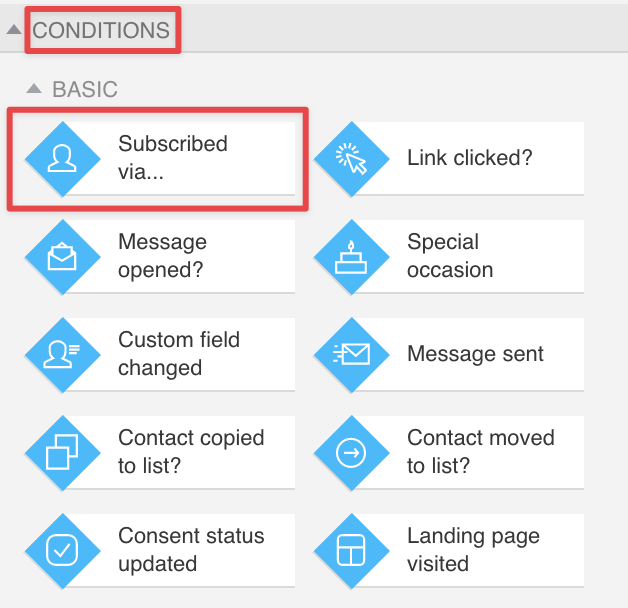
For example, Condition: Subscribed via… represents this element:
Scenario No. 1: Post-purchase lead qualification (using the scoring system)
Every paid customer deserves special attention. You, as the shop owner, have already done the most difficult thing – you’ve convinced them to make their first purchase.
What’s the goal:
Ensure clients stay engaged with your shop. Learn if they are interested in additional content you send or if this is something that won’t work for them. Then divide them into separate lists so you can send meaningful content to both groups.
This workflow focuses on two things: establishing a connection with your customers and tracking their engagement along the way. This helps you personalize the content you send to increase revenue and boost deliverability.
Workflow overview:
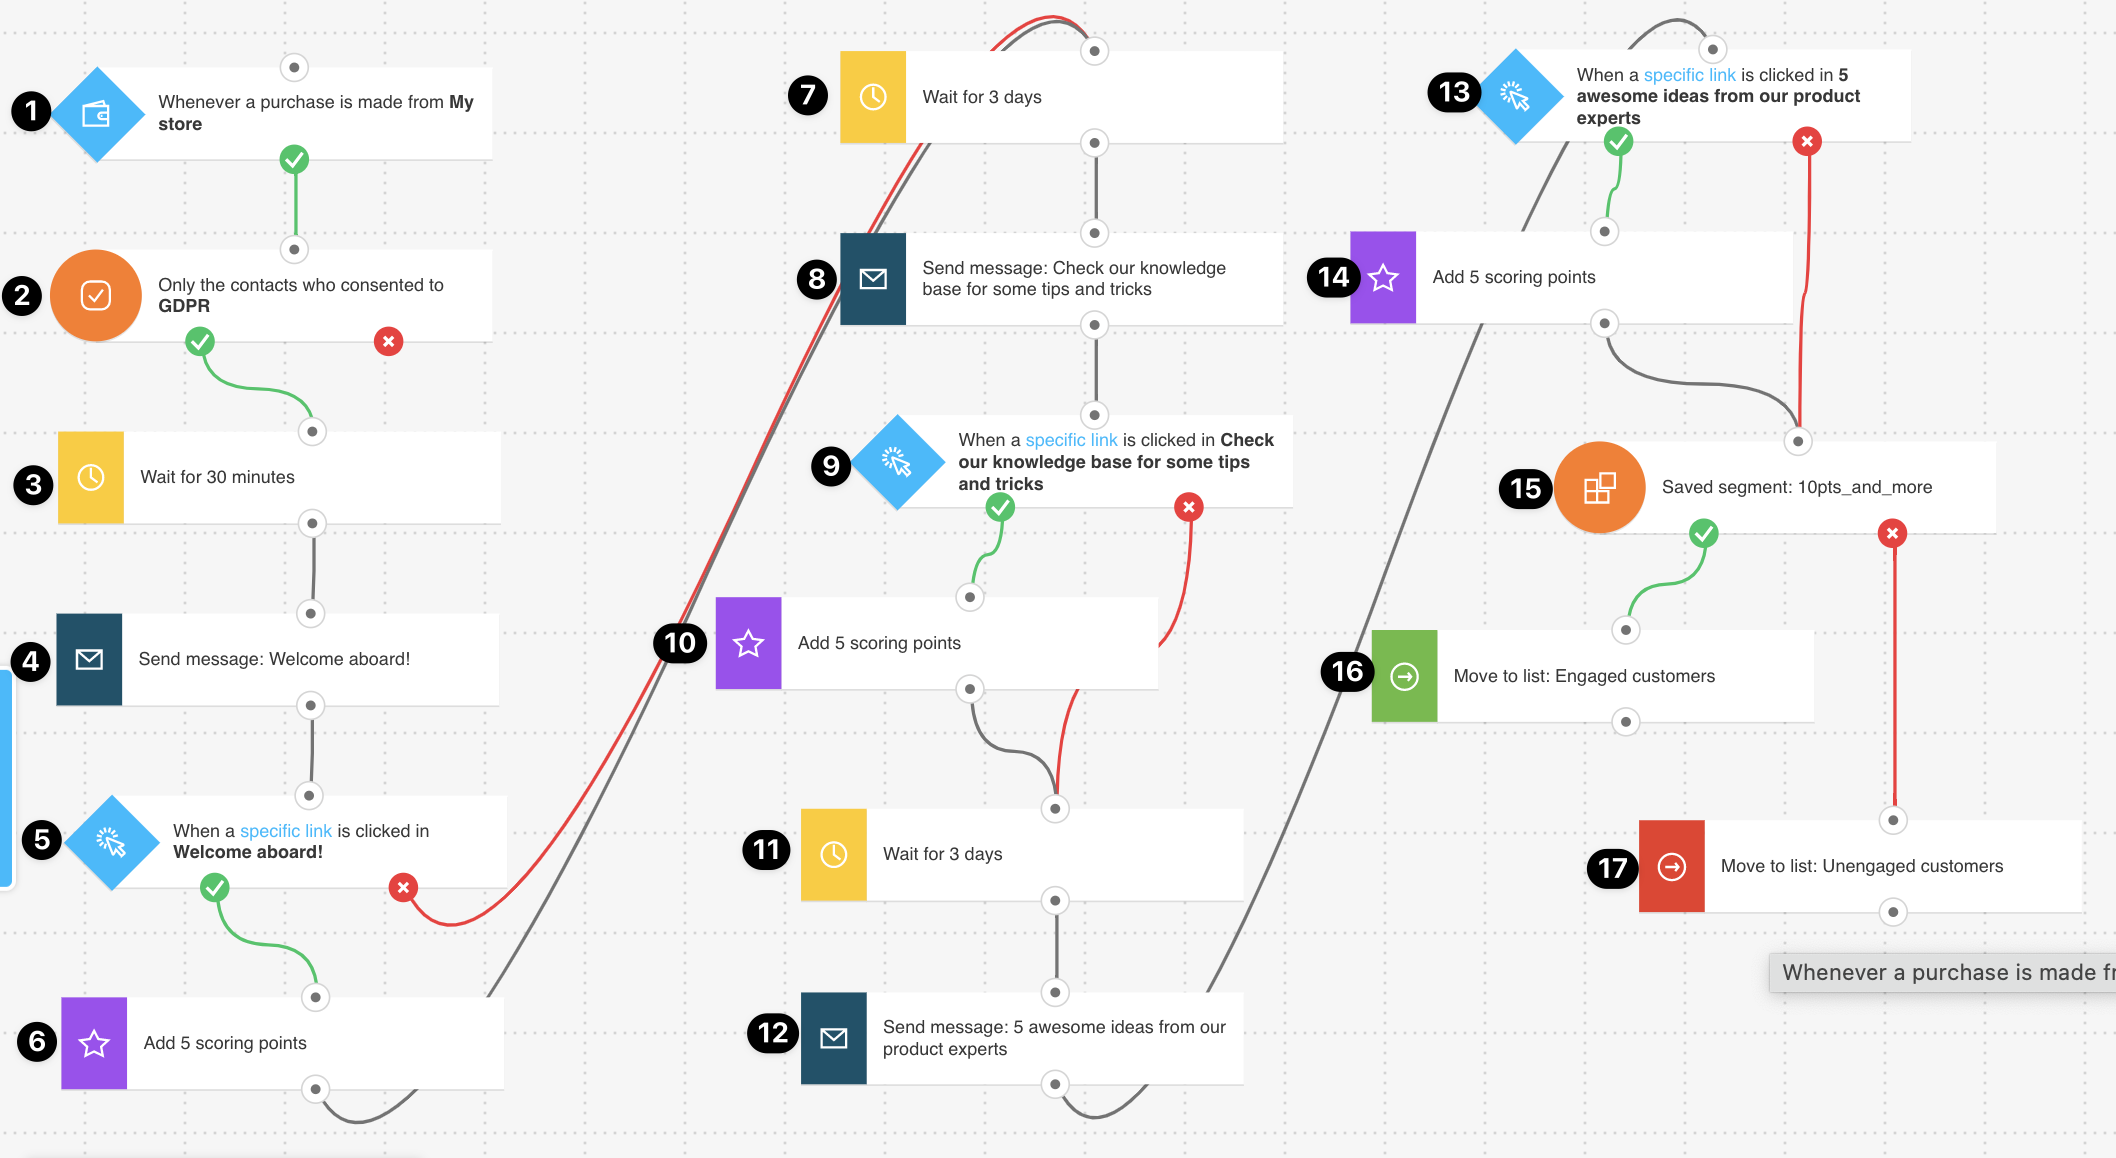
Step-by-step guide:
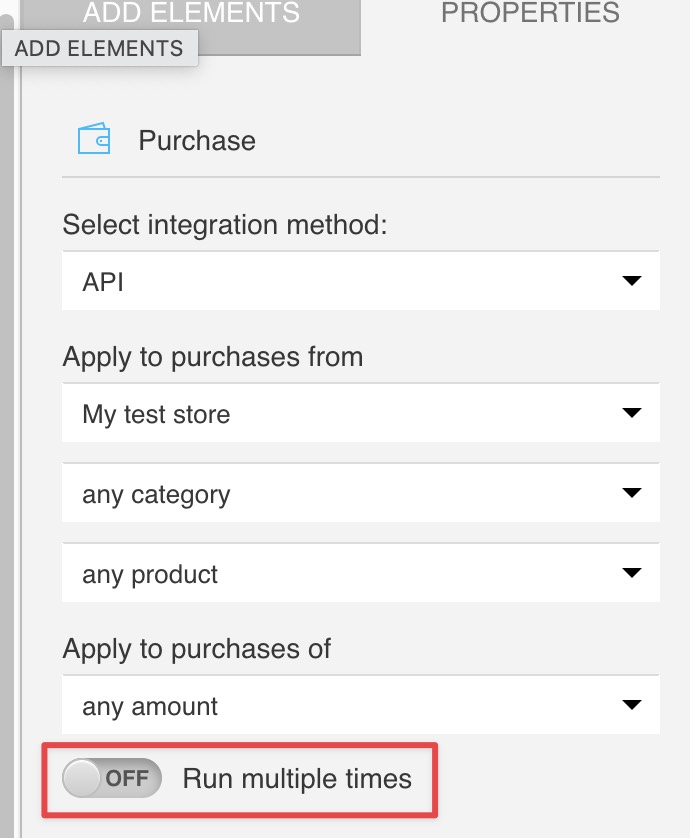
- Condition: Purchase
The workflow starts after purchase. It’s designed to run once for each customer, so be sure to have the “Run multiple times” option disabled in the block settings.
- Filter: Consent status
First, check if contacts agreed to receive marketing messages from you.
If you don’t need this step, you can delete it and connect Step 1 directly to Step 3. - Action: Wait
Set a 30-minute delay so that your message won’t be lost between order confirmation and accepted payment messages. Use a short wait to be sure your shop is still fresh in their minds.
You can, of course, adjust the time in this step. - Action: Send message
Now it’s time to act!
Send a message worthy of a royal welcome. Tell your customers how much you appreciate the fact they’ve chosen your shop.
Let them know you’ll be in touch with some meaningful content (and deliver on that promise!). Give them a little sneak peek of the value your messages can provide, like offering guides, ideas, or a community around your product.
Provide some links you want people to click: either to the resources page, social media profiles, or any page that you want them to open. You have their attention now, so take them further on a little journey.
Pro tip:
This is a very important message.
Think carefully about how you want to strategize the short moment of your customer’s full attention you have now. They’ve just shown trust toward your brand by making a purchase. Don’t brush them off with a “Hey, buy more products!” message.
The three messages you’ll send in this workflow are extremely important and may play a huge role in whether your one-time customers will become returning ones.
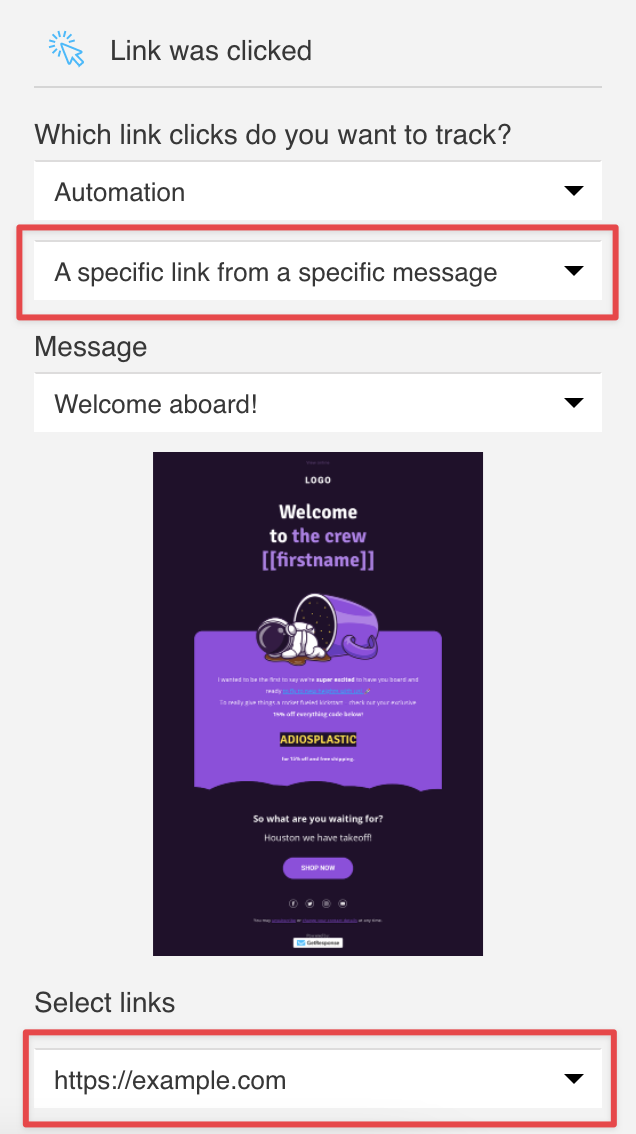
- Condition: Link clicked?
Check if your clients have clicked the link you’ve sent them. Use the “A specific link from a specific message” option and select the most important URL from the message sent in Step 4.
If you’ll track all links from that message, it will also track any footer, header, and social media links. You want to focus on the URL provided in the content, that shows the recipient’s engagement with your message.
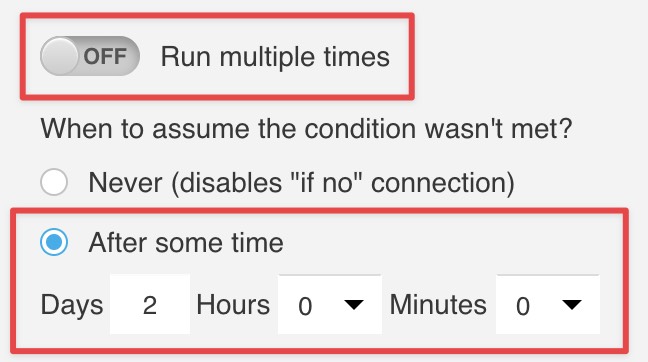
Below the message preview, you can also find the negative path settings. This allows you to decide how long you want to wait before the link is considered “not clicked” and proceed with the workflow accordingly.
In this example, they have two days, but you can of course use a different time.
Also, be sure to disable the “Run multiple times” option, so contacts will receive this message just once.
Pro tip:
Keep in mind that in general, it’s good to give your customers at least a day, in case they have a habit of checking their inbox only in the mornings or evenings.
- Action: Score
If a customer has clicked your link, mark that by assigning them five points. Those who won’t click are connected directly to the next step. - Action: Wait
Wait before sending the next message. The length of the wait is up to you, but don’t drag out the whole process for too long. You want to play this around the time of the purchase and delivery of the product that caught their attention in the first place.
The example workflow takes place within around a week (could be a bit more for some customers, because of the wait for clicks).
Pro tip:
It’s also a good idea to adjust the frequency of messages sent here, at the very beginning of your relationship with a paying customer, to the frequency you plan to contact them later on.
- to 10. Action: Send message > Condition: Link clicked? > Action: Score
Repeat the sequence sending the second message, again tracking the main link you want them to click.
Just like the first one, this email needs to be well designed and offer some value or interest to your customers. Encourage them to interact with your brand and show them that they’re valued and appreciated.
- to 14. Action: Wait > Action: Send message > Condition: Link clicked? > Action: Score
Repeat the same sequence for the third and final message of the workflow.
At this point, we know who is interested in the content you send and who’s not that engaged. Also, you have sent new customers three messages showing them why it’ll be awesome to stick around and get engaged with your brand.
- Filter: Dynamic segment
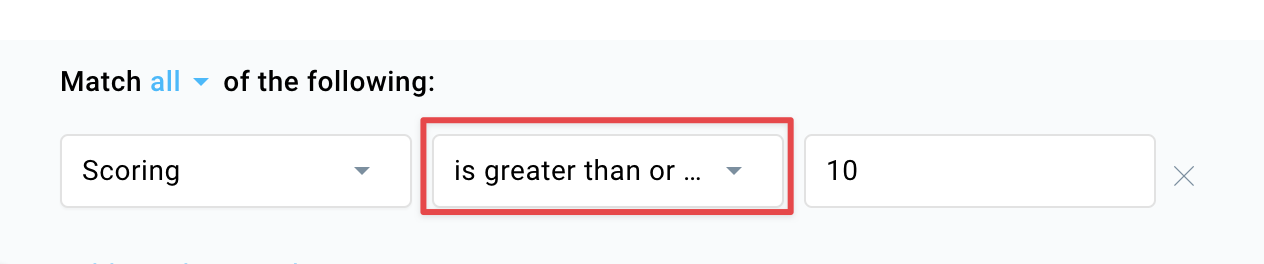
To divide contacts based on how many points they’ve scored in the workflow, create a segment and use it in the filter.
For this example, the threshold is at 10 points so that contacts who clicked links in at least two (or more) messages will be moved to a separate list. All those who clicked just one or none will be moved to their own list.
Be sure to use the “is greater than or equal to” option when creating a segment. This way you include both those who clicked two and those who clicked all three messages.
Click here to learn how to create a segment.
- Action: Move to list (engaged)
Those customers who are in the “10 points or more” segment, are connected to the “Move to list” condition where you select the list for post-purchase engaged customers.
This is your most valuable list: they are interested in your products and content and are opening the links you send. Customers on this list have great potential to become returning customers.
Make sure you nurture this list, keep them updated on news and promos from your store, but also be sure to offer them additional value, as you have done in this workflow.
You can show them appreciation by sending them early bird offers and release updates, especially if you have popular items that are often sold out.
Pro tip:
It may seem counterintuitive to offer this group any larger discounts, as they seem to be organically interested and not needing the additional encouragement.
While this is true, consider giving those contacts something extra every now and again.
You can build a separate workflow for a loyalty program (for some inspiration, check Scenario No. 3 in this file) or use the “Condition: Special occasion” block to build a little workflow to send them a birthday gift discount or a sign-up anniversary promo code.
You’ve already invested so much in obtaining them as first-time buyers by building a rapport with them. It’s reasonable to invest more in keeping them happy and loyal to your brand.
- Action: Move to list (unengaged)
Those who didn’t engage with your content, are moved to a separate list.
The first advantage of this solution is boosting your deliverability by only sending your frequent communication to engaged contacts and leaving those other ones out of the loop.
But they are not lost!
You have filtered them out to be able to take more decisive actions to try to activate them.
Consider sending them a promo code – after all, they have already purchased your product. You can send them a simple discount, or encourage them to spend more with the “buy X, get Y for free” promo.
You can also offer them free shipping with the next order. Keep in mind that the fact they’re not interested in your content doesn’t mean that they’re not interested in your products.
They are here because their journey started with a purchase. Setting up a separate workflow for a loyalty program (check Scenario No. 3) will work for them too if they come back and place more orders.
Pro tip:
Those contacts can be good recipients of only product updates and sales information.
Since they’re not expecting additional content, keep it short and sweet, and product-focused. They’ve purchased your product, so they are interested in that, but they haven’t reacted to additional content. Respecting it can work much better than showering them with more messages they might consider irrelevant.
But never forget they are valued paid customers too!
Scenario No. 2: Simple upsell/cross-sell message
In the GetResponse message editor, you can add a “Recommendation” block to your emails. Use it to send upsell and cross-sell messages after purchase automatically to increase your revenue.
What’s the goal:
Catching the eye of a customer who just bought your product is much easier than acquiring a totally new client. Capitalize on their engagement and show them other products they can be interested in to increase your revenue.
This scenario is very easy to set up and great for generating additional sales.
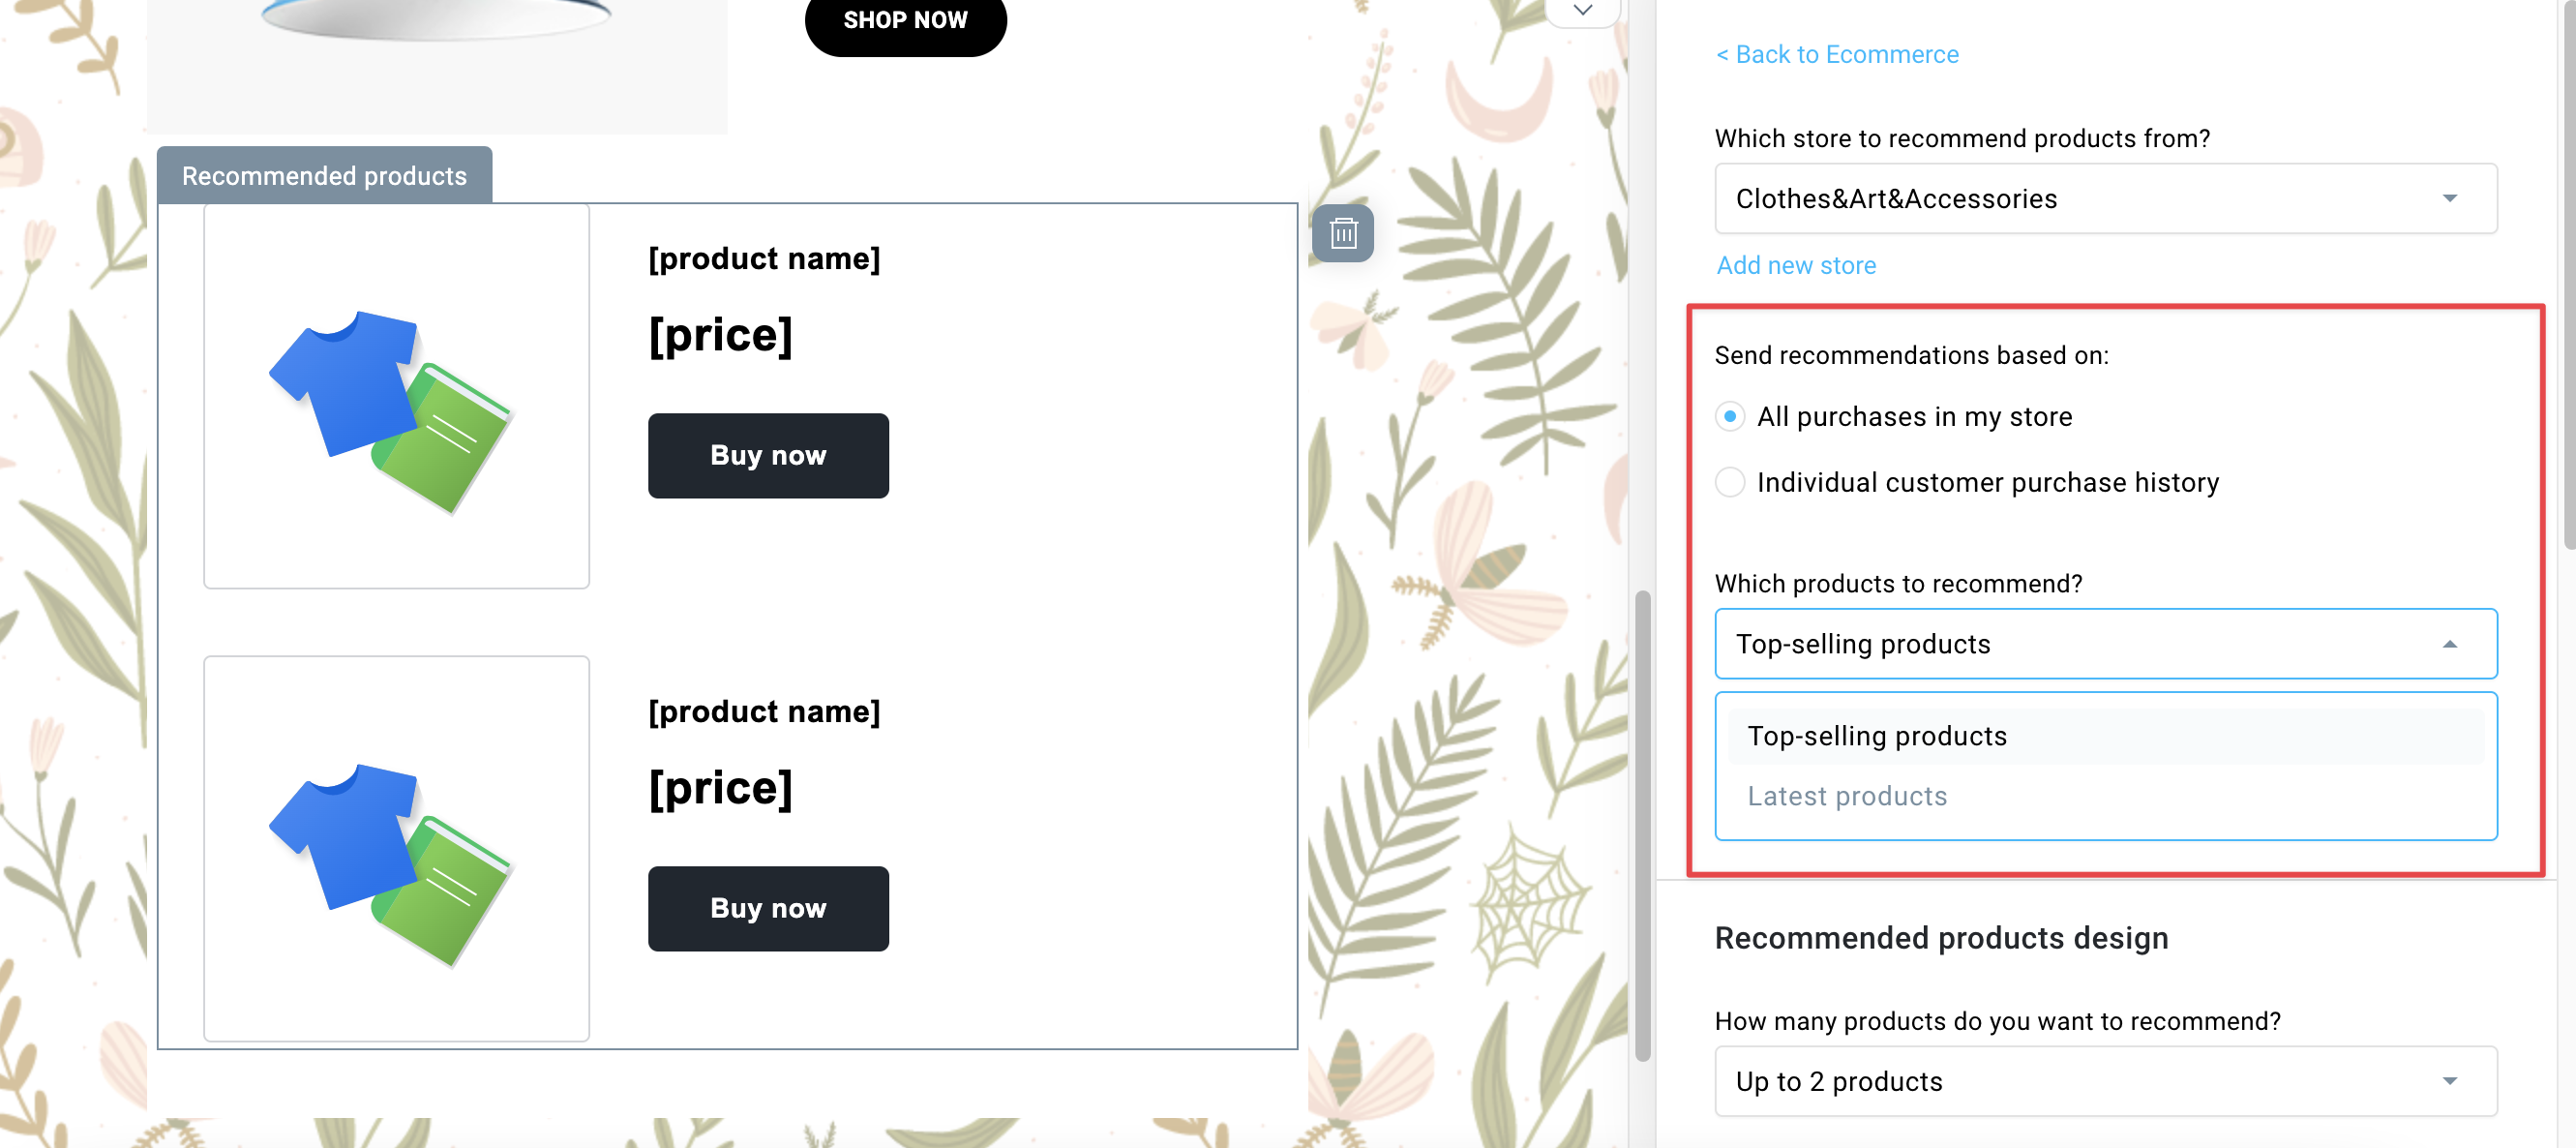
Recommendation message:
Below you can find an example of a message with a dynamic recommendation block. The products are populated from your store that’s integrated with GetResponse. You need to create such a message first, save it as a draft, and then you can use it in the workflow.
Click here to learn more about using GetResponse recommendations in your emails.
Note: recommendations work for the following platforms integrated with GetResponse: Shopify, PrestaShop, Magento, and WooCommerce.
Workflow overview:
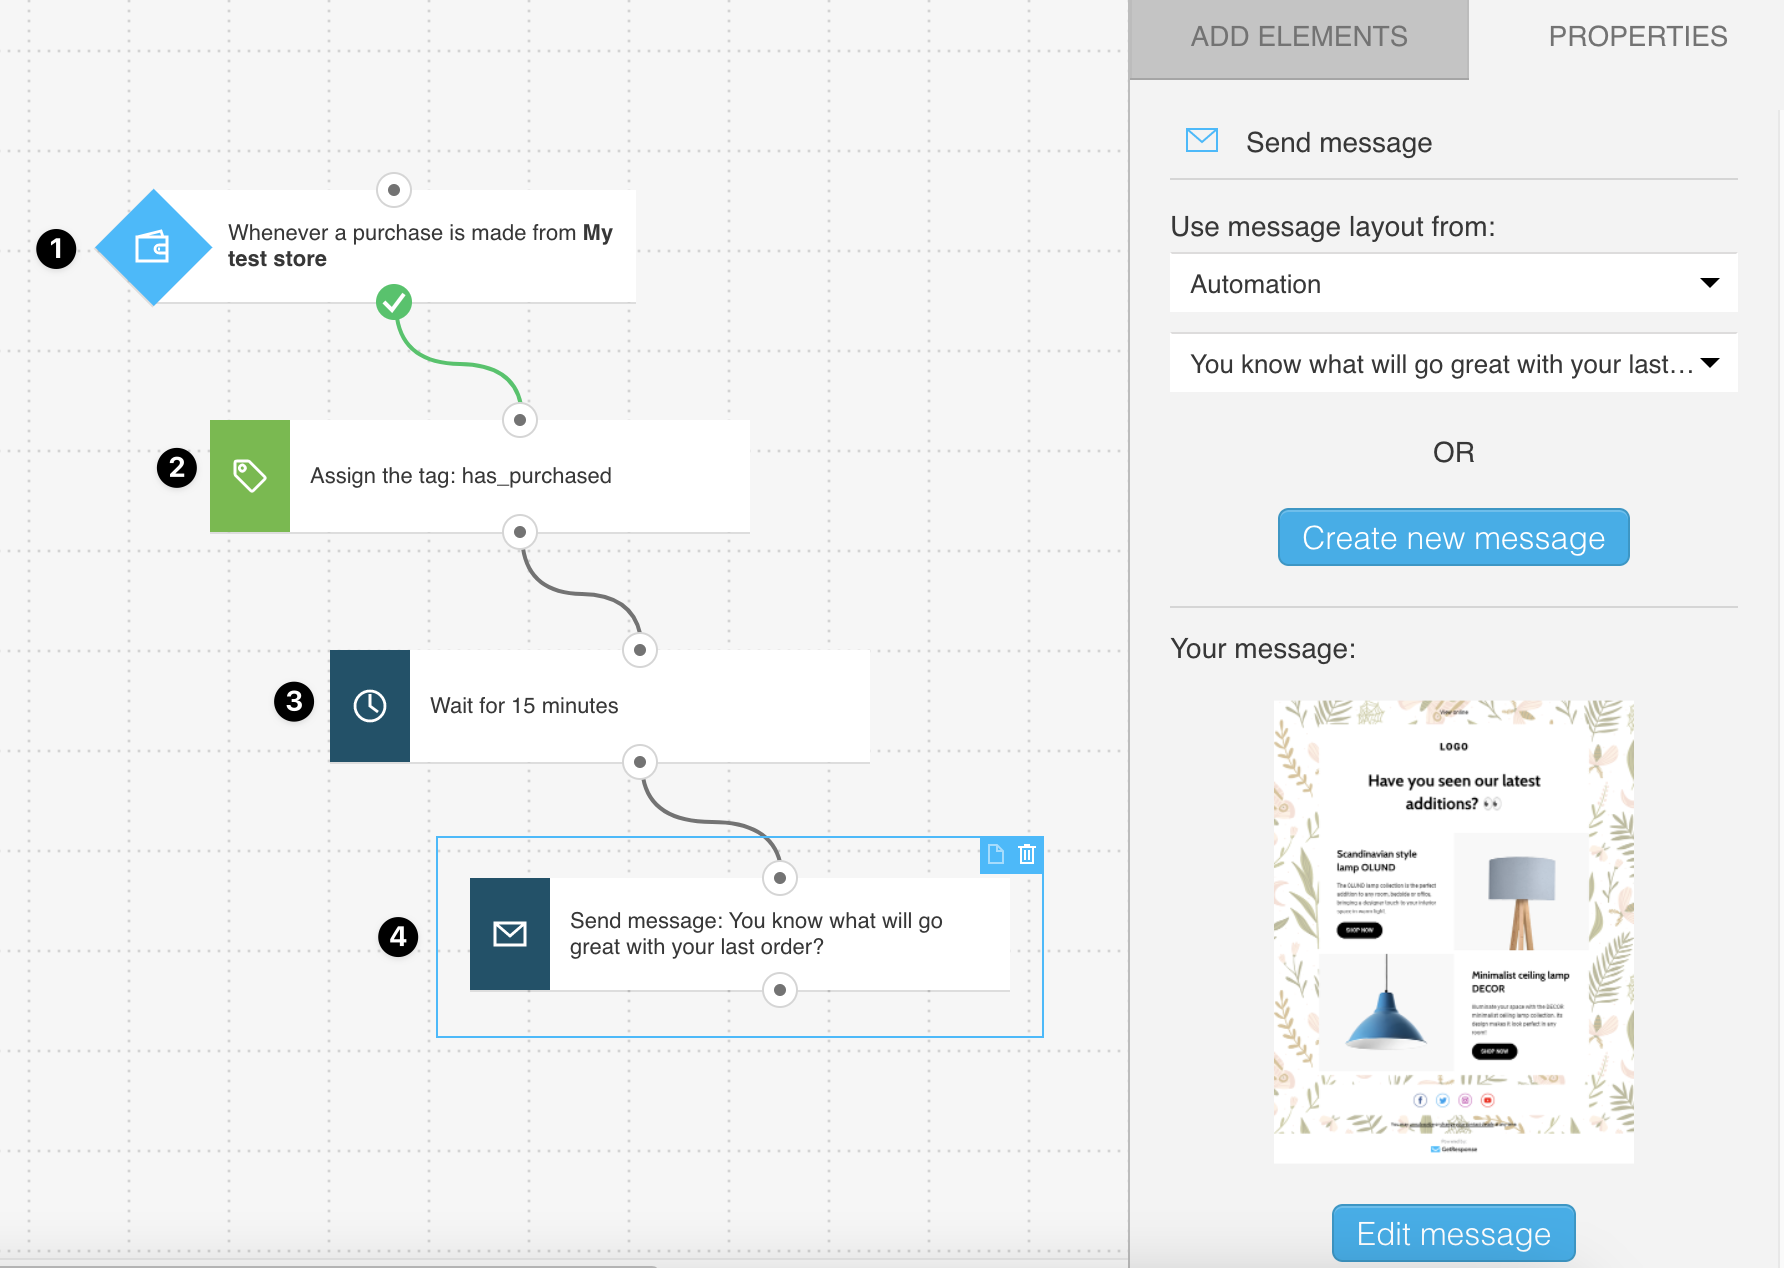
Step-by-step guide:
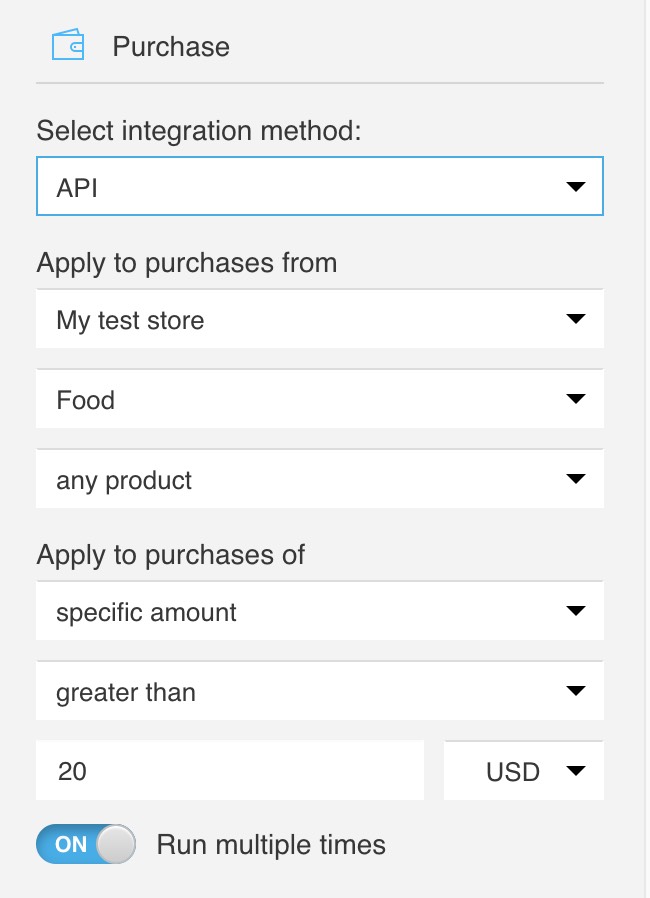
- Condition: Purchase
Again, start after purchase. Enable the “Run multiple times” option so that the workflow can be triggered each time someone buys something from your store.
You can also limit this to react only to specific products, order values, or other conditions – pick the condition details that will work best for your business strategy.
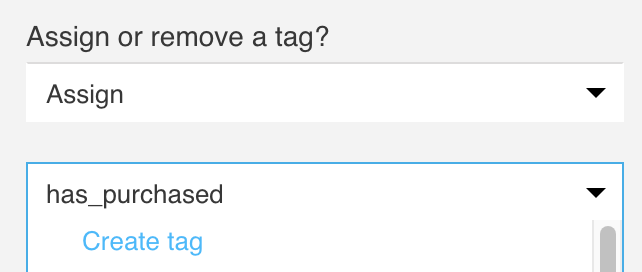
- Action: Tag
Add a tag to easily filter out contacts who purchased something from your shop later on. It’s good to gather as much information about your clients as you can, and tagging them automatically is the easiest way to do that.
You can use that information later for filtering contacts to send them targeted messages.
Pro tip:
You don’t have to leave the automation editor to create a new tag. There’s a “Create tag” option on top of the dropdown list of tags in the action settings.
- Action: Wait
To avoid the situation when this message arrives at the same time as the order confirmation and other operational messages around the purchase, add a short wait.
Fifteen minutes is just an example, you can adjust it, of course. Keep in mind that you want to monetize the customer’s interest in your products further, so don’t delay it for too long. - Action: Send message
Now is the time to send the message with the “Recommendation” box.
It’s worth making that message as enticing to open as you can – come up with a clever subject line and don’t forget to use the preview text. All the effort you put into creating this message will work toward more sales in your shop!
Click here to learn more about creating ecommerce emails.
Scenario No. 3: Loyalty program
Growing a base of returning customers is one of the most important processes for many store owners.
If your product can be used up and needs to be resupplied, then you’re in a very comfortable position to grow a following of loyal clients. If your product is not perfect for this, you can try to introduce items complementary to your stock.
What’s the goal:
Set up a loyalty reward program to encourage customers to come back to your shop. You can send them promo codes, freebies, and special offers only available for those who are in the loyalty program.
The approach on the trigger type – number of orders or total value spent – and thresholds should be adjusted according to your shop and will vary from store to store.
Be sure to set up reachable, but engaging thresholds – the first one shouldn’t be too high, you can even go as far as offering it after the first purchase to incentivize clients to place future orders.
Think of what would feel nice for you as a customer. Maybe check your competitors and see if they have any programs described in their shops. Don’t take it as an ultimate guideline, but start there and be sure to offer your customers something that will make them feel appreciated.
Workflow overview:
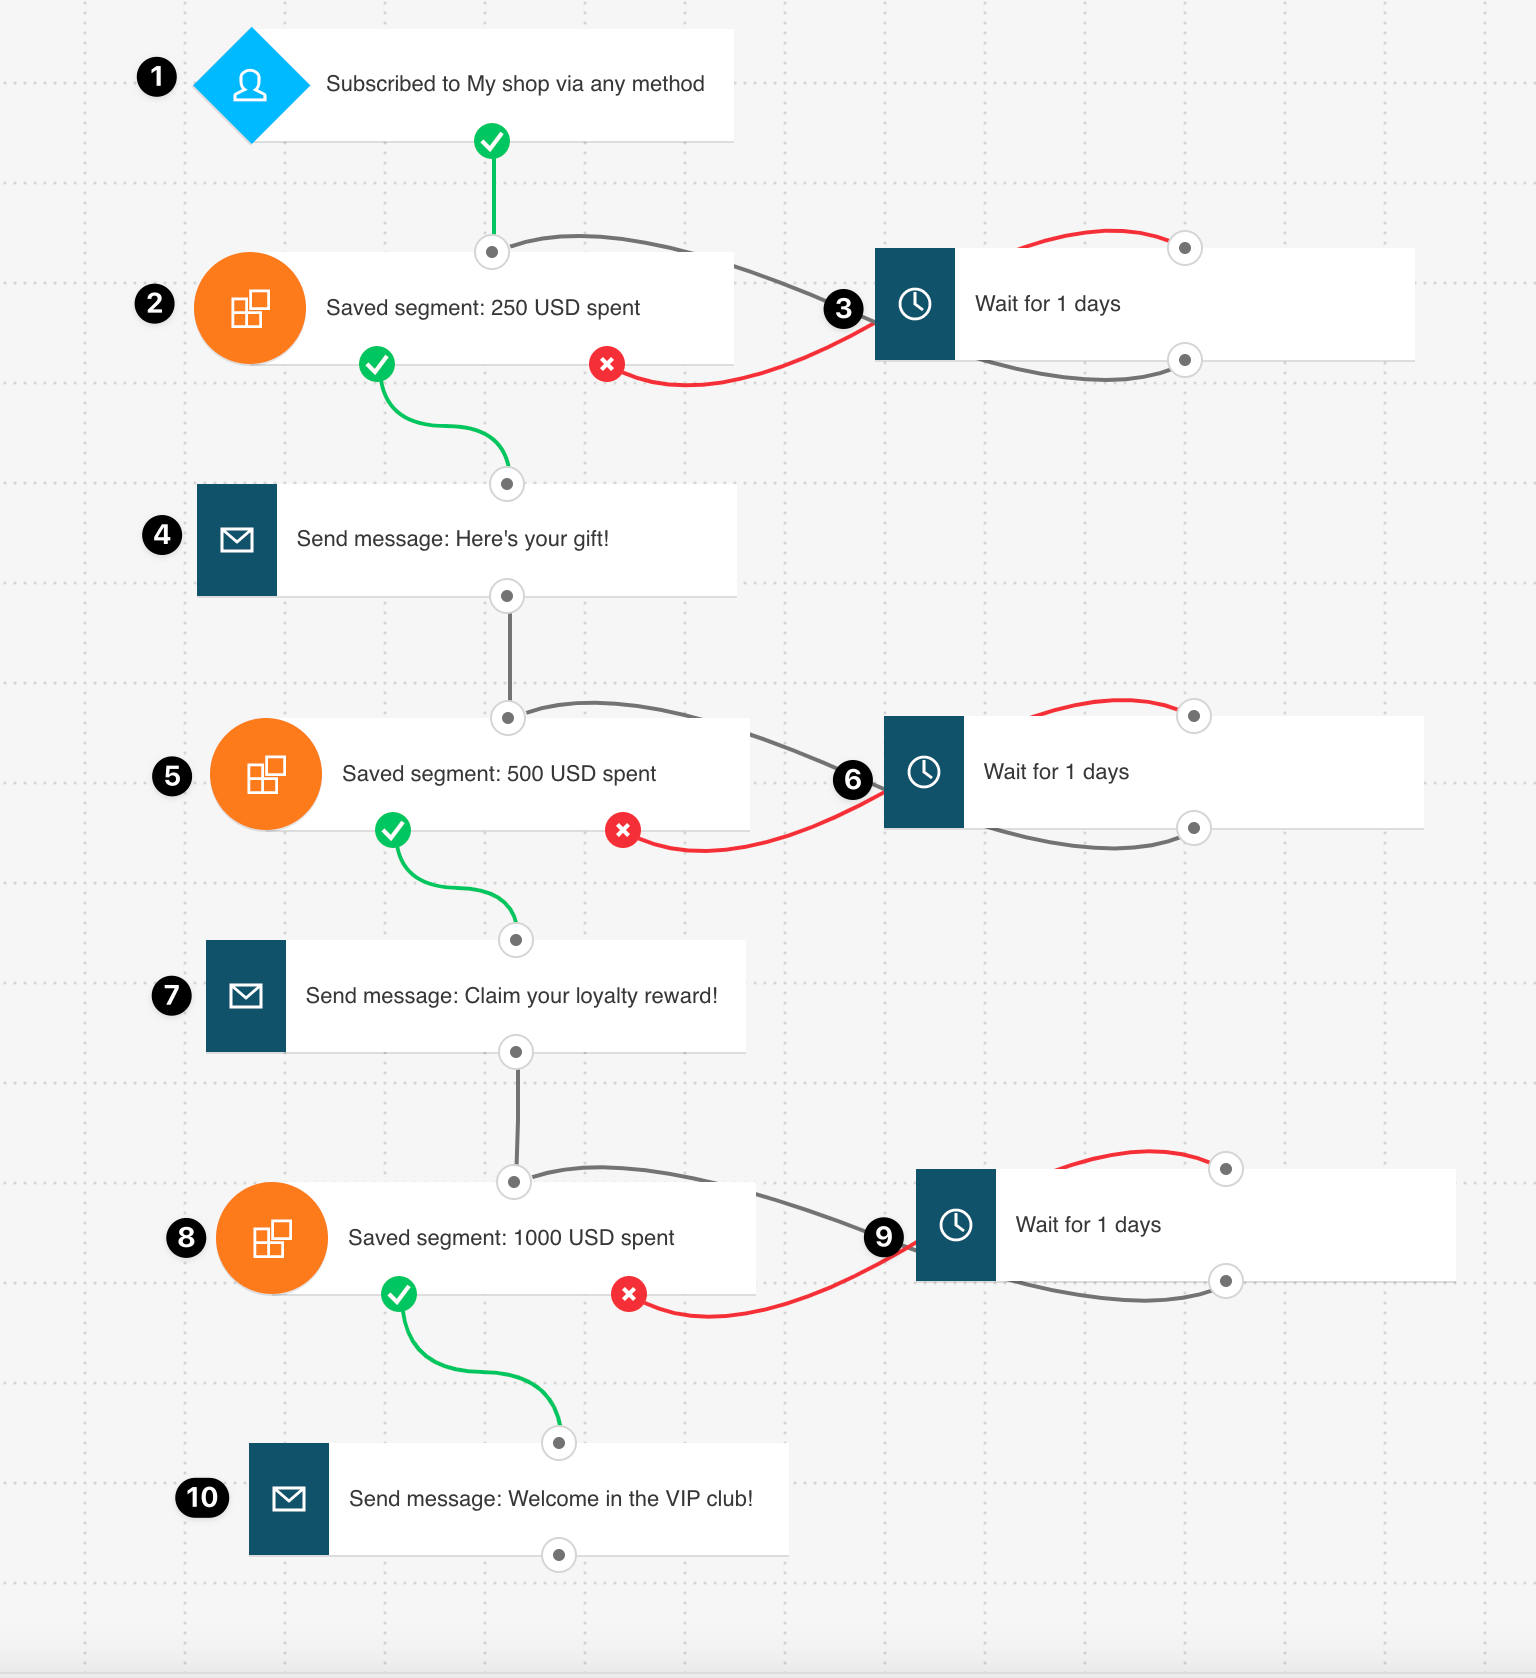
Step-by-step guide:
- Condition: Subscribed via…
Contacts enter the workflow when they are added to the list linked to your shop.
You can select that list in the integrations setup that you can open from “Tools > Integrations and API.” - Filter: Dynamic filter
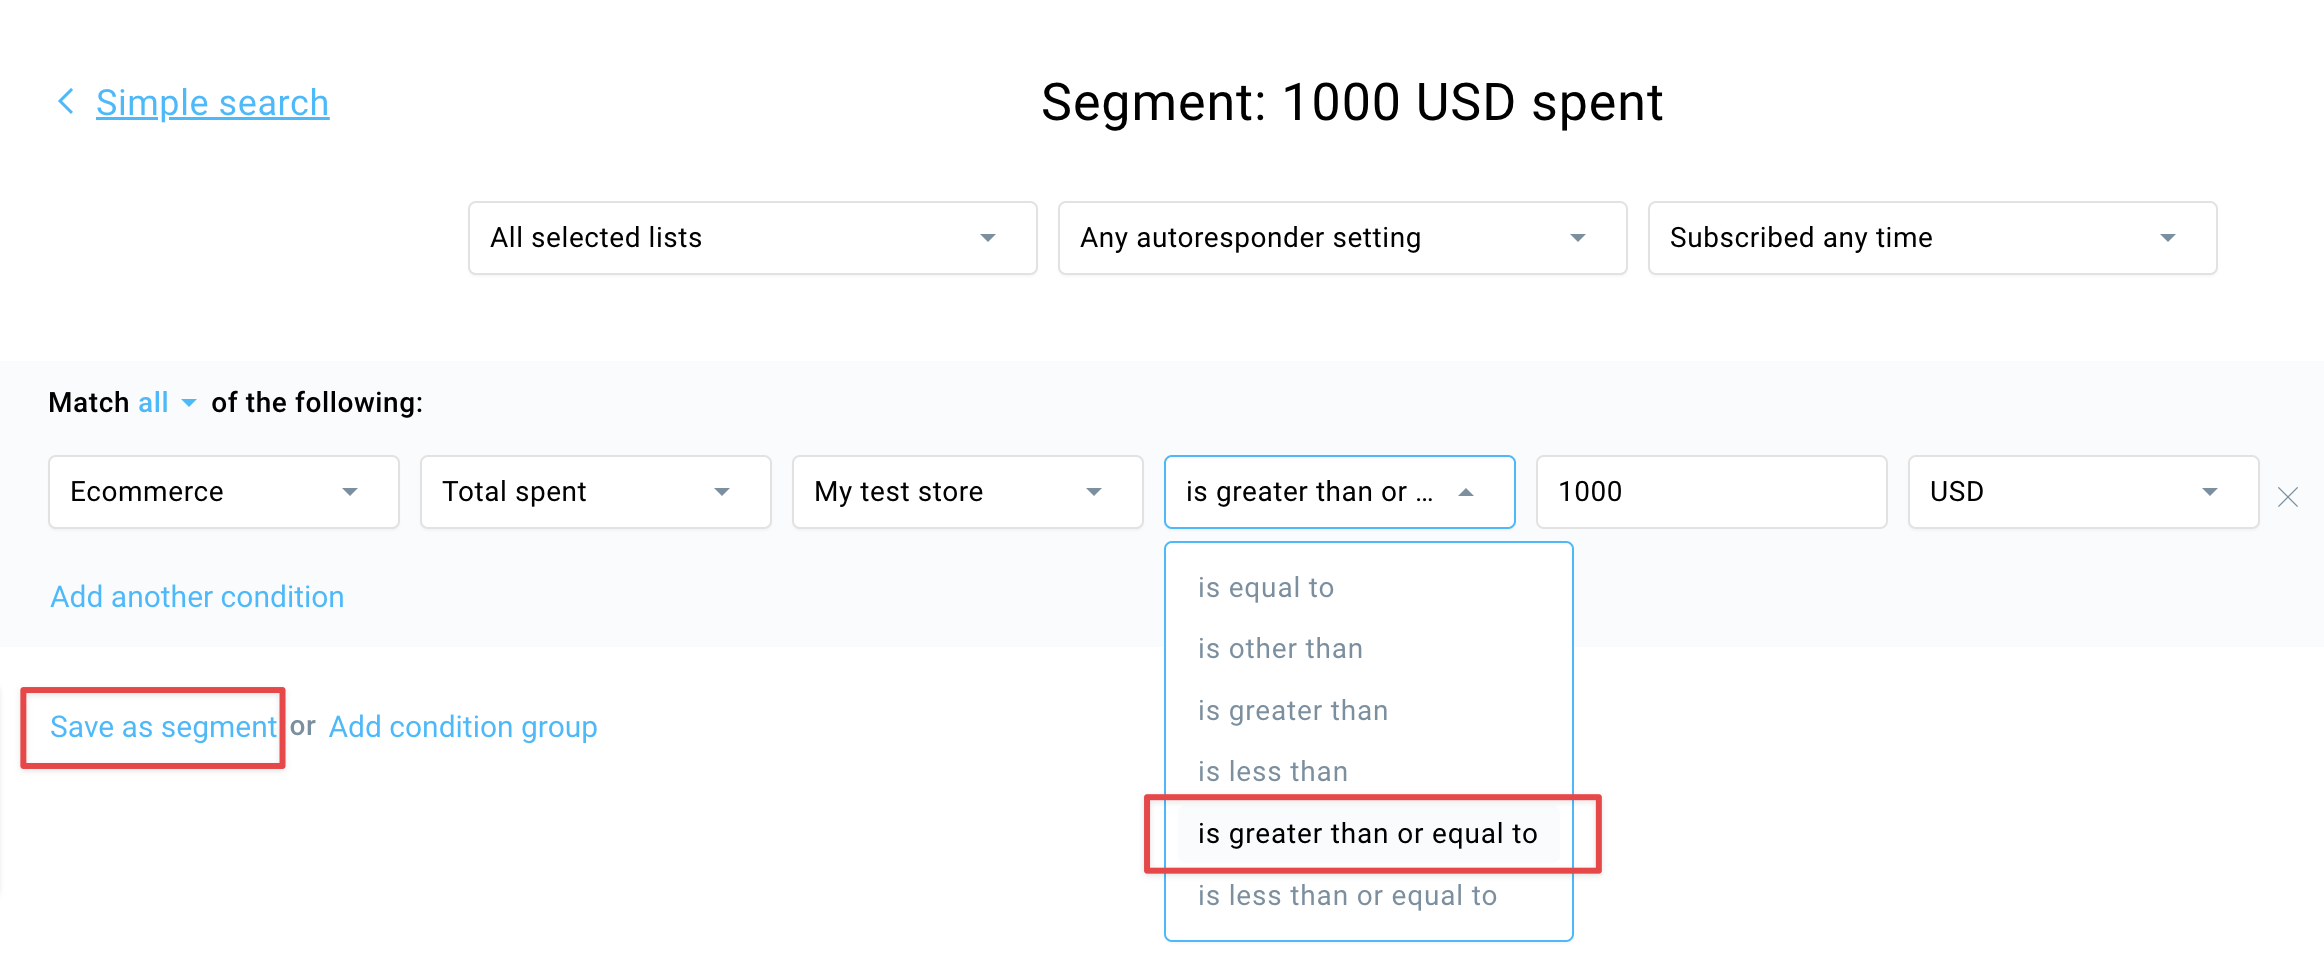
Create segments based on the total spent value or a number of purchases in “Contacts > Search” to use them in the automation filter.
Click here to learn how to create segments.
In this example, you can see segments based on the “Total Spent” filter, which look like this:
If you prefer, you can use the “Number of purchases” filter:
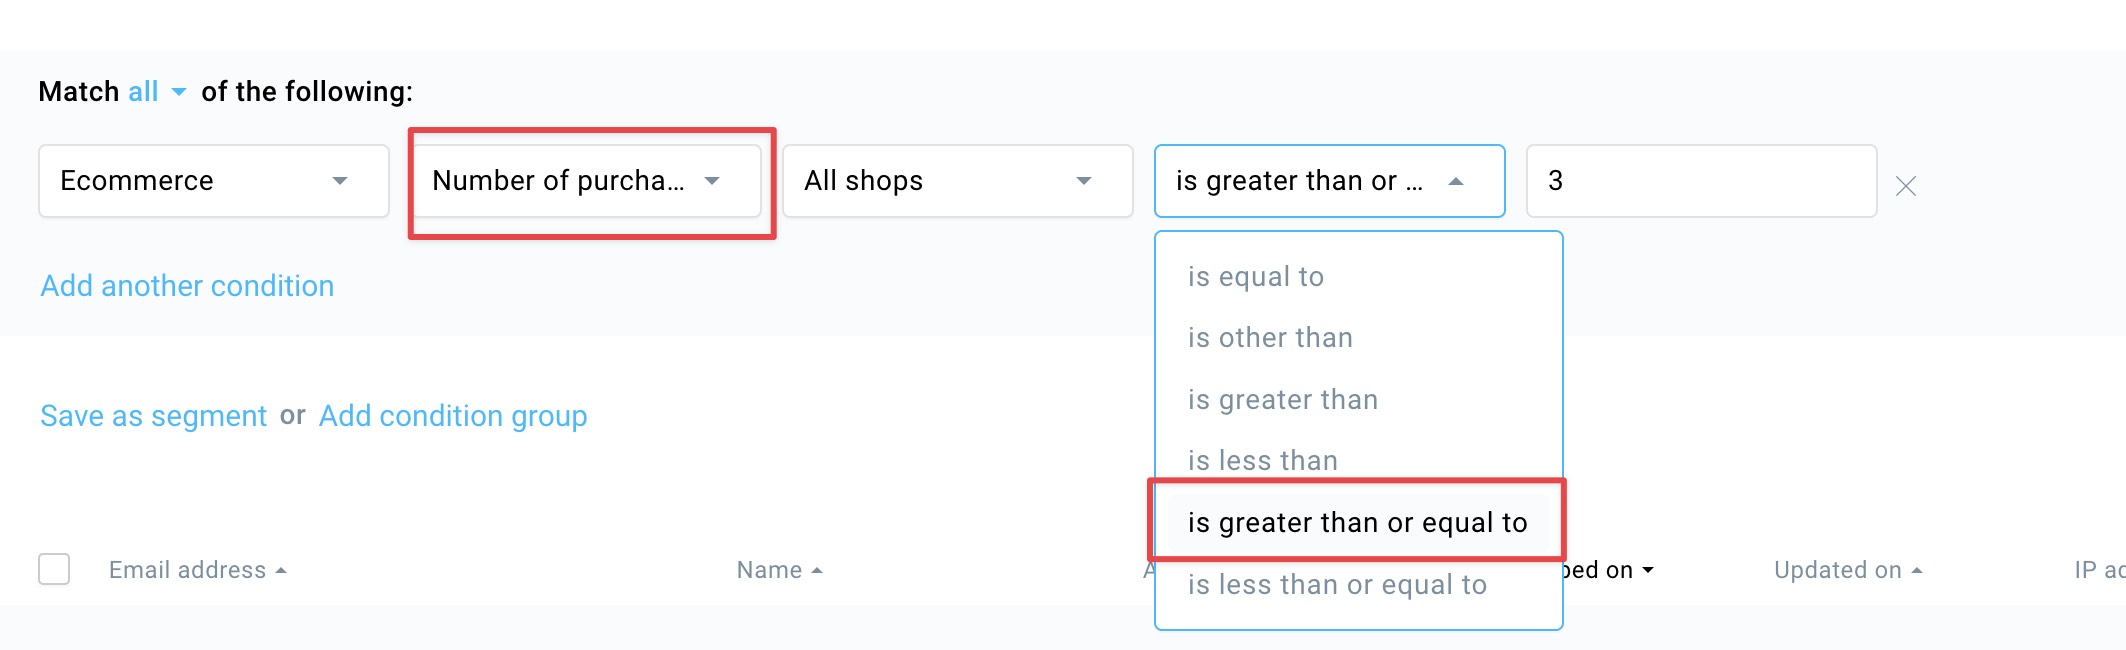
In both cases, be sure to select the “is greater than or equal to” option.
Select a saved segment that will mark your first threshold.
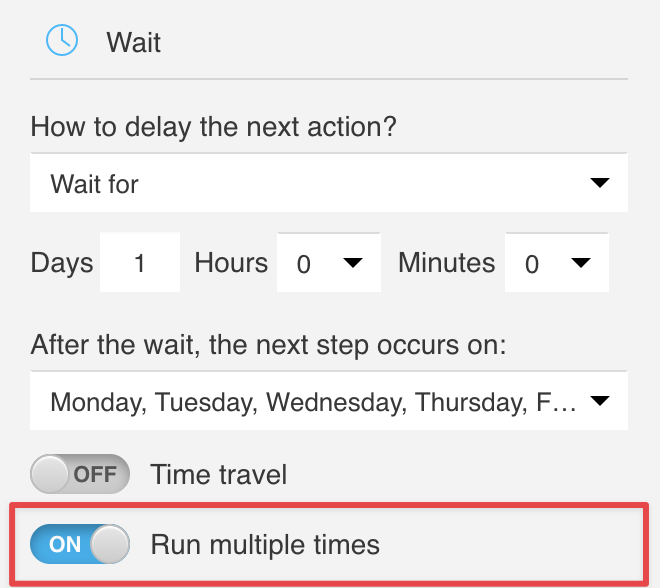
- Action: Wait
Link the negative path to the “Wait” condition.
Set it to one day so it’ll check who was added to the segment and proceed them down the workflow when they meet the requirements.
Be sure to enable the “Run multiple times” option in the “Wait” condition, so your clients won’t get stuck there:
- Action: Send message
That’s the moment when you deliver the first gift!
It can be a promo code, a free shipping offer, or a special deal. You can also send a free ebook, exclusive webinar invitation, or offer a chat with a product expert (for example yourself!) to add some value to what you sell.
Pro tip:
The idea of the loyalty program is to reward returning customers. Don’t brush them off with the exact same offer you give, for example, for subscribing to your newsletter. Plan out how you want to reward loyal brand supporters and offer them something meaningful.
- to 7. Filter: Dynamic filter > Action: Wait > Action: Send message
The cycle repeats, but with the higher total value in the second segment used in the “Filter” block.
The message sent here is a different message than the one in Step 4.
Pro tip:
It’s good to create different content and not just reuse the exact same message, even if you’re planning to offer the same reward again.
Show your customers some love and attention and mark the milestone in a special email!
- to 10. Filter: Dynamic filter > Action: Wait > Action: Send message
One more repetition of the cycle, with one more message marking the higher tier of the loyalty program.
You can plan as many of those cycles of filter > wait > send the message, just remember that contacts who will reach the end of the workflow won’t go further if you add steps after they’ve completed it. So it’s good to plan the loyalty program out well from the start.
Scenario No. 4: Product review request
It’s well established that customers prefer buying products that have positive reviews. Encourage them to share opinions about their orders with a simple workflow.
What’s the goal:
Generating more reviews for your products to help to build trust in your shop and positively influence revenue in the long run.
Request review message:
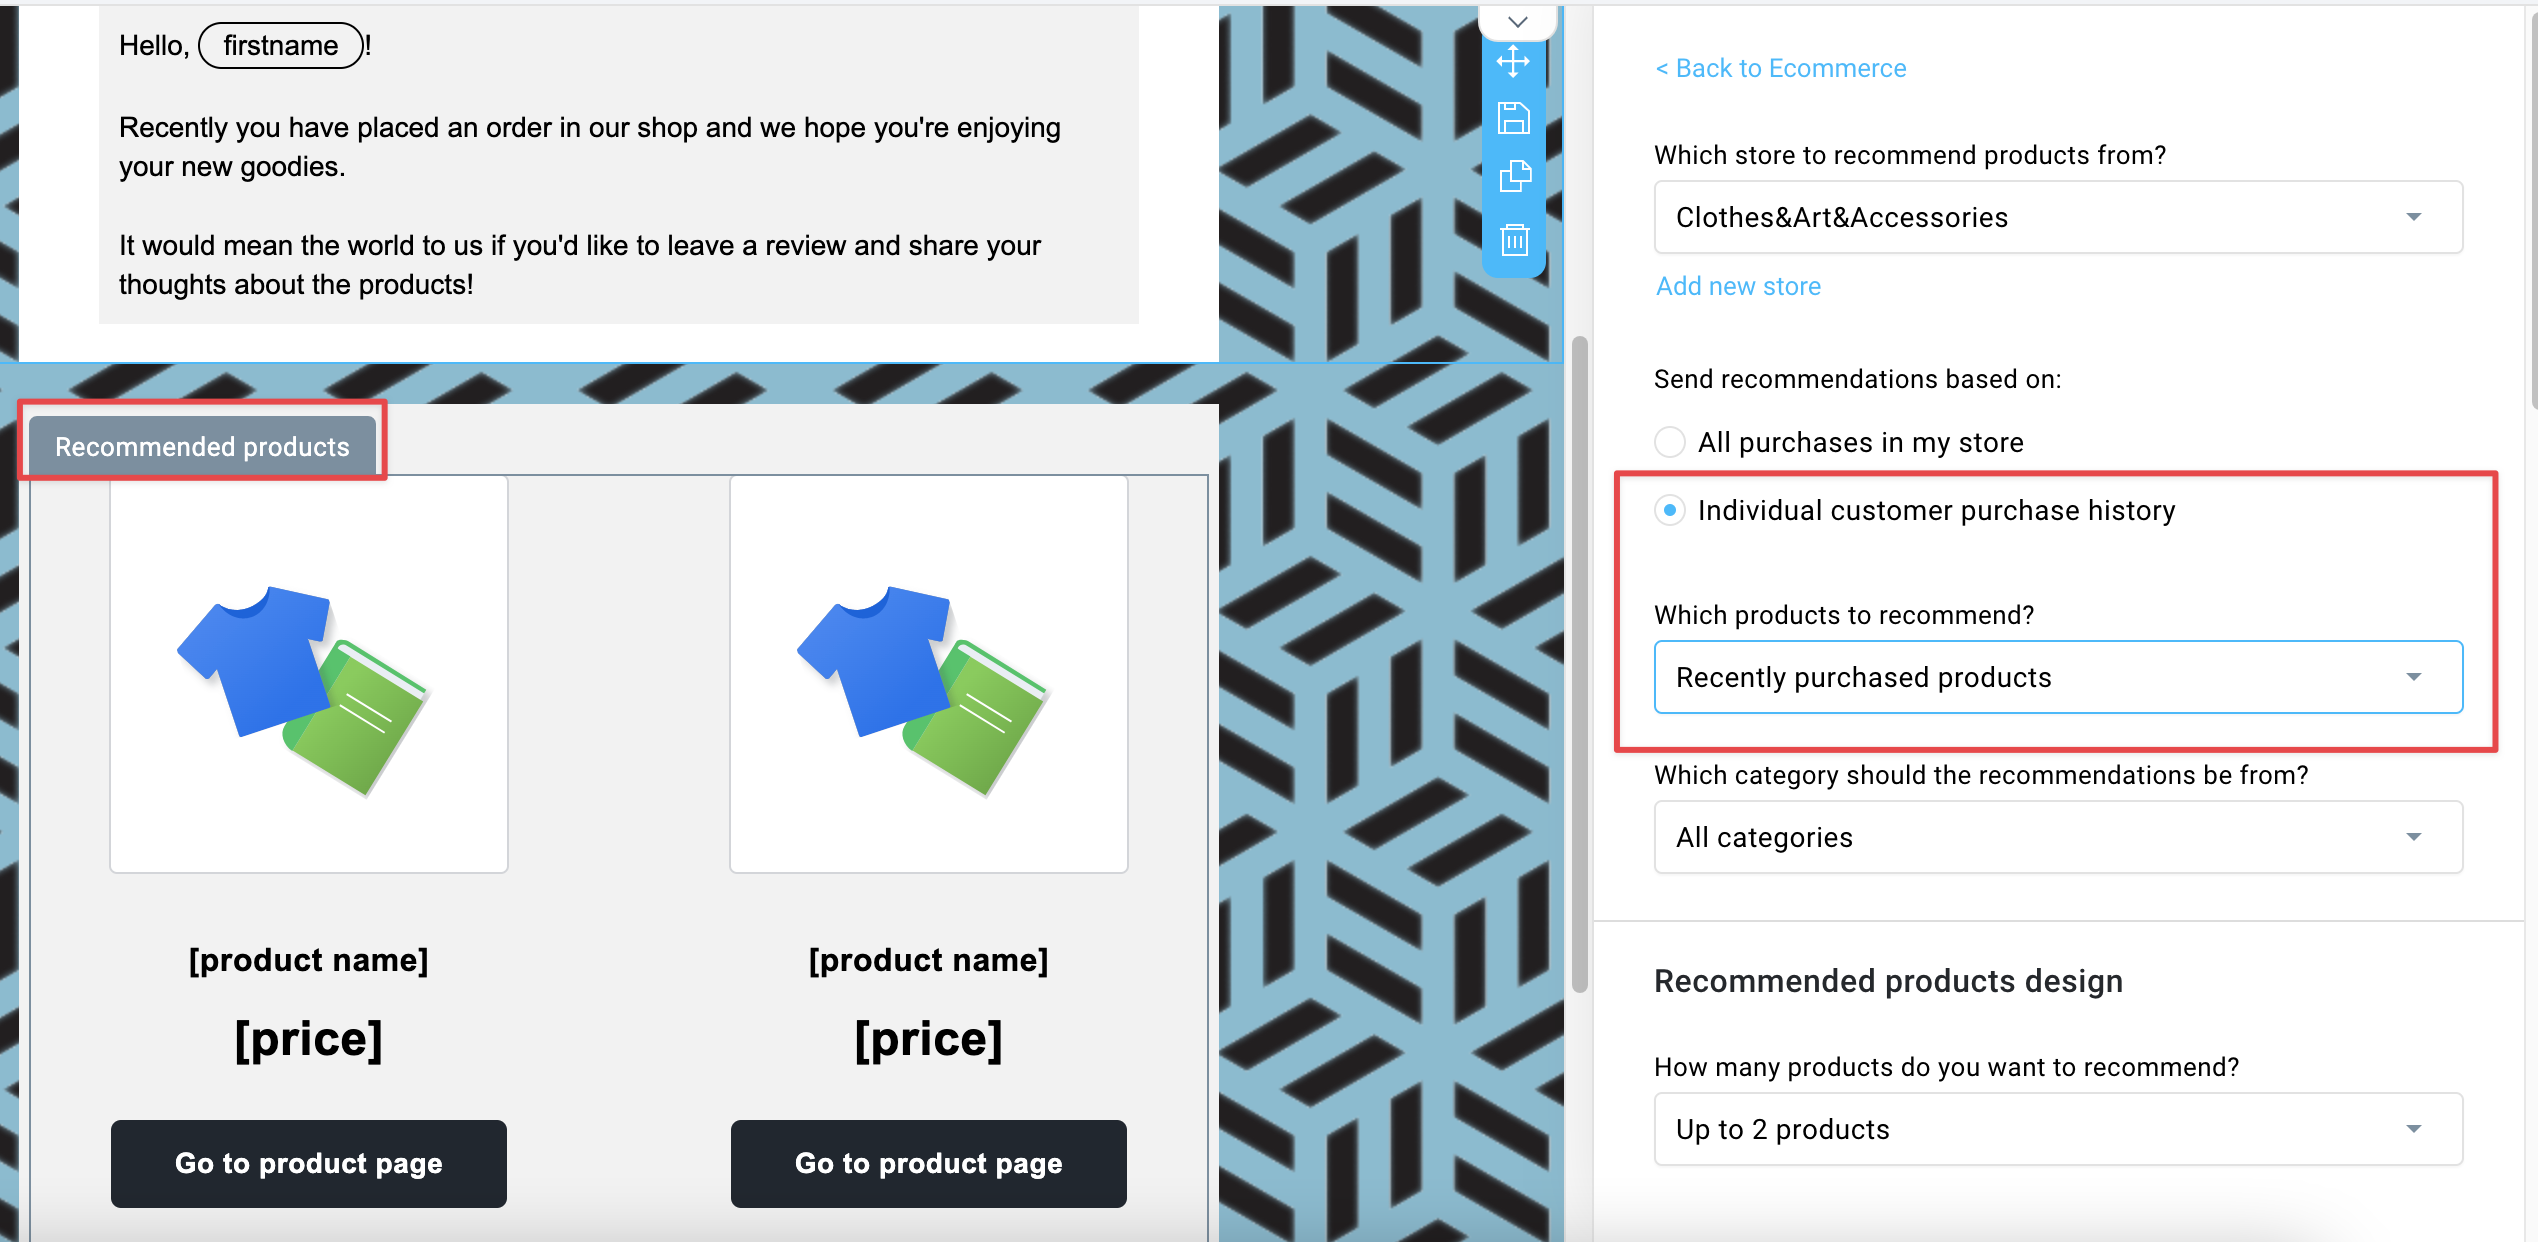
Similar to the recommendation message from Scenario No. 2, use the “Recommendation” element to create a dynamic block that will send the latest purchases to clients based on their personal history.
Below you can see an example of such a message and the settings you need to use:
Click here to learn more about using GetResponse recommendations in your emails.
Note: recommendations work for the following platforms integrated with GetResponse: Shopify, PrestaShop, Magento, and WooCommerce.
Workflow overview:
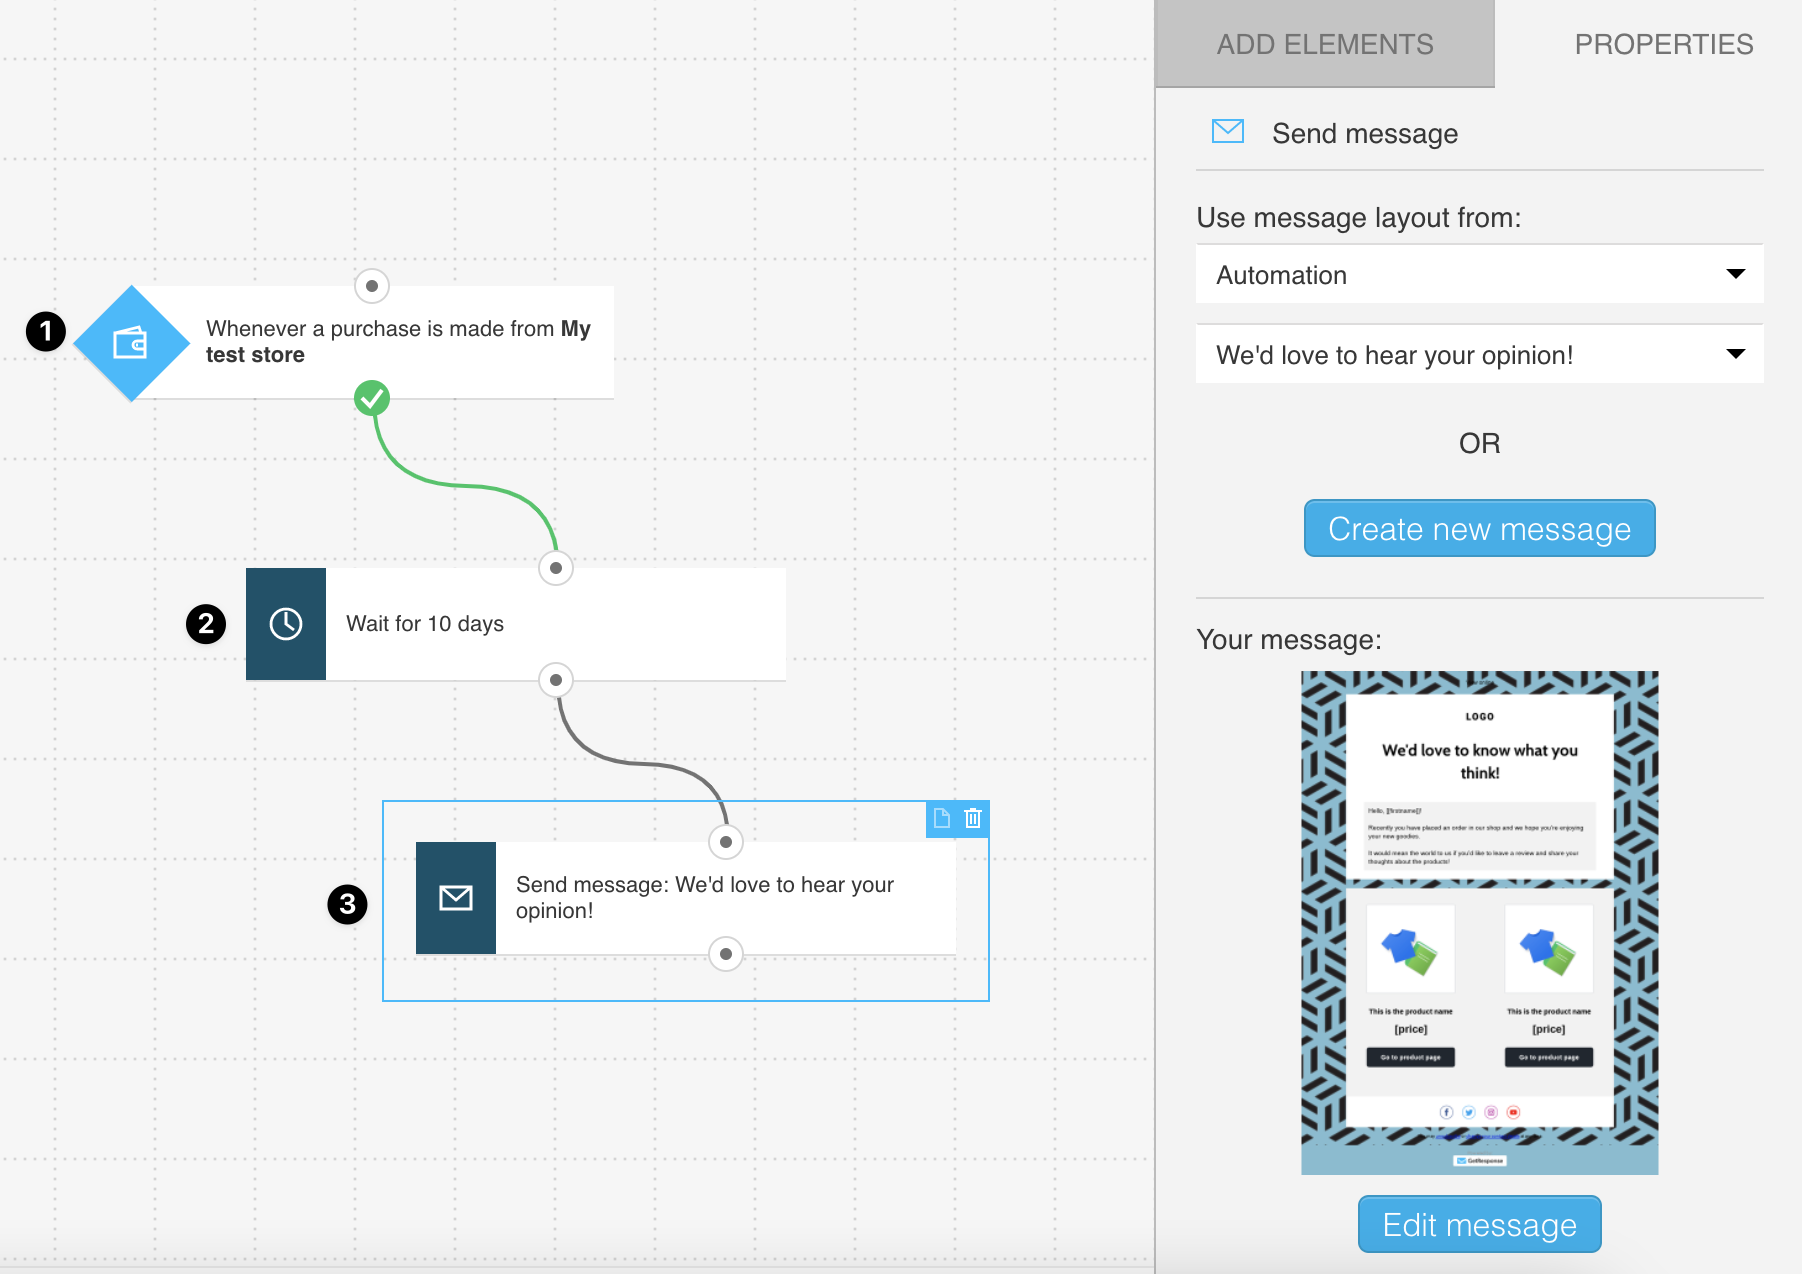
Step-by-step guide:
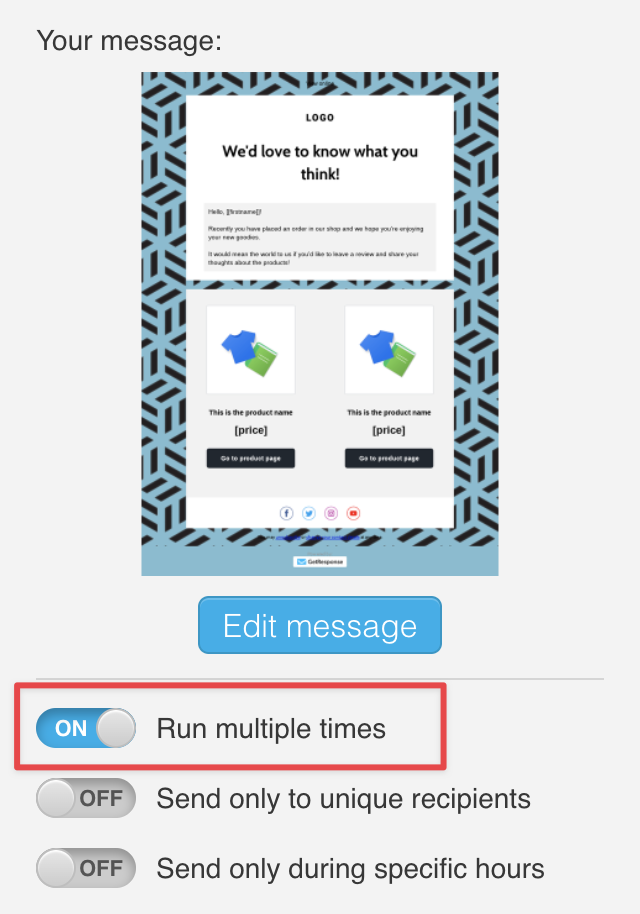
- Condition: Purchase
Start the workflow after each purchase. To trigger it every time someone buys something from your shop, enable the “Run multiple times” option.
- Action: Wait
Give your customers some time to receive the order. This wait time can be adjusted based on your usual delivery times.
If you’re selling digital items, consider giving your clients a few days to check out the product. - Action: Send message
Use the “Recommendation” block in the email editor described above to add recently purchased products to the message requesting a review.
Select the “Individual customer purchase history” option for that, save your message, and select it in the automation.
That’s it! GetResponse will do all the heavy lifting for you and send each customer a personalized message with their latest purchases.
Downloadable templates
You can easily start using the workflows described above by downloading templates and importing them into your GetResponse account!
Click here to download template files
Click here to learn how to import a workflow template to your GetResponse account
How many points does GetResponse’s scoring system assign when a customer clicks a link in a post-purchase email?
In GetResponse’s example workflow, each link click earns a customer 5 scoring points. Contacts who reach 10 or more points — meaning they clicked links in at least two of three follow-up messages — get moved to a highly engaged customer list, while everyone else is filtered into a separate unengaged list.
How long should you wait before sending the first message after a purchase?
GetResponse recommends a 30-minute delay after a purchase before sending the welcome message. This short buffer keeps the shop fresh in the customer’s mind while preventing the message from getting lost among automatic order confirmation and payment emails.
Which ecommerce platforms support GetResponse’s automated product recommendation emails?
The dynamic recommendation block only works with four platforms integrated into GetResponse: Shopify, PrestaShop, Magento, and WooCommerce. This applies to upsell/cross-sell messages and product review requests alike, since both use the same recommendation feature.
What spending thresholds does GetResponse use as an example for a three-tier loyalty program?
The sample loyalty workflow triggers three separate reward tiers at $250, $500, and $1,000 total spent (USD). Each threshold is set using the “is greater than or equal to” segment condition, and store owners are advised to adjust the actual dollar amounts to fit their own average order values.
How many days after a purchase does GetResponse suggest waiting before requesting a product review?
In GetResponse’s example workflow, the wait step before sending a review request is set to 10 days after purchase. This gives customers time to receive and try the product, though the guide notes the wait should be adjusted to match actual delivery times — with extra days added for digital products.