Early-bird sale
The Early-bird sale template is useful when you decide to entice your existing contacts to be the first one to buy your new offer. You can reward them for acting fast and generate sales before your actual big sale begins. This template lets you:
- select the special offer
- decide how many people should receive it
- automatically send the offer to everyone who qualifies
- automatically send a specific message to everyone who was interested but didn’t qualify
- assign separate tags to those who participated and qualified and those who participated but didn’t (this will help you decide what offers and content you could present to them in the future).
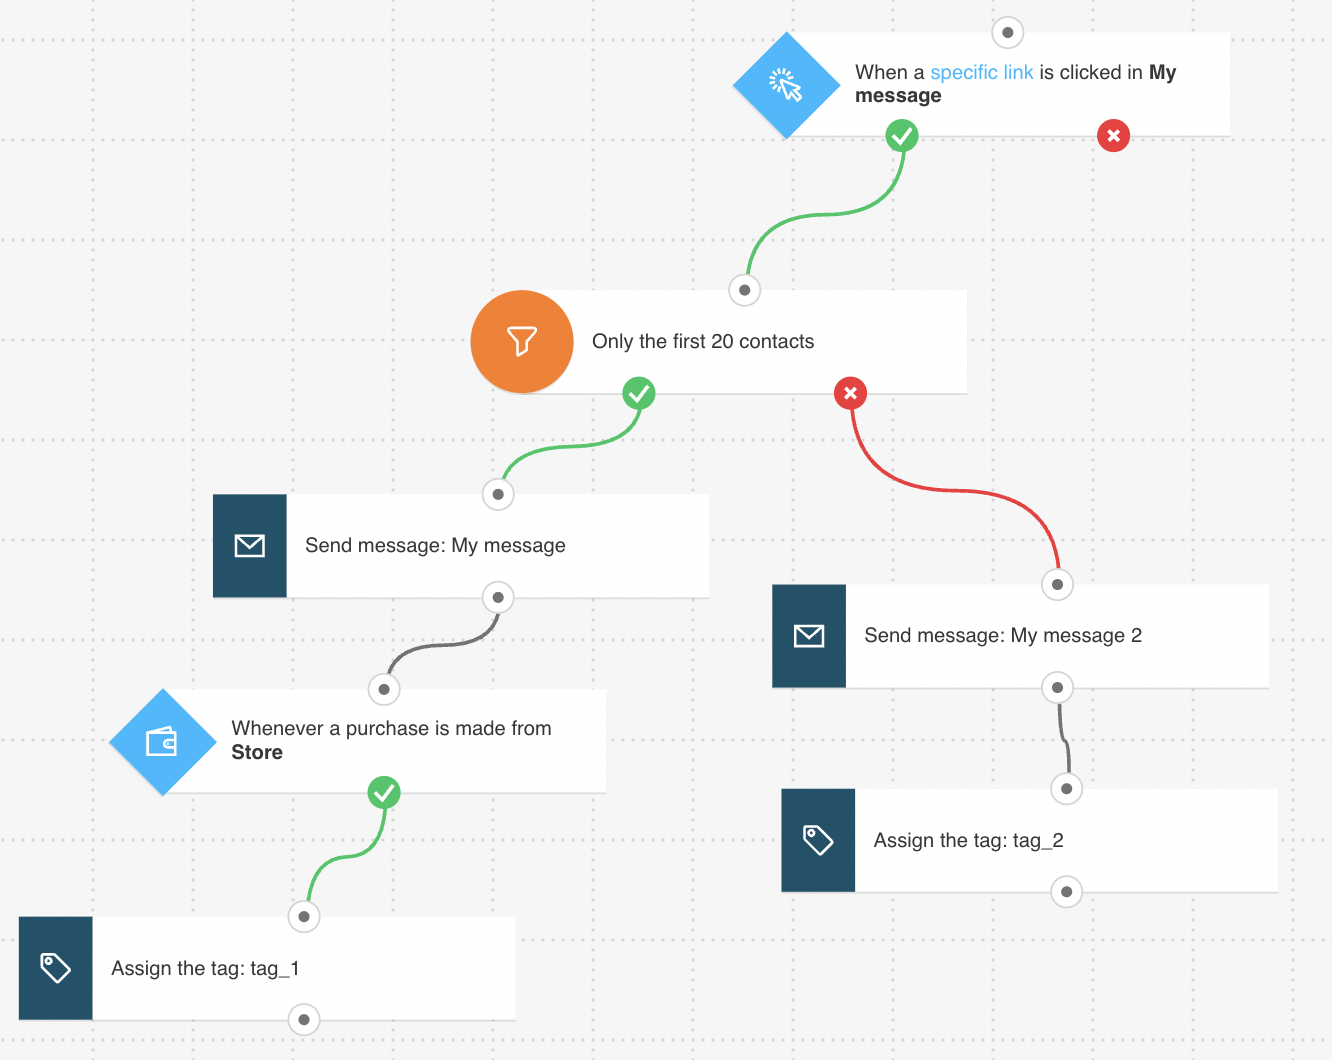
Template overview
Category: Sales promotions
Elements in template: 7
Minimum number of elements to configure: 5
Here’s what you’ll need to configure the elements and publish the template as a workflow:
- A scheduled message that will trigger the workflow when people click on the link to the offer.
- 2 automation messages or messages that can be used as automation messages to send to people participating in the sale.
- Tags (optional). You can create tags as you’re building the workflow but its best to have an idea what tag to assign to contacts who complete the workflow. This will set them apart from your other contacts.
Configuring the template
If an element is greyed out, it means that you need to set up its properties. Clicking on an element opens its Properties. The Range element has been preset to the recommended value.
1. Change the settings for the Link clicked? condition. It’s preset to any newsletter/any link. You can modify the settings to narrow down the condition to a specific message and link that you’d like to track. For example, you can select a message letting them know about the early sales with a link to your special offer.
2. (Optional) In the Amount filter, you can change the number of people who can participate in the early bird sale.
Targeting the early birds
1. For the Send message element, use the drop-downs to select the message you want to use – for example, a congrats message with the promo code and a link to your store.
2. Configure the Purchase element to track if your contacts used the code and completed the purchase.
Click the element. This will display the Get Web Connect button. The next step depends on the integration method you use:
- for JavaScript, click Get Web Connect, copy the snippet to the clipboard and after that click on ‘Back’ on the top left. (At this point it’s best to save it to a temporary document in case you copy something else to the clipboard). Under Properties, enter the URL of the post-purchase thank-you page. Note: Once you’re done configuring the template, you’ll need to copy the snippet to your website’s management system or insert it directly into the HTML source code.
For detailed instructions on installing the tracking code, please go to How do I add the tracking JavaScript code to my website?
- for API, select API as the integration method. Then, use the drop-downs to specify the purchase you want to track.
3. For the Tag element, select the tag you want to assign to your customers, e.g early_bird_yes.
Targeting the contacts who missed the sale
1. For the Send message element, use the drop-downs to select the message you want to use – for example, a message with a lower discount.
2. For the Tag element, select the tag you want to assign to the contacts who didn’t participate in the sale, e.g early_bird_no.
Finishing setup
Click Publish when you’re done setting up the template or Save and exit if you want to finish editing the template later (it will appear as a draft on the Manage workflows page).
Related links
- How does the Link clicked condition work?
- How does the Amount filter work?
- How does a marketing automation message work?
- How do I set properties for the Purchase condition?
- How do I add the tracking JavaScript code to my website?
- How can I use the Tag action in a workflow?
- How do I make use of tags?


