How to create a form in Legacy editor?
The following article is about legacy forms.
Legacy forms are no longer developed and are not available in accounts created after July 18, 2023.
You can use List Builder Wizard to create a form. The form templates are grouped by category. Whether you need a form for event sign-ups, order form, or newsletter sign-up, we’ve got you covered. The templates are fully customizable. You can even adjust the form color to the color scheme of your website with Color magic.
Getting started
1. Go to Forms and popups.
2. On the Manage forms page, click the Create form button.
3. Select the Legacy forms option.
4. Click List Builder Wizard to display the available templates. At this stage, you can:
- browse by category to pick the template you can use. When you’ve found the one you like, click on it to go to the editor.
- (Optional) Click the Color magic button. Then, enter your website URL. We’ll draw on your websites color scheme and display the color options for the form. Select the colors you want to use for the form. All the available templates are adjusted automatically. Then, click on the template you want to use to go to the editor.
- (Optional) Pick a format and then click on the template you want to use to go to the editor.
Editing form template
In the form editor, you can edit the template, add more fields, and edit their style and layout.
Add field
You can add custom fields and Consent fields to your form. Custom fields let you collect valuable information about your contacts. Consent fields help you make your form compliant with GDPR and other data protection regulations. Use them when you want contacts to be able to give their consent to your marketing or data processing policies when they sign up.
Before you begin
- To be able to add Consent fields, you first need to create them in your account. It’s not possible to create a Consent field within the form editor.
- It’s good to create custom fields before you start working on your form but you can also create a new one as you’re working on the template.
1. Double-click a field to add it to the form. Repeat this step for all the fields you want to add. The form size will automatically adjust to fit the fields.
2. Double-click an element to open its Layout tab. From there, you can
- check the box to make the fields required and edit the prompt text they see when they leave the box unchecked,
- edit the placeholder information
- add additional instructions for the user as well as the error message,
- edit the field formatting.
3. Switch to the Style tab to change the font design.
4. Double-click the button to edit text. Double-clicking also opens the Style tab for the button, where you can make additional changes to its design.
5. (Optional) Add static elements, such as dividers, images, text blocks, privacy badges, trust seals, and counters.
6. To remove any element, move the mouse over it and click the trash can icon on the element box.
Edit form layout
1. Click on a form (avoid clicking inside the form fields) to activate the Layout tab. This section lets you edit the layout and structure of your form.
2. In the Layout tab, choose a form type: embedded, pop-over, or scroll.
3. (Optional) Choose display properties such as effect and delay.
Add links
You can turn text in your form or the thank-you page into a hyperlink. The link can direct subscribers to your website or landing page. You can also use it to link to your ebooks or other files with their own URLs.
1. Double-click the text.
2. Highlight the part of the text you want to turn into a link.
3. Go to the Style tab and scroll down.
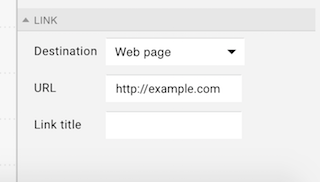
4. In the Destination drop-down menu, choose if you want to link to an external webpage or a GetResponse landing page.
- If you choose an external webpage, enter its full URL into the URL field. This is where you can also enter full paths to any files you want to share, like ebooks.
- If you choose a GetResponse landing page, open the drop-down menu and select the page you want to use. Note: you can only choose from the landing pages you have already published.
5. (Optional) Add a title to the link to display when someone moves their mouse over it.
Finishing setup
1. To edit the form settings, click “Settings” in the top right corner of the editor. Edit the opt-in settings for the current form, set up a thank-you page, and choose autoresponder settings.
2. Click Save or Publish. In the final step, you will find the JavaScript code to paste into the BODY element of an HTML web page.
How do I change the size of my form?
In the editing screen, open the form and drag the sides vertically or horizontally to change its size. Drag a corner to change both. If the form is too short to add more fields, drag the bottom corner to make it longer. Or use the Item spacing tool in the Layout section to create space between fields.
Are the forms mobile responsive?
At the moment we offer a possibility to create a mobile version of the form.
Related resources
- How to use List builder apps to add exit popups, scroll forms, and more
- How to change a thank-you page and set up an already-subscribed URL


