How does the Link clicked condition work?
The Link clicked condition tracks links you specify in the element Properties. You can:
- Choose to make the condition broad and check if a subscriber has clicked ANY link in your account over a specific amount of time. You can do this if you want to begin to evaluate the engagement of your contacts.
- Select any links that you have included in a specific message.
- Choose a specific link in a specific message for the Link clicked condition.
Using specific links in element details allows you to track which links your contacts click or don’t click on.
If Link clicked is a start element, make sure that Click-through is enabled for the newsletter that you select for the condition.
Is it possible to track more than one link in the same message?
Yes, you can track more than one link in the same message. To do this, you should use separate Link clicked conditions as start elements to track specific links in a message. You can then customize your workflows to accomplish different goals, based on which link your clients click.
For example, here’s a scenario that allows you to:
- Send a thank-you message when your client clicks either of the two links in your message.
- Assign tags, if you wish. You can use them later to check who started and finished your workflow, and to create custom fields based on their actions.
- Send follow-up messages when they don’t click specific links.
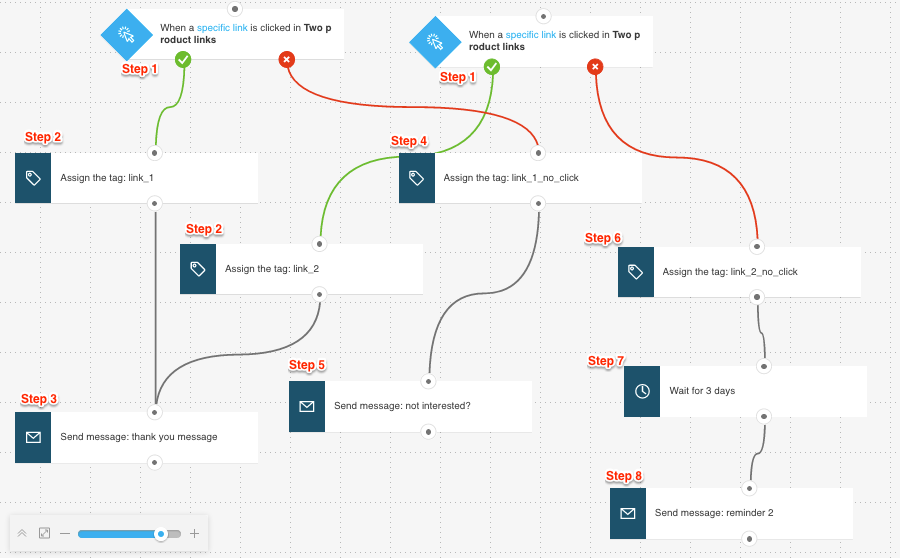
First, set up the elements to account for clicked links
- Add two Link clicked conditions to your workspace. In condition Properties, select the message type. Next, choose A specific link from a specific message, and enter the URL.
- Optionally, add two Tags. Configure each Tag and connect it to the respective “if yes” (green) connectors in the condition elements.
- Add a Send message action and configure the element details. Note: Keep Run multiple times switched toOFF.Next, connect Send message to the tags (if using them), or to the “if yes” (green) connectors of the Link clicked conditions.
Second, let’s set up a path for clients who don’t click the first link
- Optionally, add a Tag action. Link it to the “if no” (red) connector in the condition element that is tracking the first link.
- Add a Send message action and configure the element details. Next, connect Send message to the tag (if using it), or to the “if no” (red) connector of the first Link clicked condition.
Third, let’s set up a path for clients who don’t click the second link
- Optionally, add a Tag action. Link it to the “if no” (red) connector in the condition element that tracks the second link.
- Add a Wait action and connect it to the previous element. Don’t skip this element. Here, Wait spaces out sending messages for contacts who also didn’t click the first link.
- Add a Send message action and configure the element details. Next, connect Send message to the Wait action.
You can adapt this workflow to your needs. If you’re using more links, simply add another condition element and repeat the steps described above.


