How does the Custom field changed condition work?
The Custom field changed condition triggers an action when you or your contacts update a given custom field. It works with predefined custom fields as well as the ones you’ve created in your account. You can use any custom fields formats–single choice, multiselect, and text–with this condition.
The element has an “if yes” (green) and “if no” (red) connector. If the custom field changes for your contacts, they are affected by the action you’ve connected to the “if yes” connector. Contacts with no changes to the custom field move down the path to the action you linked to the “if no” connector.
Note: When you use Custom field changed as a start element, link the next element only to the “if yes” connector. Only the contacts who have the new custom field can “enter” this element at the beginning of a workflow, so the “if no” connector simply can’t trigger any action.
Note: The Custom field changed condition also triggers an action when the custom field is assigned to an existing contact who did not have this field assigned before.
However, if a contact joins your list with the custom field already assigned (the field is assigned at the same time as the signup time), this condition does not trigger an action in such a case.
Before you start
If you’d like to create a new custom field, you can do this under Contacts>>Custom fields>>Create custom field. You can’t add or create new custom fields in marketing automation.
How do I set up the custom field condition?
To set up the condition:
- Add the element to the workspace.
- Select Properties.
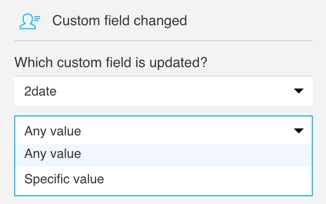
- Select your custom field from the drop-down menu. Once you do it, you have two options:
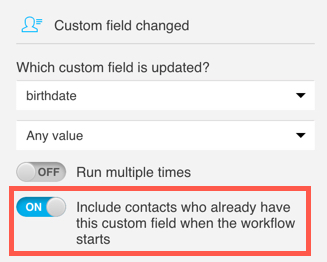
- Select Any value when it’s only important to you that the value has changed, not what the change is. The condition triggers an action for any changes to the custom field value.
- Select Specific value if you want the condition to trigger an action when only a specific change occurs. When you select this option, you additionally need to Select the action and Enter a value from drop-down list.
The action and value of the condition depend on what type of Specific value you’ve chosen. Each drop-down menu contains prompts that help you set them up.
Example 1
The condition properties can be very specific. Here, the condition triggers an action when your contacts set or update their city to Indianapolis in their contact information on your site.

You can also set up broader condition properties. In this case, an action is triggered when your contacts set or update their contact information to a city that includes the suffix “polis.”
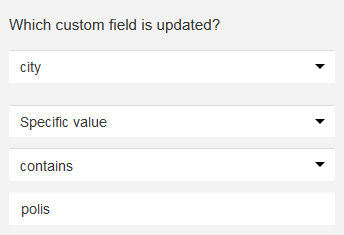
This way you can target contacts who’ve recently relocated to the Midwest (Minneapolis and Indianapolis), or perhaps moved to other parts of the world and are now in Annapolis, Demopolis, or Heliopolis.
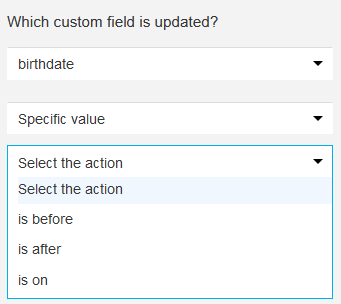
Example 2
If you select a date-based custom field, you can go with one of the three options: is before, is after and is on. Choose the setting that lets you reach the right group of people with a well-timed message or other action.
To finish setting up the condition:
- Select the time settings for when to assume the condition hasn’t been met.
- (Optional) Set the condition to run multiple times.
How do I change custom fields for the condition to work?
There are a few ways you and your contacts can make changes to custom fields:
- through API 3.0
- the contacts’ custom fields can change in another workflow either by assigning a new custom field or by updating an existing one
- you can update custom field values by hand in Search contacts.
- you can update custom fields by adding a specific custom field in contact’s card
- your contacts can change custom fields when they update their contact information using the “change your contact details” link in a newsletter.
- when importing contacts, you can update custom fields for those contacts who were previously added to your Contact list.
The Custom field changed condition doesn’t work for contacts who received a given custom field before a workflow is on, or before they “reach” that element within a workflow.
Can I trigger a workflow based on the custom field my contacts already have?
By default, the Custom field changed condition waits for your contacts to get the specified field to trigger the workflow. So, it only works for contacts who get the custom field value you specify in the Properties tab after the workflow starts.
To trigger the workflow for contacts based on their existing custom field, switch on Include contacts who already meet this condition when the workflow starts toggle.
This option works:
- For start elements only. Custom field changed adds your contacts with the given custom field only at the beginning of your workflow.
- Only once for that element.
To set up the condition:
- Add the element to the workspace.
- Select Properties.
- Select your custom field from the drop-down menu. Once you do it, you have two options:
- Select Any value when it’s only important to you that the value has changed, not what the change is. The condition triggers an action for any changes to the custom field value.
- Select Specific value if you want the condition to trigger an action when only a specific change occurs. When you select this option, you additionally need to Select the action and Enter a value from drop-down list.
- (Optional) Set the condition to run multiple times.
- (Optional) Switch on Include contacts who already meet the condition when the workflow starts. Be sure to do this for start elements only.