How to share an ebook with your contacts?
If you’re looking to send your contacts a freebie to encourage them to sign up for your newsletters, you can do it by attaching the ebook to your landing page. There are two ways in which you can do it:
- By adding the link to the file to the thank you page.
- By creating an autoresponder with a link to your file.
In each of the methods, you need to start by creating a download link for your ebook.
How to create a download link?
To create a download link:
- Go to Profile > Files and images.
- Click Add files.

- Once the file is uploaded, click on the Action menu (vertical ellipsis) and select Copy URL.

Once you have the link to the file, save it somewhere—it will be needed later in the process.
How to attach an ebook to the thank you page?
If you want your contact to get the ebook once they reach the thank you page of your landing page, you can do it by linking the file you’ve uploaded under a button.
To start:
- Go to Tools > Landing pages.
- Click on the name of your landing page, then click on the Edit design button to enter the editor. If you don’t have a page yet, create one.
- Once you’re ready with the main page view, click on the Home button in the top left corner of the editor and proceed to the Thank you page section.

- Click the Add elements menu on the right side and then drag and drop a button block.

- Once the button is placed on the thank you page, click on it to display the menu where you can edit its text, color, shape, and more.
- In the same menu, you can specify where your button should link to.

- Choose External page or website option and prepare the link to your file.
- Paste your link in the URL section.
Now your ebook is attached to your landing page and everyone who gets to the thank you page will be able to download your file by clicking the button.
Legacy landing pages
- Go to Tools > Landing pages > Legacy tab.
- Click on the name of your landing page to enter the editor. If you don’t have a page yet, create one.
- Once you’re ready with the main page view, switch to the “Thank you page” tab.

- Drag and drop a button from the side menu.

- Once the button is placed on the thank you page, double-click on the text and type in what you’d like the button to say.
- From the menu that appeared choose the linking icon.

- Prepare the link to your file.
- Paste your link in the Link URL section and click OK.

How to attach an ebook to the autoresponder?
In this method, the contacts will get your ebook delivered to their email inbox after they sign up to the newsletter.
Creating an autoresponder.
First, you need to create an autoresponder message which will include a link to your file.
- Go to Autoresponders.
- Click Create autoresponder.
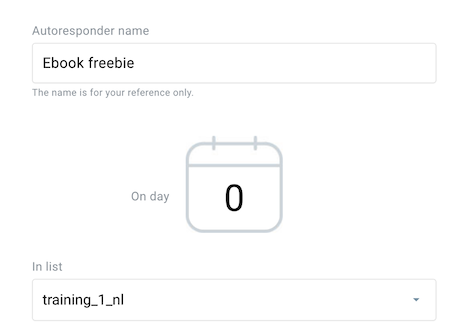
- Provide your autoresponder name.
- In the calendar type in “0” as the cycle day on which the message should be sent.

- Make sure the list of the autoresponder is the same as the list linked to your landing page.
- Select the message to be sent Same time as a sign up time on all days of the week.
- Configure the rest of your message settings.
- Scroll down and click Design message.

- Select your message template and click Use template.
- When you’re in the editor, drag and drop the Button block from Basic blocks.

- Click on the button and on the right menu edit the text it displays.
- Prepare the link to your file.
- In the menu that opens, paste your file link in the URL section.

- Once you are ready with the email, click Next.
- Scroll down and hit Save and publish to set your autoresponder live.
Make sure to enable adding to the autoresponder cycle in your landing page settings. To make sure this option is enabled, you can check out our article that explains the most common reasons why autoresponders are not going out and how to enable them.
Legacy editor
1. Go to Autoresponders.
2. Click Create autoresponder.
3. Provide your autoresponder name.
4. In the calendar type in “0” as the cycle day on which the message should be sent.

5. Make sure the list of the autoresponder is the same as the list linked to your landing page.
6. Select the message to be sent Immediately on all days of the week.
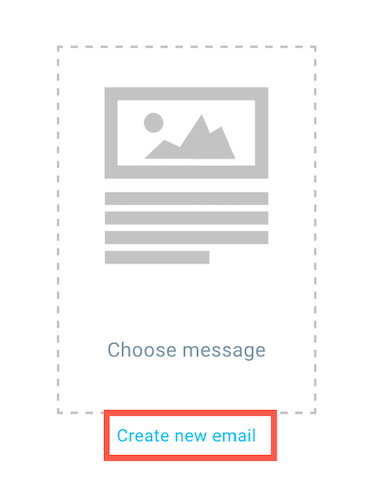
7. Scroll down and click Create new email.
8. Configure your message settings and click Next step.
9. Select your message template and click Next step.
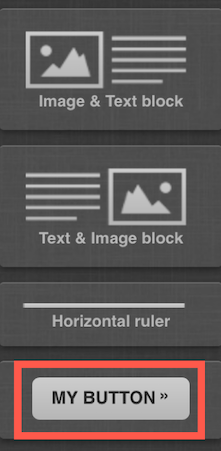
10. When you’re in the editor, drag and drop the My button block from Basic blocks.
11. Click on the button to edit the text it displays.
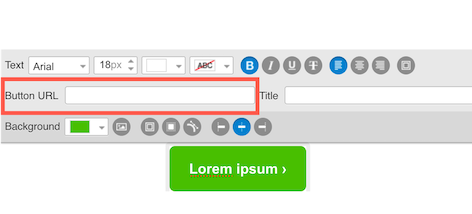
12. Prepare the link to your file.
13. In the menu that opens, paste your file link in the Button URL section.
14. Once you are ready with the email, click Next step.
15. Scroll down and hit Save and publish to set your autoresponder live.


