How does the Message sent condition work? Video
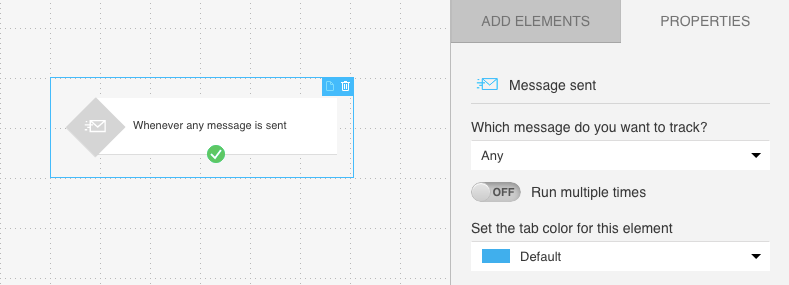
The Message sent condition tracks your sent messages. Use it to target contacts based on the type of messages you send out. Simply decide how broad or how specific the condition needs to be. Message sent works with newsletters, autoresponders, automation messages, and A/B tests. Under Properties, you can choose any message type, a specific message type, or an individual message for the condition.
You can use Message sent only as a start element. The condition has an “if yes” (green) connector. It triggers the workflow for the recipients of the message you’ve selected for the condition. There’s no “if no” (red) connector because no contact on your list can meet this condition if you haven’t sent them a message.
Keep in mind that the condition doesn’t track messages that have gone out before you set up the element. We recommend you schedule your messages to go out after you run the workflow with the Message sent condition.
How do I set it up?
- Go to Automation and select Create workflow to open the workflow creator.
- Select the Message sent element to add it to the workspace.
- Open Properties to set up the condition.
- If you’d like the condition to track any message sent, leave the properties set to Any.
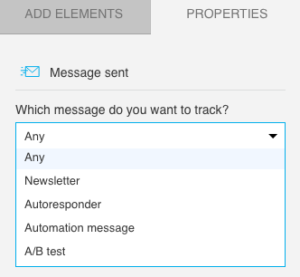
- If you’d like to track a specific message type, choose the type, and select Any from the drop-down list that becomes available.
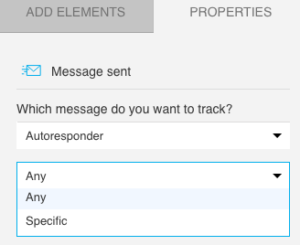
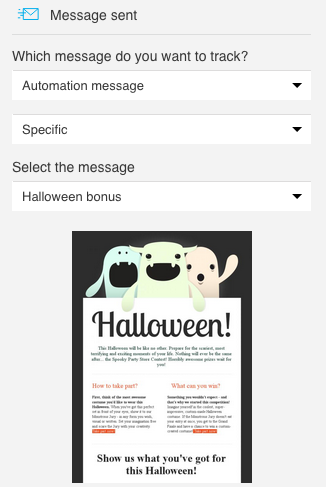
- If you’d like to track an individual message, select the message type. Then, select the Specific option and expand the drop-down list to select the message.
Optionally, you can set the element to run multiple times.
- Add more elements to your workflow.
- Click Save and publish.
How do I schedule messages for the condition to work?
The condition only tracks messages you send out after you set up the element and start your workflow. Keep this in mind when you’re scheduling your messages and workflows. This is especially important to remember if you’d like a particular message to be the trigger.
For autoresponders, remember that the condition triggers your workflow only for those contacts who receive the selected message after you set the workflow to run.
For automation messages, think about how you schedule your workflows. Automation messages can only be sent in another workflow. So, the workflow that uses the Message sent condition needs to start before the workflow that sends the automation message. Alternatively, stagger the workflows in such a way that the workflow with Message sent is up and running before your contacts reach the Send message action in another workflow.
For newsletters and A/B tests, think about how you schedule them. The workflow with Message sent needs to be up and running before your messages go out. So, we recommend the following approach:
Working with scheduled newsletters (newsletters you’ve never set out before)
This is a two-step approach: you create a new message and then build a new workflow.
In the message creator
- Go to Email marketing.
- Follow the steps in the newsletter creator.
- On the Message summary page, select Schedule. Set the delivery time and day to give yourself time to build and publish your workflow. That way you can make sure the message goes out after your workflow starts running.
In the workflow creator
Follow the steps described in the element set-up section.
When the scheduled message goes out, the workflow is triggered.
Reusing newsletters (newsletters you’ve previously sent out)
This is a multi-step approach. It requires switching between the workflow and message creators.
In the workflow creator
- Add Message sent to the workspace.
- Set the element properties as described above.
- Add more elements to build your workflow.
- Click Save and exit.
- You now need to go to Email Marketing.
On the Manage newsletters page
- Find the message you selected for your workflow.
- Expand the Actions menu and select Re-use. This opens the message creator.
- Go to the Message summary. Next, click Schedule to set new delivery time.
- Once this step is complete, go to the Automation.
On the Manage automation workflows page
- Find the workflow you’ve saved.
- Expand the Actions menu and choose Edit.
- Go to Properties for the Message sent.
- From the Select a message list, select the top-most message. It’s the message you’ve just scheduled and it has the same name as the message you originally selected for the condition.
- Click Save and publish.
When the message goes out, it triggers your workflow.


