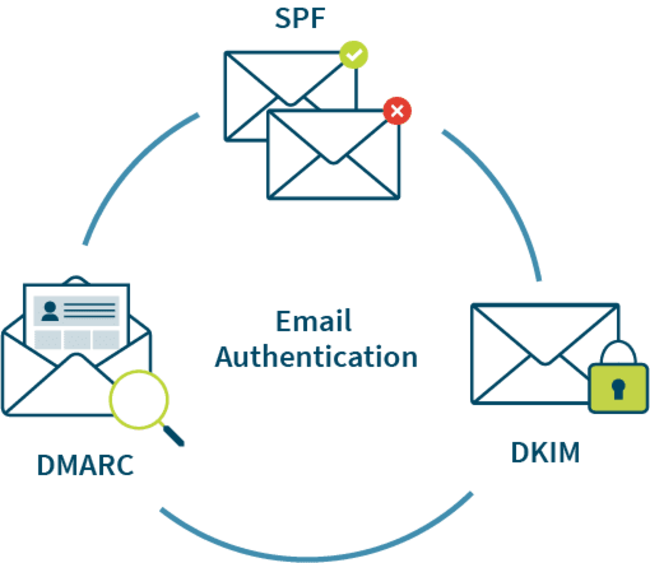
Email authentication proves your messages genuinely come from your domain, which keeps them out of spam and protects your brand from spoofing. There are four protocols to know: DKIM (a digital signature ‘ required), DMARC (enforces rules and reports failures – required), SPF (lists who can send for your domain ‘ recommended), and BIMI (displays your logo in the inbox ‘ optional). Since 2024, Gmail, Yahoo, and Microsoft require bulk senders to use an authenticated custom domain, so setting these up is no longer optional for serious senders.
This guide explains what each protocol does and walks you through authenticating your domain step by step, including how to verify it’s working.
Editor’s note: In February 2024, Gmail and Yahoo implemented changes to their email authentication policies. In May 2025, Microsoft rolled out similar changes.
Bulk senders now must use custom domains (e.g., email@company.com) rather than free email domains (e.g., email@gmail.com) when sending emails. These domains also need to be authenticated using DKIM, DMARC, and (optionally) SPF.
Don’t have your own domain? No worries! When you upgrade to a GetResponse annual plan, we’ll gift you a free domain at no additional cost.
The benefits of using a professional email address for email marketing
If you use a free email address to send your email marketing campaigns, you are setting yourself up for failure.
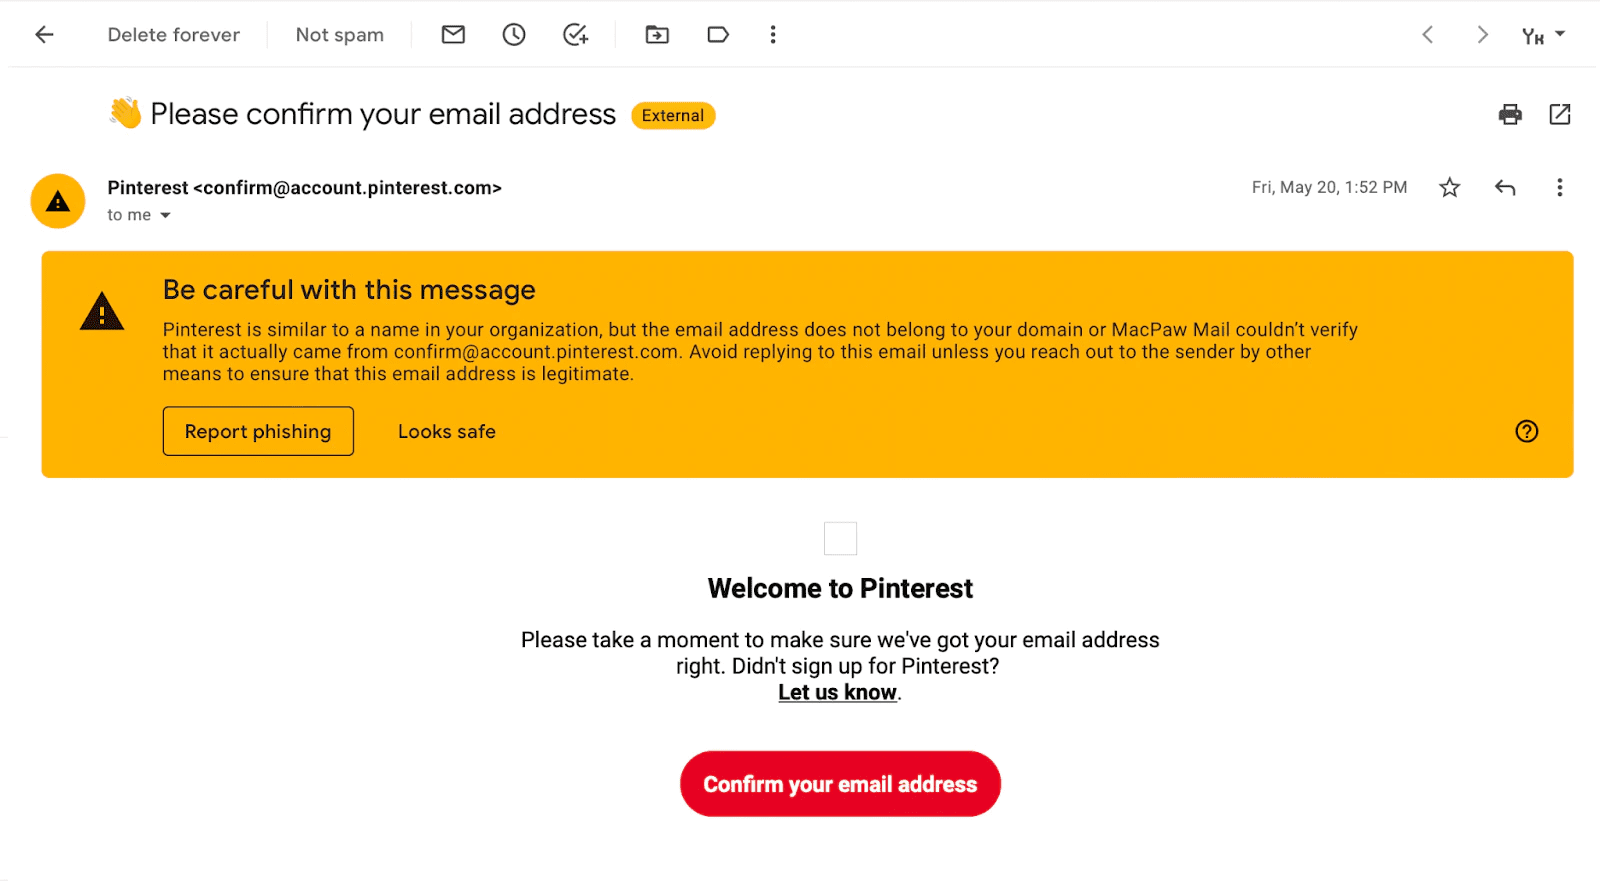
When sending messages from third-party senders like GetResponse, using a Yahoo or AOL address will lead to your messages being rejected. Similarly, using a Gmail address may cause your messages to land in the spam folder or be rejected outright.
Given that many people rely on these mailbox providers, employing a free, non-professional email address essentially undermines all the hard work you invested in building your email list.
Professional vs. free email address for marketing
| Factor | Free address (Gmail/Yahoo/AOL) | Professional/custom domain |
|---|---|---|
| Deliverability | Rejected by Yahoo/AOL; may be spam-filtered or rejected by Gmail | Higher deliverability, fewer spam issues |
| Trust & credibility | Often linked to spam/phishing | Looks professional and legitimate |
| Branding | Inconsistent | Consistent across emails, website, social |
| Authentication | Harder to manage | Easier to set up DKIM, SPF, DMARC, BIMI |
So there are many advantages to using a custom email address rather than a generic one.

Better trust and credibility
Using a branded email address makes your messages look more professional. Potential clients and customers are more likely to trust emails from a company domain instead of free email providers, which are often linked to spam and phishing attempts.
A professional email address helps make your brand appear more legitimate and reliable, increasing the chances that your emails will be opened and read.
Higher deliverability and fewer spam issues
Email providers use smart algorithms to filter and sort incoming messages. Sending messages from freemail addresses will cause rejection when sending to Yahoo and Gmail addresses.
Consistent branding and professionalism
A professional email address helps keep your brand consistent across all communication channels. When customers see the same domain in your emails, website, and social media, it strengthens your brand identity and helps build brand recognition.
A consistent and professional brand image can lead to more customer loyalty and improved marketing results.
Simpler email authentication and security management
Using a professional email address also makes it easier to set up and manage email authentication protocols like DKIM, SPF, DMARC, and BIMI, methods that help prevent email spoofing and phishing attacks, further boosting your brand’s credibility and email deliverability.
The significance of email authentication in ensuring deliverability
As a former email marketer, I understand the challenges you face in getting your carefully crafted messages into the inboxes of your target audience. There’s nothing more frustrating than spending hours on a well-thought-out campaign, only for it to end up in the dreaded spam folder. I’ve been there, and I’ve learned that one of the critical factors in ensuring deliverability is email authentication.
The email authentication system is a set of techniques used to verify that an email is genuinely sent by the person or organization it claims to be from. It helps prevent spam, phishing attempts, and other malicious activities that could damage your reputation or the trust recipients have in your emails.
When your emails are authenticated, recipients can be confident that the message is coming from a legitimate source, which increases the likelihood of your emails being opened and read.
As of the 2024–2025 rollouts, Gmail, Yahoo, and Microsoft no longer accept messages from senders without any DMARC policy on the domain. Additionally, these mailbox providers require proper SPF and DKIM authentication as well, so email authentication has become more important than ever.
What are the available email authentication protocols?
Several methods exist that focus on different aspects of email messages. Here you have the main four email authentication protocols expained:
| Protocol | What it does | Status |
|---|---|---|
| DKIM (DomainKeys Identified Mail) | A digital signature using public/private keys to verify the email wasn’t tampered with | 🚨 Required to avoid deliverability issues |
| DMARC (Domain-based Message Authentication, Reporting & Conformance) | Enforces rules based on DKIM/SPF; tells servers how to handle failures and sends reports | 🚨 Required to avoid deliverability issues |
| SPF (Sender Policy Framework) | A “guest list” of IPs/servers authorized to send for your domain | ⚠️ Recommended, but not mandatory |
| BIMI (Brand Indicators for Message Identification) | Displays your brand logo next to emails; requires DKIM + DMARC | 💡 Optional |
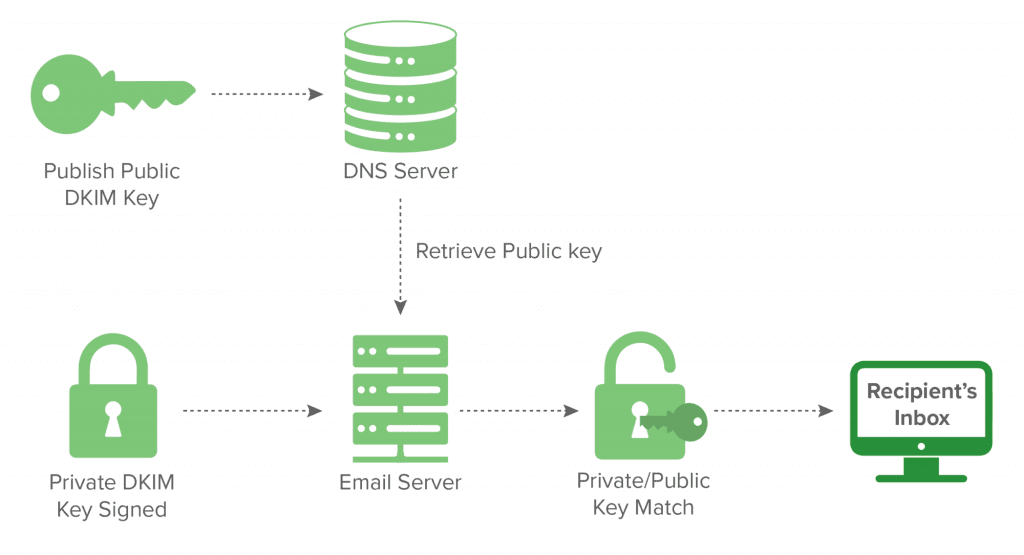
DKIM (DomainKeys Identified Mail)
🚨 REQUIRED TO AVOID DELIVERABILITY ISSUES
Think of DKIM as a digital signature for your emails. It uses a pair of keys (public and private) to sign and verify your emails. The private key is used to sign the outgoing emails, while the public key is published in your domain’s DNS records.
When a recipient’s email server receives your email, it checks the signature using the public key to confirm that the email is legitimate and hasn’t been tampered with during transit.
Sometimes, emails may display as “From: [xyz@getresponse-mail.com] on behalf of [your_from_email]” or “From: John Smith [your_from_email] via getresponse.com” due to the way certain email clients and applications, like Gmail and Outlook, interpret the sender information.
This can occur regardless of the ‘From’ address settings you choose for your messages. To avoid such branding issues in the email header, it’s essential to set up a DKIM signature for the domain used in the from-field.
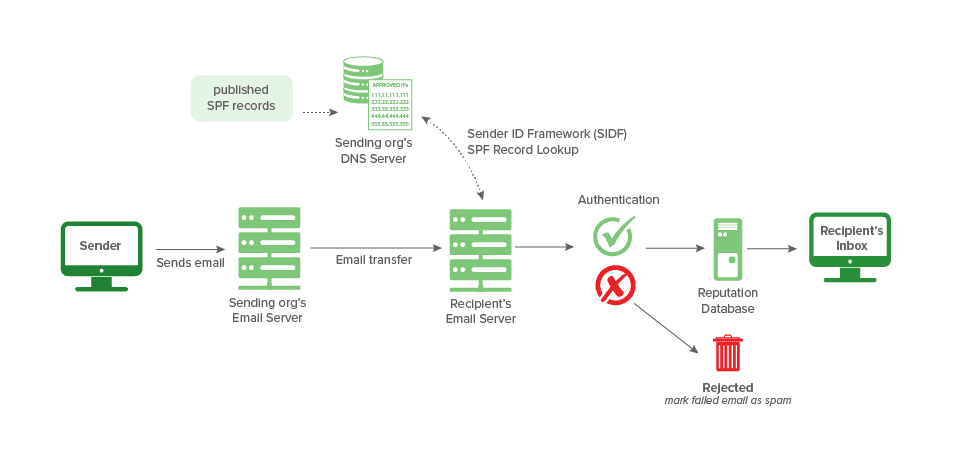
SPF (Sender Policy Framework)
⚠️ RECOMMENDED, BUT NOT MANDATORY
SPF is like a guest list for your email party. It’s a way to tell email servers who is allowed to send emails on behalf of your domain. When you set up an SPF record, you list the IP addresses and email servers authorized to send mail for your domain.
When a recipient’s email server receives your email, it checks your domain’s SPF record to see if the sending server is on the “guest list.” If it’s authorized, the email is more likely to be delivered to the recipient’s inbox.
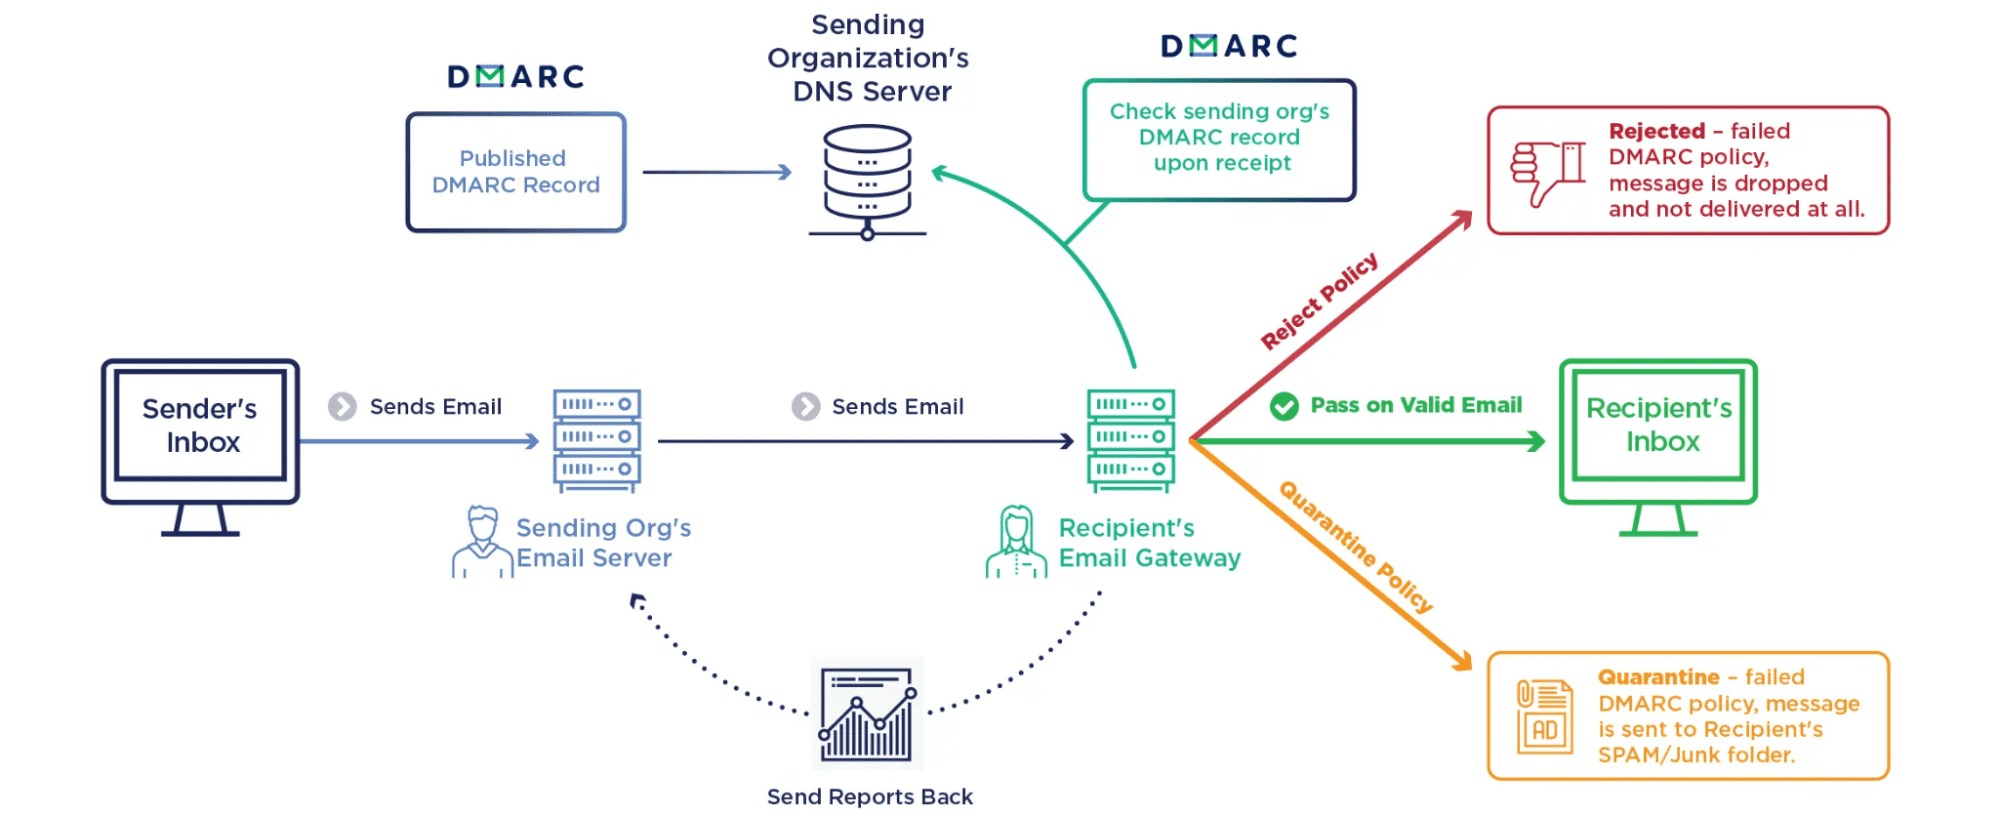
DMARC (Domain-based Message Authentication, Reporting, and Conformance)
🚨 REQUIRED TO AVOID DELIVERABILITY ISSUES
DMARC is like a security guard that enforces the rules based on DKIM and SPF. It allows you to specify how recipient email servers should handle unauthenticated emails (those that fail DKIM and SPF checks). With DMARC, you can choose to have unauthenticated emails rejected or quarantined (sent to the spam folder).
DMARC also enables you to receive reports on authentication failures, helping you identify potential issues and improve your email deliverability.
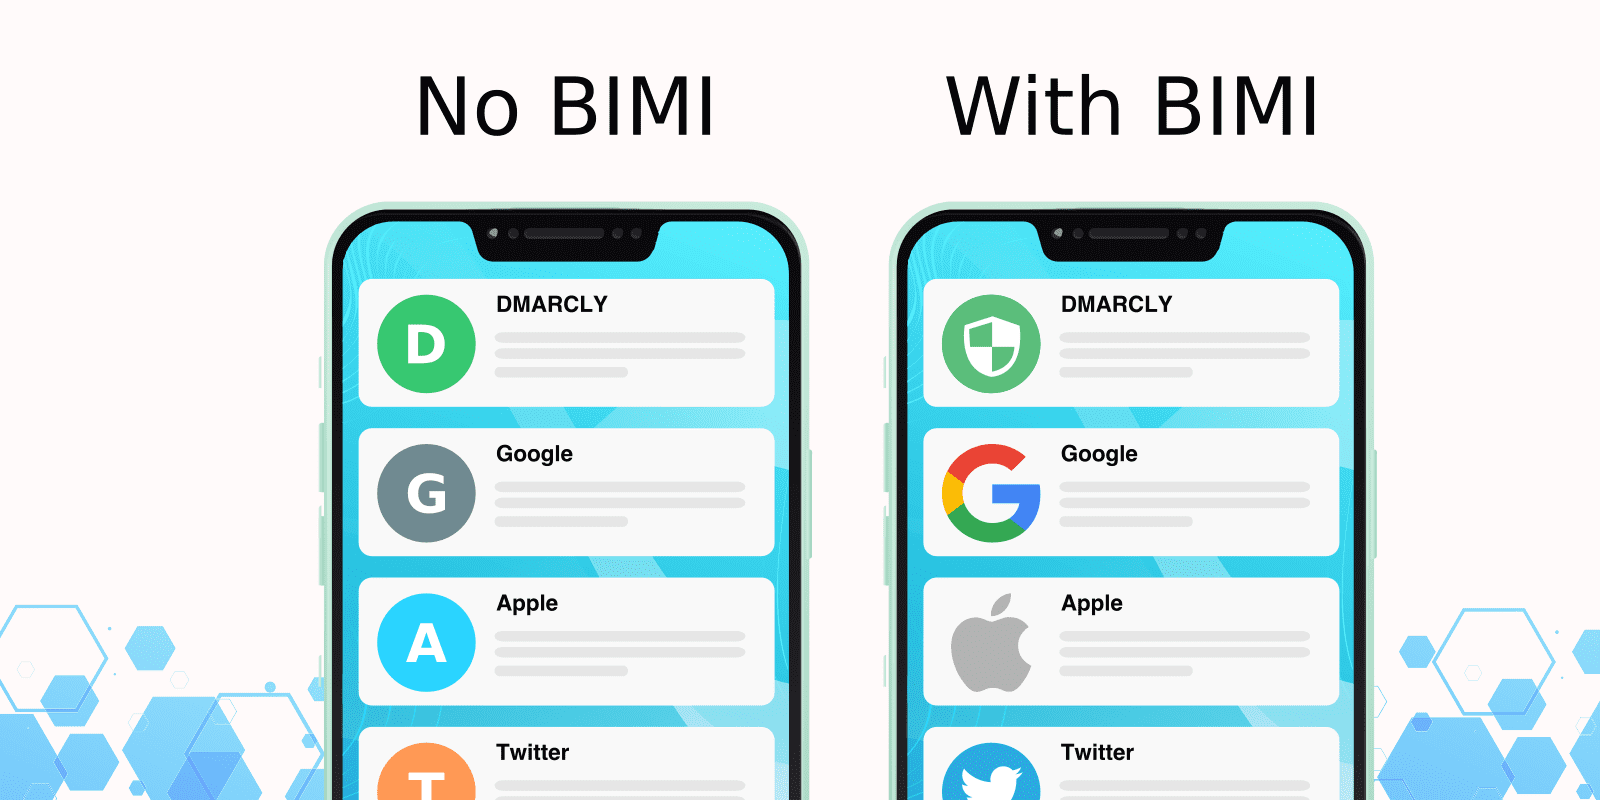
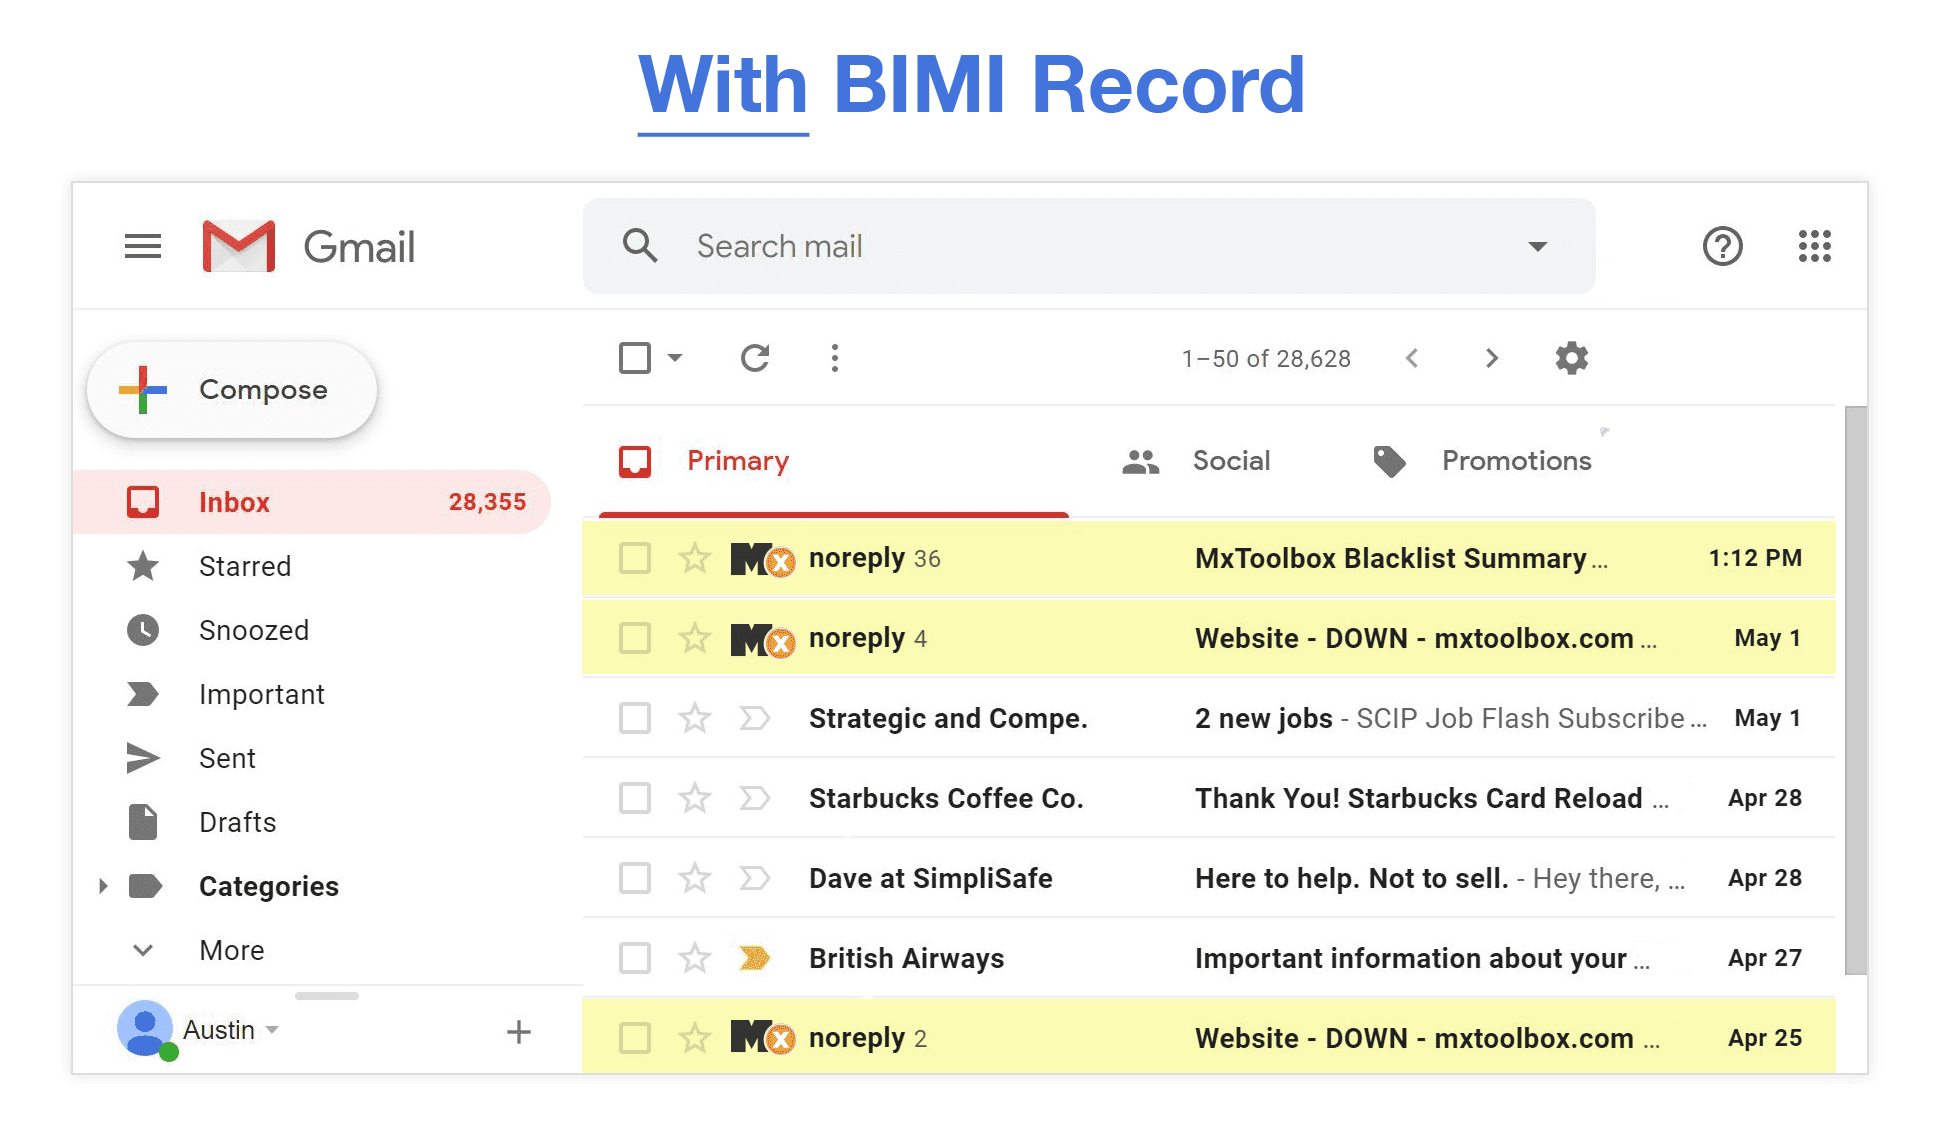
BIMI (Brand Indicators for Message Identification)
💡 OPTIONAL
BIMI is like a digital business card for your emails. It allows you to display your brand’s logo next to your emails in the recipient’s inbox, making your messages more recognizable and visually appealing.
To use BIMI, you need to have both DKIM and DMARC properly set up. You’ll also need to create a BIMI record in your domain’s DNS, which includes a link to your brand’s logo. This way, when a recipient’s email server receives your email, it fetches the logo from the BIMI record and displays it alongside your email in the recipient’s inbox.
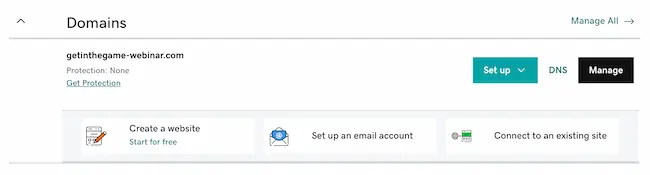
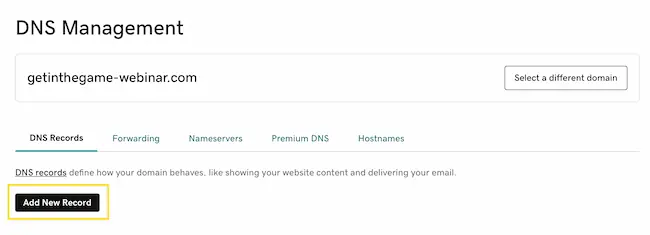
How to authenticate your sender emails in GetResponse
How-To table:
| Step | Action | What to do in practice |
|---|---|---|
| 1 | Verify your email address | In GetResponse: Account settings → Emails and domains → Add email → click the verification link |
| 2 | Authenticate your domain with DKIM | Copy the TXT record from GetResponse; add it in your registrar’s DNS; wait up to 48 hours to propagate |
| 3 | Configure DMARC | Add a _dmarc TXT record; start with p=none to receive reports, then tighten to quarantine/reject |
| 4 | Configure SPF | Add/edit a TXT record like v=spf1 mx a include:_spf.getresponse.com -all |
| 5 | (Optional) Configure BIMI | After DKIM/SPF/DMARC, add a default._bimi TXT record pointing to an SVG logo (VMC for Gmail) |
| 6 | Verify your authentication | Send a test email, check headers for DKIM/SPF/DMARC “pass,” or use MXToolbox / Mail Tester |
When using GetResponse as your email marketing platform, it’s crucial to authenticate your sender emails to ensure optimal deliverability and protect your domain reputation. In this article, we’ll discuss the steps to verify your email address and authenticate your domain with DKIM. We’ll also cover some common issues you might encounter during this process.
Don’t have a domain yet? Here’s how you can claim your free domain with GetResponse 12-month plans.
Step 1. Verify your email address
Before you can start sending emails from your GetResponse account, you’ll need to verify your email address. This is an essential step to confirm that you own the email address and have the authority to send emails on behalf of your domain. Here’s how to verify your email address in GetResponse:
1) Log in to your GetResponse account.
2) Navigate to Account settings in the top right corner and click Emails and domains
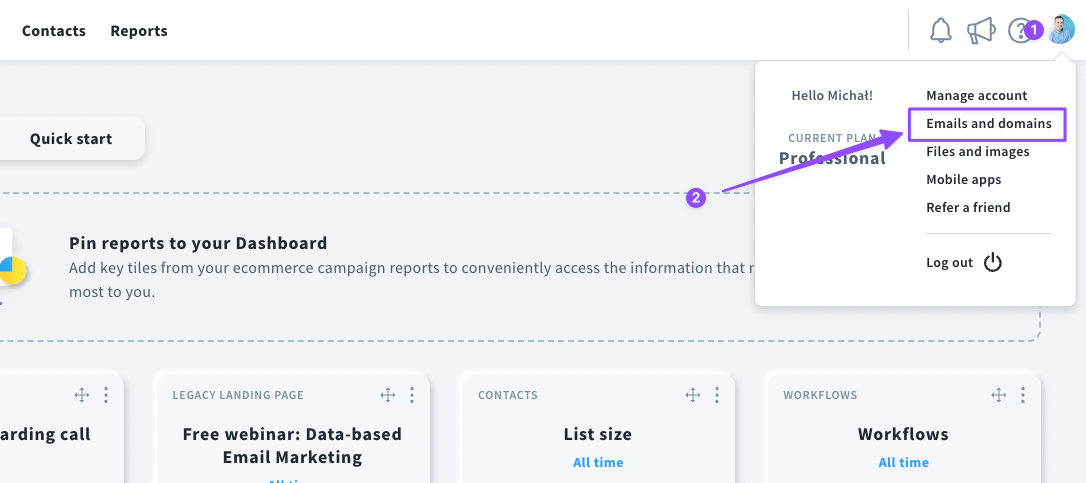
3) Click “Add email.”
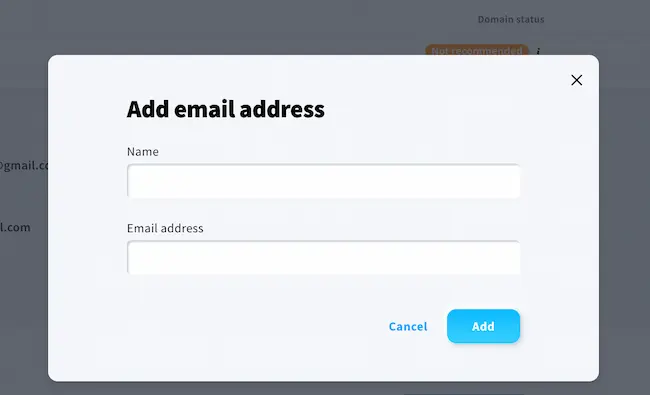
4) Enter the email address you want to use as your sender email.
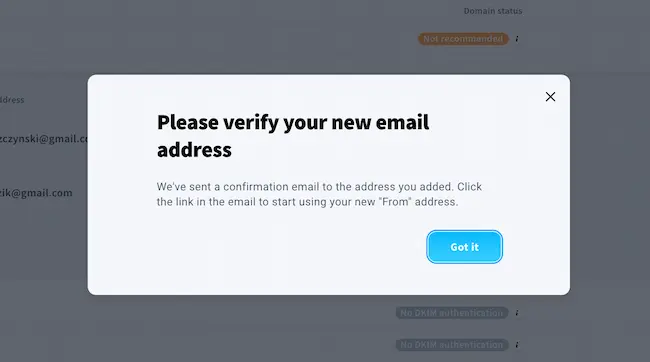
5) Check your inbox for an email from GetResponse containing a verification link. Click the link to complete the verification process.
Step 2. Authenticate your domain with DKIM
Authenticating your domain with DKIM in GetResponse involves adding a DKIM record to your domain’s DNS settings. Follow these steps to authenticate your domain with DKIM:
1) After you have verified your email address, select the domain you want to verify from the list and click Authenticate
2) GetResponse will provide you with a DKIM record in the form of a TXT record. You can see it in the image below starting with “k=rsa”.
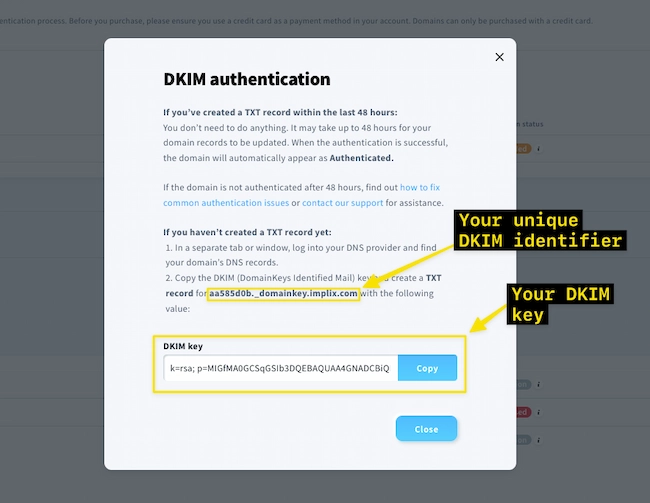
Copy this record.
3) Log in to your domain registrar’s website and navigate to your domain’s DNS settings.
Here’s what this looks like for GoDaddy:
This process may vary depending on your domain provider, here are tutorials for the main providers:
4) Create a new TXT record
5) In the “Name” or “Host” field, enter your DKIM identifier provided by GetResponse, this should look something like this: dbaa517f._domainkey.example.com
6) In the value field, paste the DKIM key value from step 2.
7) Set the TTL (Time to Live) value. TTL determines how long the DNS record should be cached by the DNS resolvers (e.g., 3600 seconds, which is equivalent to 1 hour). If you’re unsure, you can use the default TTL provided by your domain registrar.

8) Save the TXT record and wait for the DNS changes to propagate (this can take up to 48 hours).
Once the DNS changes have propagated, GetResponse will automatically detect the DKIM record and authenticate your domain.

Common issues
During the email authentication process, you might encounter some common issues, such as:
1) Email verification link not received: If you don’t receive the email verification link from GetResponse, check your spam or junk folder. If it’s not there, try adding GetResponse’s email address to your contacts and request a new verification email.
2) DKIM record not detected: If GetResponse doesn’t detect your DKIM record after 48 hours, double-check that you entered the correct DKIM record in your domain’s DNS settings. Additionally, ensure that there are no typos or formatting errors in the record.
3) Conflicting SPF records: If you’ve already set up SPF records for other email services, you may need to modify your existing SPF record to include GetResponse’s SPF entry. To do this, add “include:_spf.getresponse.com” to your existing SPF record without creating a new one.
Step 3. Configure DMARC for your sender email
Now that you have set up your SPF and DKIM records, it’s time to configure DMARC. As I mentioned before, DMARC is an email authentication protocol that helps protect your domain from email spoofing and phishing attacks. It does this by instructing the recipient’s email server how to handle messages that fail SPF and/or DKIM checks.
Anatomy of a DMARC record
A simple DMARC record without a specific policy would look like this:
v=DMARC1; p=none; rua=mailto:reports@example.com
Let’s break it down:
v=DMARC1 – This is the DMARC version identifier. It indicates that this is a DMARC record using DMARC version 1.
p=none – The “p” tag specifies the policy to apply to emails that fail DMARC checks. “none” means that no action should be taken, but you will receive reports on failed messages. In this simple example, no other policy is specified, such as “quarantine” or “reject.”
rua=mailto:reports@example.com – The “rua” tag provides the email address where you want to receive DMARC aggregate reports, which give you an overview of your domain’s email authentication status. Naturally, you will have to change the email address to your own.
This simple DMARC record can be used as an initial step when implementing DMARC for your domain.
By setting the policy to “none,” you can start receiving reports about your email authentication status without affecting the delivery of your emails. These reports will provide valuable insights into whether your SPF and DKIM configurations are working correctly and help you identify potential issues or unauthorized sending sources.
Once you’re confident that your SPF and DKIM records are set up correctly and you understand the impact of applying a stricter policy, you can update the DMARC record to use “quarantine” or “reject” policies to provide stronger protection against email spoofing and phishing attacks.
Adding a DMARC record to your DNS settings
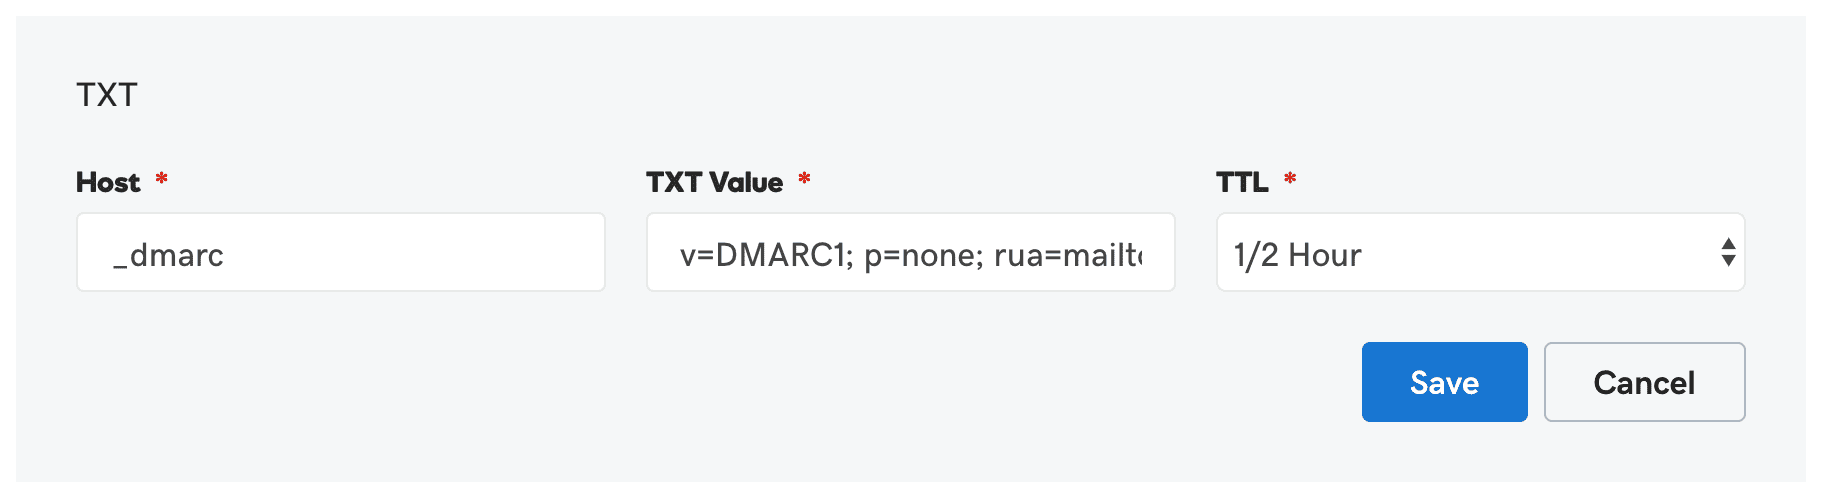
1) Log in to your domain registrar’s website and navigate to the DNS settings then create a new record.
2) Select “TXT” as the record type from the available options.
3) In the “Name” or “Host” field, enter “_dmarc” followed by your domain name (e.g., “_dmarc.example.com“). Some registrars may require you to enter “_dmarc” as the name.
4) In the “Value” or “Text” field, enter your DMARC record.
5) Set the TTL (Time to Live) value. TTL determines how long the DNS record should be cached by the DNS resolvers (e.g., 3600 seconds, which is equivalent to 1 hour). If you’re unsure, you can use the default TTL provided by your domain registrar.
6) Save your DMARC record.
Step 4. Configure SPF for your sender email
Now that you have authenticated your sender email with DKIM, it’s time to set up your SPF records. As I’ve mentioned earlier, SPF helps verify the sender’s identity by checking whether the sending mail servers are authorized to send emails on behalf of your domain.
Anatomy of an SPF record
Suppose you are using GetResponse and Gmail to send emails from your domain. Your SPF record might look like this:
v=spf1 mx a include:_spf.getresponse.com -all
But how does it work? Let’s break it down!
v=spf1 – This is the SPF version identifier. It indicates that this is an SPF record using SPF version 1. In most cases, you won’t have to change that.
mx – This mechanism specifies that any host listed in the domain’s MX (Mail Exchange) records is permitted to send email for the domain.
a – This mechanism specifies that the domain’s A (Address) record IP addresses are allowed to send email.
include:_spf.getresponse.com – The “include” mechanism tells the recipient’s email server to also check the SPF record of GetResponse. This is necessary because GetResponse is an authorized sender for your domain.
“_spf.getresponse.com” is the SPF record of GetResponse.
-all – This is the fallback mechanism for the SPF record. It indicates how the recipient’s email server should handle emails that don’t match the authorized senders (GetResponse and Gmail, in this case).
The “-all” symbol means hard fail, meaning the email server should reject the email.
Other options include “~all” (soft fail, accept but mark as potentially suspicious if the email doesn’t come from authorized senders) and “?all” (neutral, no policy).
Obviously, this is just an example. You will have to modify the record to include all email servers you are using to send emails from your domain.
Adding an SPF record to your DNS settings
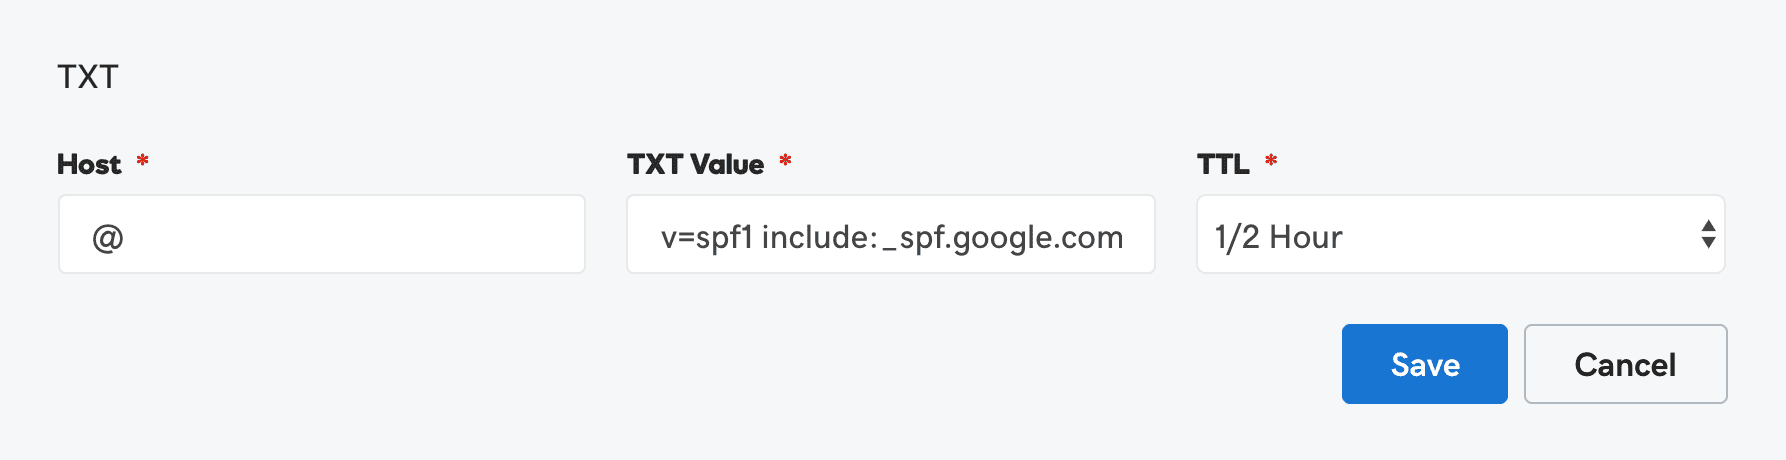
1) Just like before, you will need to log in to your domain registrar’s website and navigate to DNS settings. If an SPF record has already been set up, you will need to edit it, otherwise, create a new record.
2) Select “TXT” as the record type from the available options.
3) In the “Name” or “Host” field, enter your domain name (e.g., “example.com”). Some registrars may require you to enter “@” instead of your domain name.
4) In the “Value” or “Text” field, enter your SPF record.
5) Set the TTL (Time to Live) value. TTL determines how long the DNS record should be cached by the DNS resolvers (e.g., 3600 seconds, which is equivalent to 1 hour). If you’re unsure, you can use the default TTL provided by your domain registrar.
6) Save your SPF record.
Step 5. (Optional) Configure BIMI for your sender email
BIMI is a valuable addition to your email strategy, but it’s not as crucial as DKIM, SPF, and DMARC when it comes to email security and authentication methods. Before implementing BIMI, you should first ensure that your domain is protected with DKIM, SPF, and DMARC records.
Once you’ve protected your email domain using SPF, DKIM, and DMARC, you can take your branding to the next level by implementing BIMI. BIMI is an email standard that lets you showcase your brand’s logo right next to your emails, making your messages stand out in your recipients’ inboxes.
Please note that BIMI is not a replacement for DKIM, SPF, and DMARC, but rather a complementary technology that works together with them to improve your overall email strategy.
Anatomy of a BIMI record
If you want to set up a BIMI record for your domain, it will look something like this:
v=BIMI1; l=https://example.com/logo.svg; a=https://example.com/authority
It consists of two parts:
l=https://example.com/logo.svg – The “l” tag specifies the URL where your brand’s logo is hosted. The logo must be in SVG format, and it’s recommended to use an HTTPS URL for secure hosting.
a=https://example.com/authority – The “a” tag is optional and specifies the URL of a Verified Mark Certificate (VMC) authority. This tag is required if you want to display your logo in Gmail, as it currently requires a VMC. VMC certificates can be purchased from Certificate Authorities, such as DigiCert, Entrust and GlobalSign.
Adding a BIMI record to your DNS settings
1) Ensure that you have a DMARC record with a “quarantine” or “reject” policy in place, as BIMI relies on DMARC for email authentication.
2) Create an SVG version of your brand’s logo and host it on a secure web server (using HTTPS).
3) Log in to your domain registrar’s website and navigate to the DNS settings.
4) Create a new TXT record with the hostname “default._bimi” followed by your domain name (e.g., “default._bimi.example.com“).
5) In the “Value” or “Text” field enter your BIMI record.
6) Set the TTL (Time to Live) value. If you’re unsure, you can use the default TTL provided by your domain registrar.
7) Save your BIMI record.
Once you have completed these steps, email providers that support BIMI, such as Yahoo Mail and Gmail (with VMC), will display your brand’s logo next to your emails.
Step 6. Verify your email authentication
After setting up DKIM, SPF, and DMARC records for your domain, it’s essential to ensure that your email is authenticated correctly. Proper email authentication not only helps protect your domain from spoofing and phishing attacks but also improves email deliverability and your brand’s reputation. In this section, we’ll walk you through the steps to check if your email is authenticated correctly using these protocols.
1. Send a test email
To begin the verification process, send a test email from your domain to an email address you have access to, preferably with a different email provider (e.g., Gmail, Yahoo, or Outlook). This test email will help you verify if your email authentication is working as expected.
2. Check the email headers
Email headers contain essential information about the email, including the authentication results for DKIM, SPF, and DMARC. To access the email headers:
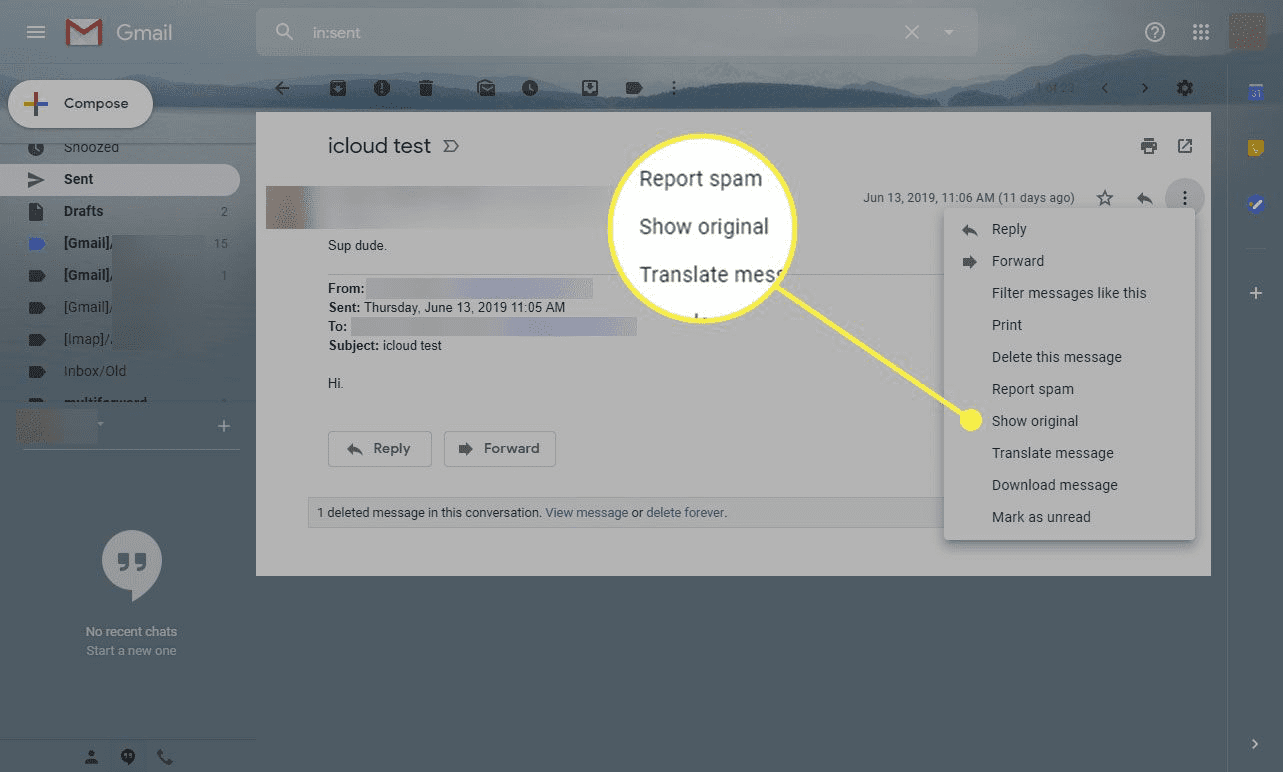
- For Gmail: Open the email, click the three vertical dots next to the reply button, and select “Show original.”
- For Yahoo Mail: Open the email, click the “More” button (three horizontal dots), and select “View Raw Message.”
- For Outlook.com: Open the email, click the three horizontal dots next to the “Reply all” button, and select “View message source.”
3. Analyze the authentication results
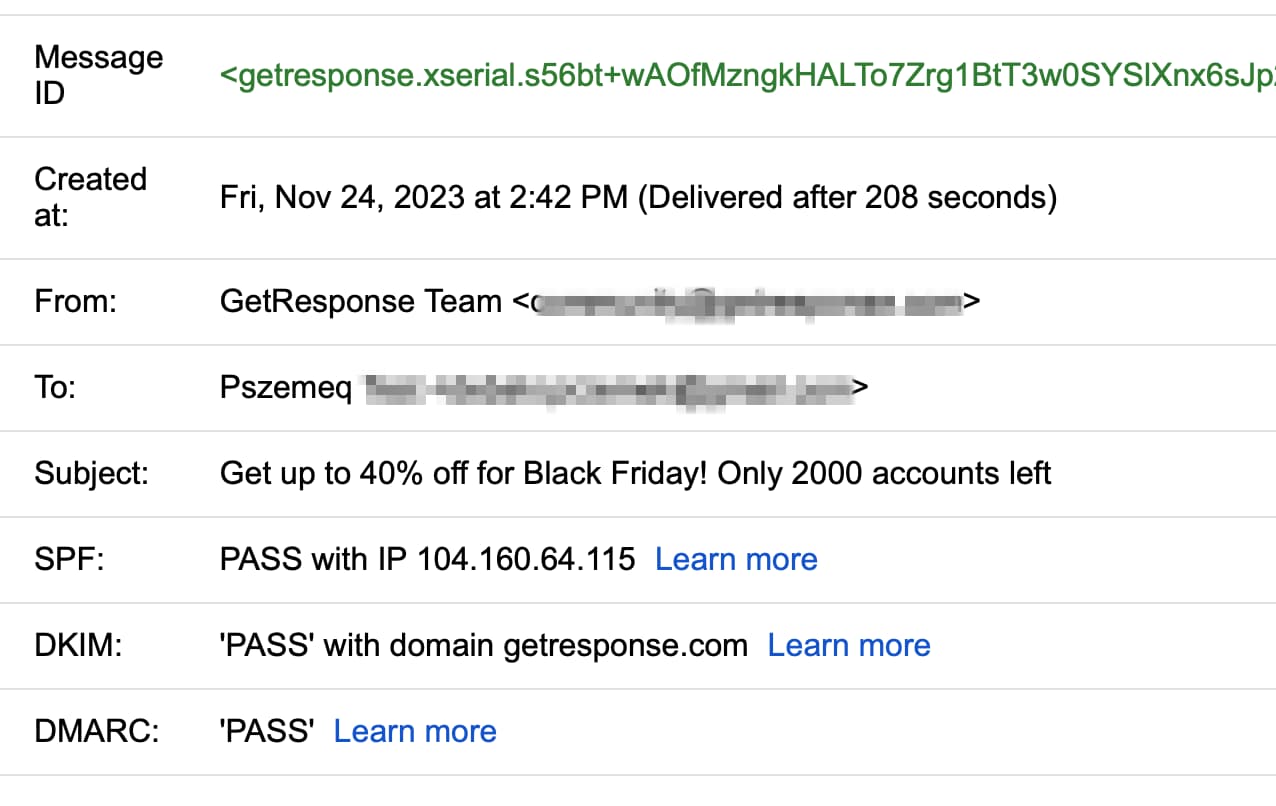
In the email headers, look for the following sections:
- DKIM: Search for “DKIM-Signature” or “Authentication-Results” containing “dkim.” You should see a result indicating “pass” or “OK” if the DKIM authentication is successful.
- SPF: Search for “Received-SPF” or “Authentication-Results” containing “spf.” A successful SPF authentication will show a result like “pass” or “OK.”
- DMARC: Search for “Authentication-Results” containing “dmarc” or “DMARC-Filter.” A successful DMARC authentication will display a result such as “pass” or “OK.”
If you see “pass” or “OK” for DKIM, SPF, and DMARC, your email is authenticated correctly. If any of these protocols show “fail” or an error, you will need to revisit your DNS settings and ensure your records are set up correctly.
4. Use online email authentication testing tools
Several online tools can help you verify your email authentication, such as:
MXToolbox: Offers tools to check your DKIM, SPF, and DMARC records, as well as analyze email headers.
Mail Tester: Mail Tester is a user-friendly tool that allows you to check your email’s spam score and assess the configuration of DKIM, SPF, and DMARC. To use Mail Tester, send a test email to the unique email address provided on their website, and you’ll receive a comprehensive report detailing the results.
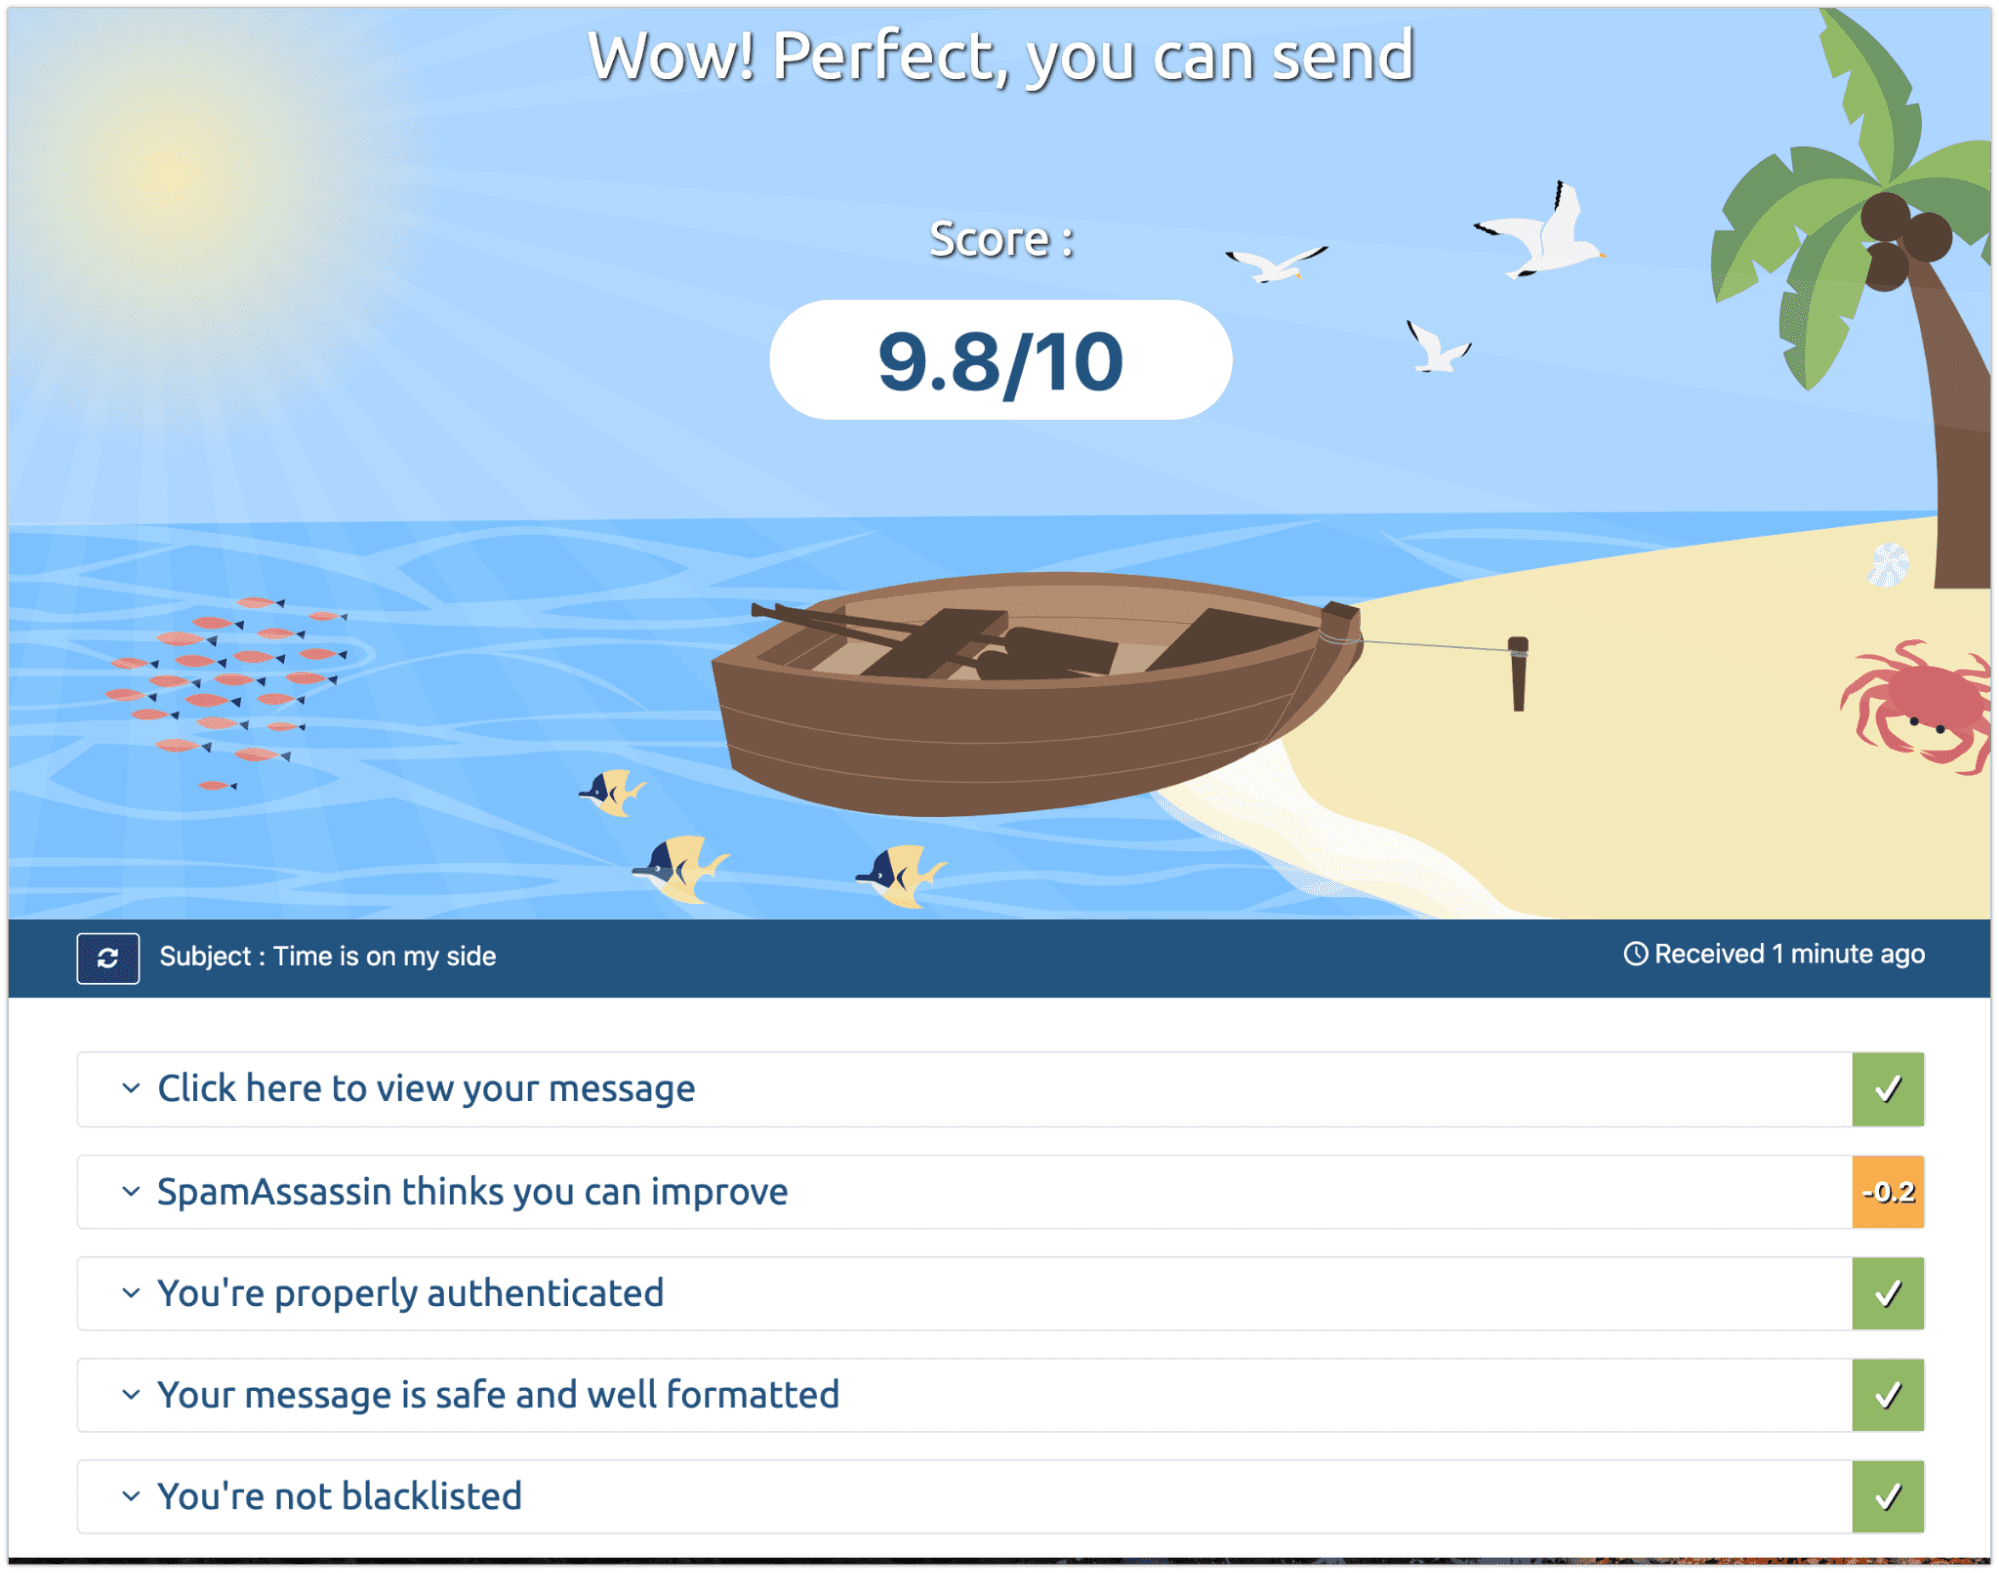
DMARC Analyzer: DMARC Analyzer offers a suite of tools to help you verify and monitor your email authentication setup. They provide a DMARC record checker, SPF record checker, and DKIM record checker, as well as options for monitoring and analyzing your DMARC data.
PowerDMARC: it offers a robust solution for email authentication. Key features include simplified DMARC record creation and management, detailed reporting and analytics on email deliverability and authentication, and real-time monitoring of DMARC performance. With PowerDMARC, you have a centralized platform for managing and monitoring DMARC, enhancing email security beyond basic verification.
Final words
And there you have it! We’ve covered the essentials of email authentication. I hope you now understand the importance of using a professional email address and setting up authentication protocols.
By leveraging email marketing platforms like GetResponse, you’re well on your way to improving your email deliverability, safeguarding your domain reputation, and enhancing your brand’s visibility in your recipients’ inboxes.
But remember, email authentication is an ongoing journey. Make sure you stay informed about best practices, keep your authentication records up-to-date, and monitor your email deliverability to maintain top-notch email security and performance. By dedicating time and effort to these aspects of your email marketing, I’m confident that you’ll be able to build strong connections with your subscribers and achieve great results for your business.
Want to learn more about email authentication? Check out our recent webinar with our in-house deliverability experts that explains this topic in detail:
Email authentication FAQs
What is email authentication?
Email authentication is a set of techniques used to verify that an email genuinely comes from the person or organization it claims to be from. It helps prevent spam, phishing, and other malicious activity, and increases the likelihood that your emails are opened and read.
What’s the difference between SPF, DKIM, DMARC, and BIMI?
DKIM is a digital signature that verifies an email wasn’t tampered with (required). DMARC enforces rules based on DKIM and SPF and reports failures (required). SPF is a list of servers authorized to send for your domain (recommended). BIMI displays your brand logo next to emails and requires DKIM and DMARC (optional).
Which authentication protocols are required?
Gmail, Yahoo, and Microsoft no longer accept messages from senders without a DMARC policy and also require proper SPF and DKIM. In the article’s terms, DKIM and DMARC are required, SPF is recommended, and BIMI is optional.
Why shouldn’t I use a free email address for email marketing?
Sending from a Yahoo or AOL address through a third-party sender leads to rejected messages, and a Gmail address may be spam-filtered or rejected. A custom domain improves deliverability, trust, branding consistency, and makes authentication easier to manage.
How long does email authentication take to work?
After adding a DNS record such as DKIM, changes can take up to 48 hours to propagate before GetResponse automatically detects and authenticates your domain.
How do I check if my email is authenticated?
Send a test email to an address on a different provider, open the email headers (e.g., “Show original” in Gmail), and look for “pass” or “OK” next to DKIM, SPF, and DMARC. You can also use tools like MXToolbox, Mail Tester, DMARC Analyzer, or PowerDMARC.
What is BIMI and do I need it?
BIMI lets you display your brand’s logo next to your emails in the inbox. It’s optional and complementary — not a replacement for DKIM, SPF, and DMARC — and requires those to be set up first, plus a DMARC quarantine or reject policy and (for Gmail) a Verified Mark Certificate.
