How to synchronize contacts between GetResponse and Microsoft Dynamics 365? MAX Video
The integration with Microsoft Dynamics is being gradually phased out.
You can easily integrate your GetResponse account with Microsoft Dynamics 365. The integration will allow you to synchronize contacts between the two platforms, associate their marketing activities and launch email marketing campaigns without leaving your CRM.
The integration allows you to:
- Sync contacts between the two platforms, along with their activities and marketing metrics attributes
- Send your email campaigns straight from your CRM platform
- Analyze campaign results and inform your sales and marketing planning
We support the following versions of Microsoft Dynamics 365: v8.2, v9.0, v9.1, v9.2.
Organizational roles
GetResponse Connector Administrator
The integration administrator who is able to:
– Create edit, delete, assign and share their CRM contact records for the entire organization
– Create, read, append, append-to, assign and share marketing list records for the entire organization as well as edit and delete their records of marketing lists
– Create, assign and share their campaign records, and read, append-to the campaign records for the entire organization
– Read, append, append-to, assign, share GetResponse activity records for the entire organization
– Read, edit, append, append-to, assign, share GetResponse contact records for the entire organization
– Create, read, edit, delete, append, append-to, assign, share GetResponse list records for the entire organization
– Read GetResponse custom field records for the entire organization
– Read and append-to GetResponse template records for the entire organization
– Create, read, edit, append GetResponse Newsletters for the entire organization
GetResponse Connector User
The integration user who is able to:
– Create, edit, delete, assign, share their CRM contacts records for the entire organization
– Create, read, edit, delete, append, append-to their marketing list records
– Read and append-to campaign records for the entire organization
– Read, append, assign, share GetResponse activity records for the entire organization
– Read, edit, append, append-to, assign, share GetResponse contact records for the entire organization
– Read GetResponse lists records for the entire organization
– Read GetResponse custom field records for the entire organization
– Read and append-to GetResponse template records for the entire organization
– Create, read, edit, append their GetResponse newsletter records
GetResponse Read-only
The application user who is able to:
– Read CRM contact records for the entire organization
– Read marketing list records for the entire organization
– Read campaign records for the entire organization
– Read GetResponse activity records for the entire organization
– Read GetResponse contact records for the entire organization
– Read GetResponse lead records for the entire organization
– Read GetResponse custom field records for the entire organization
– Read GetResponse template records for the entire organization
– Read GetResponse newsletter records for the entire organization
GetResponse Service User
The application user that will be used by the Connector and who is able to:
– Read, append, append-to CRM contact records for the entire organization
– Read, append, append-to marketing list records for the entire organization
– Read, append, append-to campaign records for the entire organization
– Read GetResponse activity records for the entire organization
– Create, read, edit, delete, append, append-to, assign, share GetResponse contact records for the entire organization
– Create, read, delete, append, append-to, assign, share GetResponse list records for the entire organization
– Create, read, edit, delete, append, append-to, assign, share GetResponse custom field records for the entire organization
– Create, read, edit, delete, append, append-to, assign, share GetResponse template records for the entire organization
– Create, read, edit, delete, append, append-to, assign, share GetResponse newsletter records for the entire organization
How to connect Microsoft Dynamics 365 Sales with GetResponse?
To connect your GetResponse account with Microsoft Dynamics 365 you need to:
- Download the GetResponse for Dynamics 365 installation file from your GetResponse account in the integrations and API section and go to Advanced settings in Microsoft Dynamics 365 to install it.

- Expand the arrow next to Settings and select Solutions.

- Click Import and add the GetResponse Connector file. Then proceed with the installation.
- Once the installation has been completed, a new area in Microsoft Dynamics 365 called GetResponse will become available.
Activating Microsoft Dynamics 365 in GetResponse
- In your GetResponse account, navigate to Integrations and API >> MS Dynamics.
- Click Connect.
- Provide the following details:
– MS Dynamics version (On-Line or On-Premises)
– Client ID
– Client Secret
– CRM Environment Address
– API CRM version
– Authority Server URL
- Click Connect to Microsoft Dynamics 365.
- Then, configure the integration.
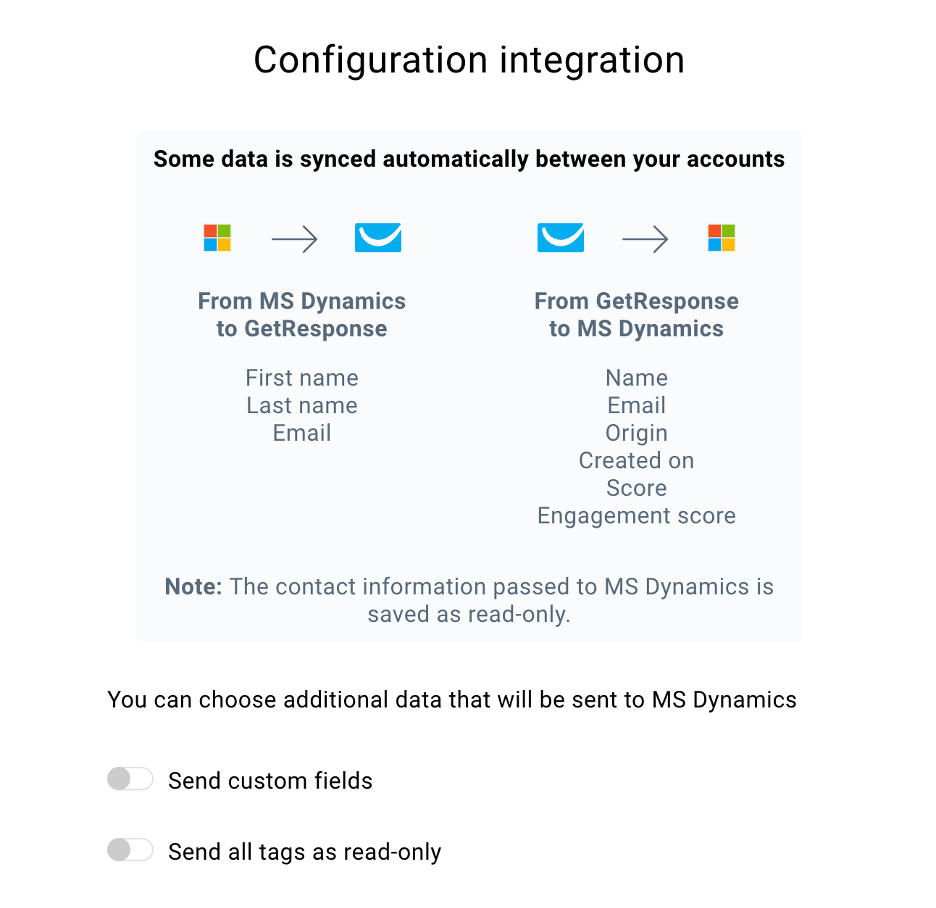
- Decide if you want to send custom fields, and choose which custom fields you’d like to sync.
- Decide if you want to send tags.
- Click Save.
You can change the settings later by clicking Edit settings on the integration page.
What data is synchronized between GetResponse and Microsoft Dynamics 365?
The data synced from Microsoft Dynamics 365 to GetResponse includes contact names and email addresses. The integration doesn’t import any data from Leads or Opportunity objects in the CRM.
The contact data synced from GetResponse to Microsoft Dynamics 365 includes:
- Contact name
- Email address
- Engagement score
- Scoring points
- Origin
- Creation date
- Custom fields
- Tags
We also provide contact activity data related to specific messages received by the contact. These include:
- Message name
- Activity type – send, open and click
- Activity date
- URL (optional and depending on message type)
The data sync happens hourly.
The contact sync process from Microsoft Dynamics 365 to GetResponse
First, create a marketing list in Microsoft Dynamics 365 to define the list of contacts you want to sync.
The fields marked with a red asterisk are required. Set the list target to Contacts.
To create a list:
- Go to Marketing lists.

- Click New.

- Add the list name.
- Choose list type (static or dynamic).
- (Optional) Add list purpose.
- Choose Contact in Targeted at.
- Fill out the rest of the fields if needed.
- Click Save.
Depending on the type of list you’ve selected, now it’s time to add contacts to the list.
To add contacts:
- Go to Members.

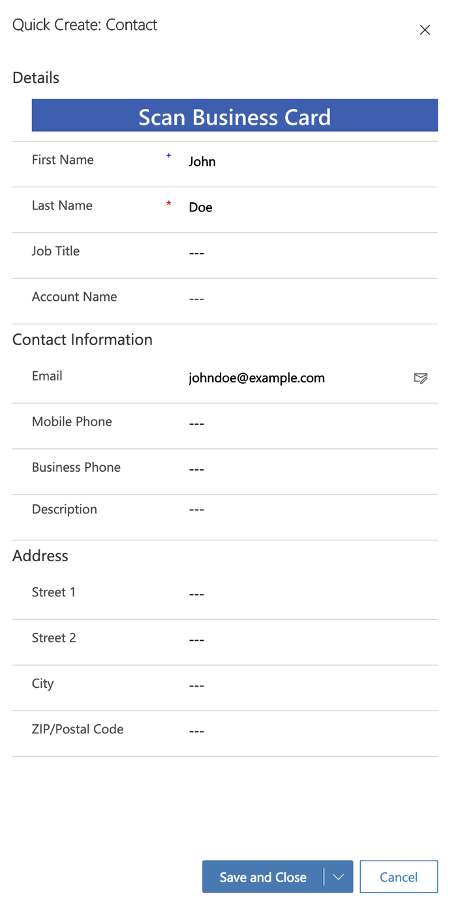
- For a static list, click Add or Manage members. Then look for your contact or add a new one by clicking New record >> Contacts. After filling out the details (don’t forget the email address), click Save and close. Then click Add and the contact will be added to the marketing list.
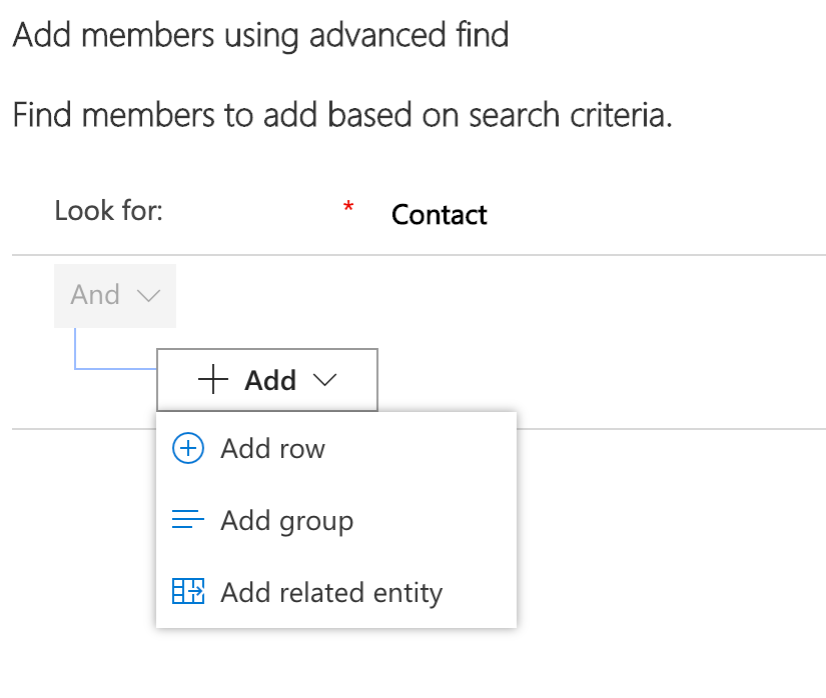
- For a dynamic list, click on the arrow next to Manage members and select Add using advanced find. Then define the conditions. Click Find once the conditions are set up and Add for selected users or Add all.
Note: Don’t use filters based on Owner>> Equals current user. Use a filter based on a defined owner like Owner>>equals>>John Doe.
- Your contacts will be listed as members on the list. Click Save & Close to finish creating your marketing list.
You can also add contacts later on. The same CRM contact can appear on multiple marketing lists which are then connected to GetResponse lists.
The next step is to create a GetResponse list in Microsoft Dynamics 365. You can have multiple GetResponse lists, but only GetResponse Connector Administrator can create them.
To create a list:
- Go to GetResponse Lists.

- Click New.
- Add the list name. List names in GetResponse must be unique across all GetResponse accounts. Use only lower-case letters, numbers, dashes ‘-‘, and underscores ‘_’.
- Choose the marketing list you’d like to sync with GetResponse. You can only use marketing lists targeted at Contacts.
- Click Save.
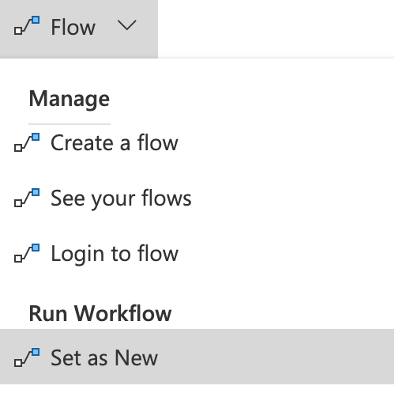
- To mark the list as ready for sync, go to Flow >> Set as New and click OK in the popup window.
The list is synchronized with GetResponse hourly. The Is created in GetResponse field will change to Yes and the Synchronization status will switch from New to Created in GetResponse. This will create contacts in GetResponse equivalent to the contacts in the CRM linked to the marketing list connected to a GetResponse list in Microsoft Dynamics 365.
In case of an error, the synchronization status will change to Error and the Is created in GetResponse field will change to No. In the ** Synchronization error** field, you’ll see the error reason, like an already existing list name in GetResponse. After changing the required field according to the error, you can repeat the synchronization by going to Flow >> Set as new, which will change the synchronization status to New.
If you delete a list in GetResponse, the list in Microsoft Dynamics 365 will change the synchronization status to Deleted in GetResponse and Is created in GetResponse will be set to No.
The synchronization creates the CRM contacts in GetResponse. The contacts have all the necessary information and are linked to the CRM contacts and a GetResponse list in Microsoft Dynamics 365. Their synchronization status is set to Synchronized.
The contact sync process from GetResponse to Microsoft Dynamics 365
Contacts are not added automatically, because the integration doesn’t create new records in Microsoft Dynamics 365. The integration enriches the existing records with additional data.
For contacts created in GetResponse, records of GetResponse contacts are created with no connection to CRM contacts. Connect your GetResponse contacts with existing CRM contacts or create new ones.
GetResponse contacts connected to the CRM contacts refresh automatically.
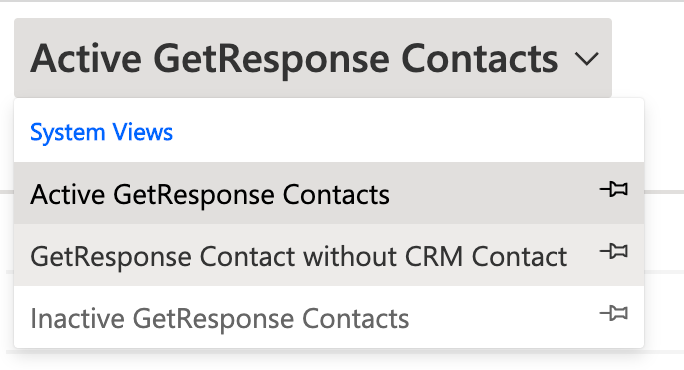
You can easily view the contacts that require connecting when you go to GetResponse contacts >> click on Active GetResponse contacts >> and select GetResponse contact without CRM contact.
GetResponse contacts waiting to be synchronized with CRM contacts are shown as Processing in Dynamics.
To move your GetResponse database to Microsoft Dynamics 365, do the following:
- Find a list in GetResponse that you want to sync.
- Note its name.
- In Microsoft Dynamics 365 Sales, go to GetResponse lists.
- Click New.
- Create a list with the same name as the list in GetResponse.
- Select or create your marketing list that will be linked to the GetResponse list.
- Save the list.
- Click the arrow next to Flow and select Set as new.
The list will be synchronized and contacts from GetResponse will be imported within an hour.
After the list synchronizes, you will have to import the contacts to the CRM and match them with your GetResponse contacts in Microsoft Dynamics 365. To accomplish this, follow the process outlined below:
- Go to GetResponse contacts.
-
Export the list in GetResponse contacts to an Excel file. Its name will be Active GetResponse contacts.

-
Go to Contacts in Microsoft Dynamics 365 Sales.

- Export the empty list to an Excel file called My active contacts.
- Open both files in Excel.
- In the first file, select the column with first and last names and paste it into the second file under the Full name column.
- In the Active GetResponse contacts file, insert a new column to the left of the Name column.
- In the same file, select the first column (Name), go to Data at the top and click Text to columns and click Next on the window that opens.

- Select Space as the delimiter and click Next.
- Then press Finish and *OK** in the popup window that appears.
- Copy the first column with the name only to the My active contacts file in the First name column.
- Go back to the Active GetResponse contacts file and copy the second column with the last name to the second file. Paste it in the Last name column.
- In the Active GetResponse contacts file, copy the email column.
- Paste it in the My active contacts file into the Email address column.
- Save the My active contacts file.
Once you have the file saved, go to Microsoft Dynamics 365. You will need to import the My active contacts file to your CRM contacts.
- Go to Contacts.

- Click Import from Excel and add your file.
- Click Next.
- Select if you want to allow duplicates.
- Click Finish import.
- Click Confirm.
It will take a moment to import the contacts. Click Refresh to monitor when the import is complete. Next, link the contacts.
- Go to GetResponse contacts.
- Click Export to Excel again.
- Open the file.
- Copy the Name column.
- Paste it to the Contact column.
- Save the file.
- In Microsoft Dynamics 365, go to GetResponse contacts.
- Click Import from Excel.
- Select the file you just edited.
- Click Next.
- Choose if you want to allow duplicates.
- Press Finish import.
Wait till the process of synchronization is complete. After that all records should have their status marked as Synchronized.
Whatever happens to the contact in GetResponse will now be reflected in Microsoft Dynamics 365.
When you complete the steps, your GetResponse contact data will be passed to Microsoft Dynamics 365 along with the name, email address, engagement score, scoring points, origin, creation date, custom fields, and tags.
You can’t edit the GetResponse custom fields imported with the contacts. They’re connected to the GetResponse contacts as well as CRM contacts in Microsoft Dynamics 365, and you can view them in the CRM contact in Related >> GetResponse Custom fields.
In GetResponse Activities a contact’s actions in a newsletter sent through Microsoft Dynamics 365, like clicked links or opened messages, will be synced. They’re linked to the GetResponse contact in Microsoft Dynamics 365 and the CRM contact. When checking a contact in Microsoft Dynamics 365 Sales, the activity will be shown in Related.
How message templates work
Templates include message drafts created in GetResponse.
To see a newsletter template in Microsoft Dynamics 365, create a draft in the account with a MS CRM prefix, so it looks like this: MS CRM Welcome message. You can reuse the template multiple times.
You’ll find the message in Microsoft Dynamics 365 under GetResponse Newsletters when you start creating a newsletter.
If a draft is no longer available in GetResponse, the template in the CRM becomes inactive and shown as Deleted in GetResponse, and can no longer be used.
Template data is synced every 5 minutes.
How to send a newsletter through Microsoft Dynamics 365
The GetResponse Newsletters area includes information about the emails you send. Every newsletter sent from Microsoft Dynamics 365 is linked to your marketing list and a GetResponse template. It’s also connected to the recipient activity in GetResponse. The emails created in GetResponse will also be displayed in the GetResponse Newsletters area.
To schedule a message through Microsoft Dynamics 365:
- Log in into your Microsoft Dynamics 365 Sales account.
- Open the GetResponse area.
- In the menu select GetResponse Newsletters.
- Click New.

- Add your message name.
- Choose the template by searching for its name.
- Select the marketing list in Microsoft Dynamics 365 you want to send the message to.
- (Optional) Select your campaign.
- Schedule when you want the message to be sent.
- Go to Flow and select Set as ready for realization.
- In Administration, Synchronization status will be set to Ready for realization. You won’t be able to edit the fields selected earlier.
Scheduled messages are synced every minute. If there’s an error, you’ll see the reason, like a removed template or undefined marketing list.
Recipient activity in sent emails is synced hourly.
What happens when the email address is deleted or changed in Microsoft Dynamics 365 or GetResponse?
If an email address of a GetResponse contact in Microsoft Dynamics 365 is changed, it won’t change in GetResponse. If an address gets deleted or deactivated, it won’t be deleted in GetResponse.
If an email address is changed in a GetResponse contact, it’s automatically changed in the GetResponse contact located in Microsoft Dynamics 365, but not in the CRM contact. If the contact is deleted from GetResponse, the GetResponse contact in Microsoft Dynamics 365 is shown as Deleted in GetResponse and won’t be synced in the future.
What happens when you merge CRM contacts with GetResponse contacts?
If you merge CRM contacts, the GetResponse contacts, along with its custom fields and activities, will still be visible in the master contact.
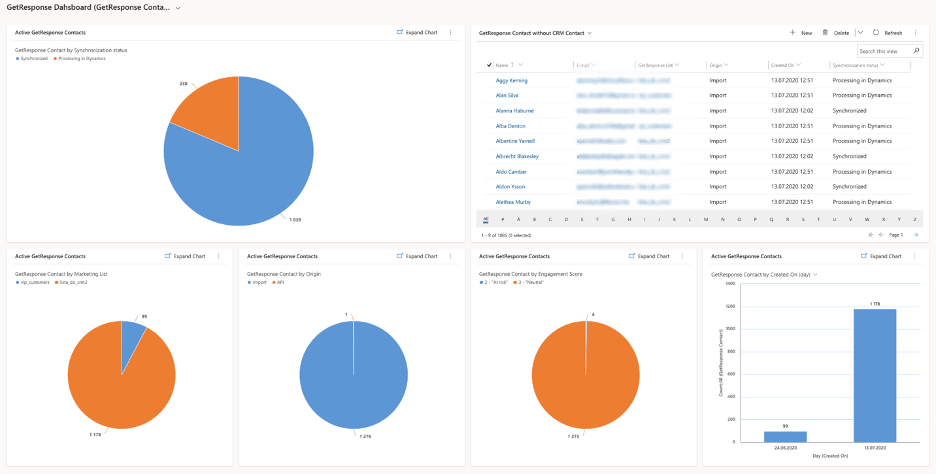
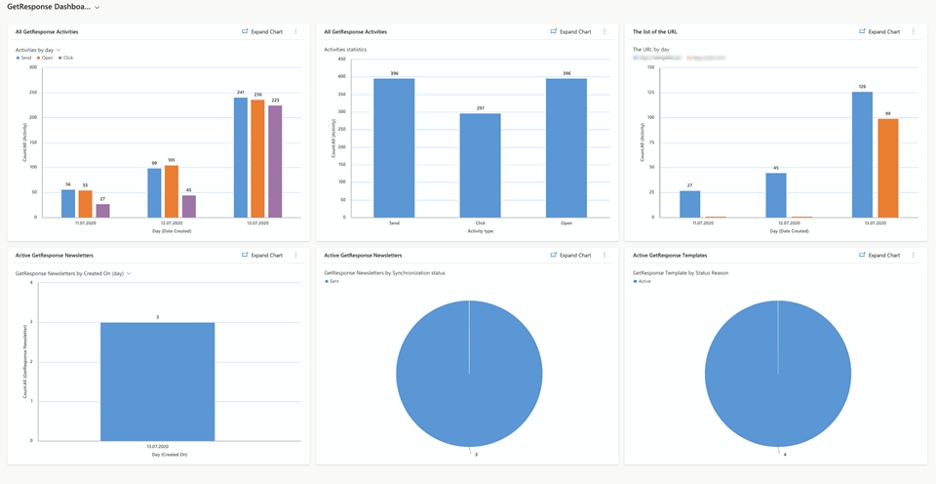
Where to find reports in Microsoft Dynamics 365?
After clicking on Home, you’ll find two report dashboards: one related to contacts and one to their activity and emails sent.
The contacts dashboard:
The activity and sent emails dashboard
Glossary
CRM contacts in Microsoft Dynamics 365
CRM contacts are used to set up GetResponse lists and GetResponse newsletters in Microsoft Dynamics x365. When you sync a GetResponse list, the contacts will be used to create contacts in GetResponse. The contacts are also connected to GetResponse custom fields and contact activities.
Marketing lists in Microsoft Dynamics 36
The lists are used to define GetResponse lists and newsletter recipients in Microsoft Dynamics 365, and need to be targeted in Contacts. The lists contain CRM contacts synced with GetResponse or contacts selected for a GetResponse Newsletter. You can also use them in campaigns.
Marketing lists can be static or dynamic. You add contacts manually to a static list using search or advanced search. With dynamic lists, contacts are added automatically according to your search rules.
GetResponse lists in Microsoft Dynamics 365
The GetResponse lists in Microsoft Dynamics 365 are the lists that have been synchronized with GetResponse platform.
Contacts in marketing lists are connected to GetResponse lists in Microsoft Dynamics 365 and they are the ones that get synced.
Synced CRM contacts are in marketing lists connected to the GetResponse lists. GetResponse contacts are created based on the CRM contacts linked to the marketing list.
GetResponse contacts in Microsoft Dynamics 365
A GetResponse contact is created based on a CRM contact added to the marketing list linked to a GetResponse list in Microsoft Dynamics 365.
A GetResponse contact is created for every CRM contact that exists on the marketing list connected to a GetResponse list in Microsoft Dynamics 365.
Information coming from GetResponse, like activity or custom fields, is linked to the GetResponse contacts in Microsoft Dynamics 365.
GetResponse custom fields
You can find them in contact details of a GetResponse contact and a CRM contact linked to it. It comes directly from GetResponse and is used to describe the contact in detail. It’s not editable.
GetResponse newsletters
GetResponse newsletters contain information about the newsletters sent through Microsoft Dynamics 365. Each newsletter is linked to a marketing list with contacts and a GetResponse template. GetResponse activities are linked to them.
GetResponse templates
GetResponse templates contain information about email drafts created in GetResponse. They’re available when creating a GetResponse newsletter in Microsoft Dynamics 365. They’re based on GetResponse drafts with the prefix MS CRM.
GetResponse activity in Microsoft Dynamics 365
The integration tracks the email activity of the synced contacts, gathering information from newsletters sent either through Microsoft Dynamics 365 or GetResponse.
You can see message opens, sent messages, and clicked links. The information is first saved in GetResponse and then synced with the CRM and GetResponse contacts.


