Why aren’t my autoresponders going out?
There are a number of possible reasons why an autoresponder didn’t go out. Check the steps below to see why this might have happened.
Are there any outstanding charges on your account?
You can check that under Profile>>Billing.
- If you can see a Pay the balance button, that means your account has an outstanding charge and is limited. To start sending messages again, settle your payment.

- If the Pay the balance button isn’t there, everything’s in order. You can go to the next step.
Is your account under verification?
Another reason why message sending can be blocked is if your account is under verification by our Compliance Team.

Messages will not send until the check concludes. Learn more about account verification.
If you don’t see a review notification on your Dashboard, your account is active. Go on to the next step.
Are your autoresponders active?
Go to Autoresponders to make sure that the Status toggle is set to ON for the proper message.

Is the autoresponder setting enabled for your subscription method?
Regardless of whether you’re adding contacts through import or manually, or collecting subscribers through subscription methods (such as legacy forms, forms created under Forms and popups, Website Builder signup forms, webinars, landing pages, or API), you need to check the settings for each of those subscription methods and make sure autoresponders are enabled. GetResponse doesn’t turn them on by default.
Forms and popups
- Go to Forms and popups.
- Click the Actions icon (ellipsis) next to your form.
- Choose Edit.
- Click on the form.
- Navigate to the Subscription settings and expand the menu.
- Make sure to enable Add to an autoresponder cycle.

- Save the changes.
Website Builder
- Go to Website Builder.
- Click the Actions icon (ellipsis) next to your website.
- Choose Edit.
- Click on the form.
- Navigate to the Subscription settings and expand the menu.
- Make sure to enable Add to an autoresponder cycle.

- Save the changes.
Forms (Legacy editor)
1. Go to Forms.
2. Click the Actions icon (ellipsis) next to your form.
3. Choose Edit form.
4. Navigate to the Settings icon and click it.

5. Look for the Add to the cycle on day setting and make sure it’s checked. If it isn’t, check the box next to it and click Save. Your form will update and new contacts will get your autoresponder.

If you are using a List Builder App form, click its name and scroll down to the bottom of the popup window. Make sure the option for Cycle day is checked.
If you are using our Plain HTML editor to generate your forms, make sure you check the Add to the cycle on day box in the sidebar.
Landing pages
1. Go to Landing Pages.
2. Click the Actions icon (ellipsis) next to your page.
3. Choose Edit settings.

4. Navigate to the Subscription settings section.
5. Make sure the Add to the cycle on day box is checked. If it isn’t, check it and click Save. Your landing page will update and new contacts will get your autoresponder.

Webinars
1. Go to Webinars.
2. Click the Actions icon next to your webinar.
3. Choose Edit.
4. Navigate to the Registration and subscription settings section.
5. Make sure the Add to the cycle on day switch is ON. If it isn’t, switch it on and click Save. Your webinar will update and new contacts will get your autoresponder.

API
If you’re using an external subscription method (one that you didn’t create in GetResponse) you will need to find the setting for autoresponders in your external service. Look for an Add to the cycle on day box or a setting with similar wording.
Alternatively, if you’re a developer, you can add the autoresponder setting directly in your API. Check our API documentation.
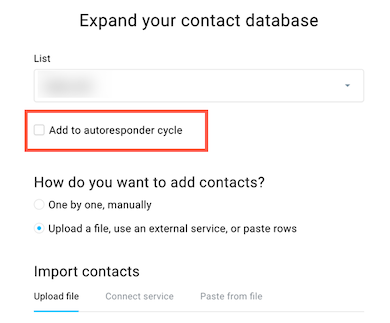
Adding contacts through import or manually
When you add contacts manually or through import, you will see the option Add to autoresponder cycle. Make sure to tick this option before you add your contacts.
Do the cycle days in the settings match the first scheduled message day?
While you’re checking whether the autoresponder setting is enabled in your subscription method, make sure the day you select there matches the day of your first autoresponder message under Manage Autoresponders. For example, if you choose to add a contact on day 1 in your landing page settings, but your first autoresponder message in Manage Autoresponders is set for day 0, the contact won’t get the first message.
Similarly, if you select day 0 in the subscription settings but the first message is scheduled for day 2, the contacts will only get the message 2 days after they subscribe. In GetResponse, day 0 is the same day a contact subscribes.
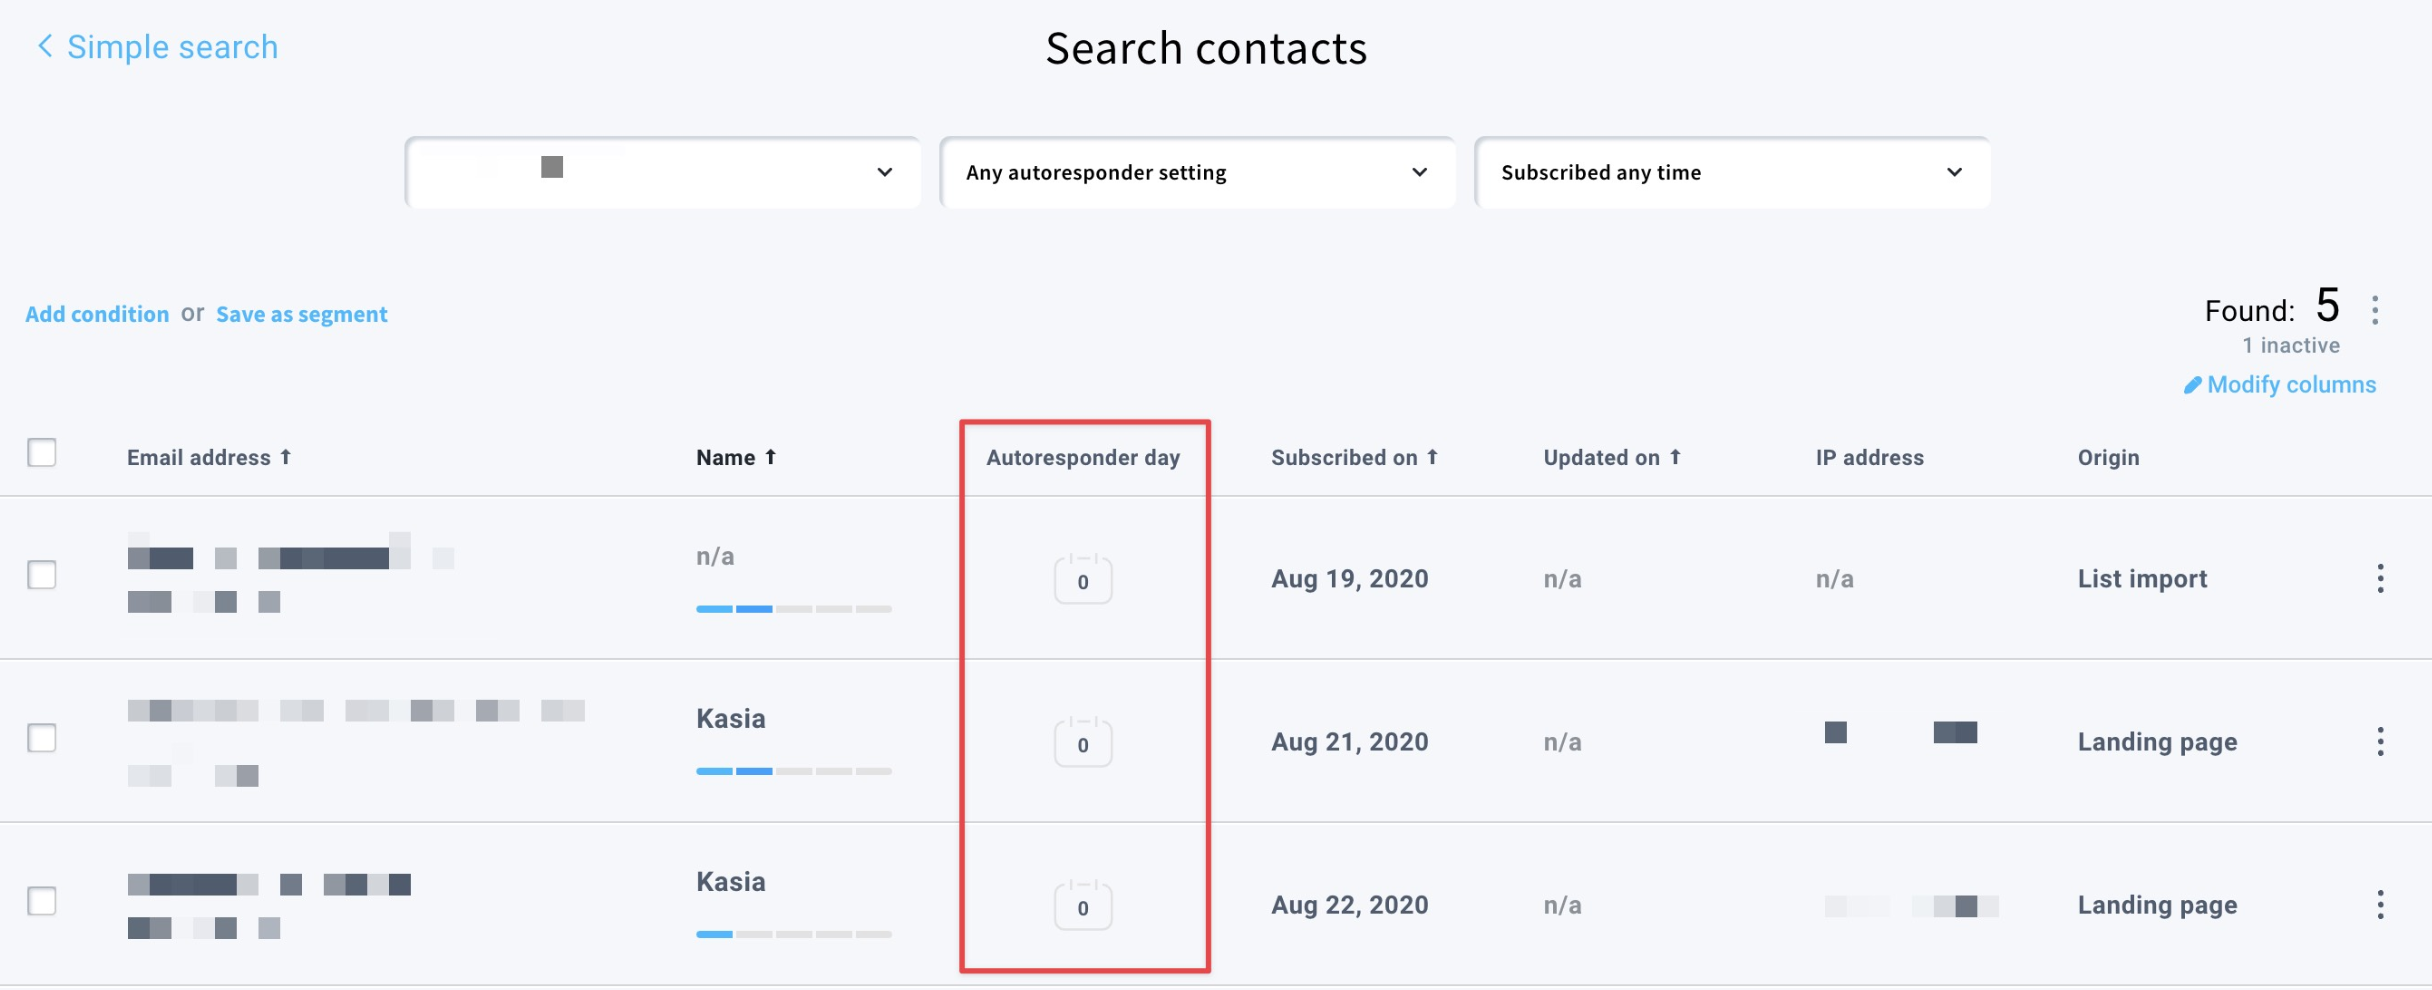
How can I check the day of the cycle my contacts are on?
- Go to Contacts > Lists.
- Select the list you want to check.
- The day of the cycle that your subscribers are on currently will be displayed under Autoresponder day column.
You can edit the autoresponder cycle day a given contact is on. Learn more about adding existing contacts to the cycle.
Still not working?
Our Customer Success Team will be happy to help. Make sure you have the following information on hand to speed things along:
- the name of the list that houses your autoresponder
- the name of the autoresponder message
- the autoresponder day cycle your message is on
- the URL of the sign up method we can use to test your optin process
- an example email address that didn’t receive your message


