What are sections in the message editor? Video
Sections are a useful tool that allows you to create and manage your message layout. They are an empty area that you can fill with different types of message blocks such as images, buttons, text and more. Each message includes the following parts:
- Header – this includes your logo and view online link, both of them can be turned off. You can’t add elements to this section.
- Content – a place where you can add your sections and basic blocks within them.
- Footer – includes a link to unsubscribe and change details of the subscriber as well as the postal address of the sender.
Sections will make it easier for you to create beautifully designed newsletters with a variety of well-organized content.
Sections also guarantee that the content will be divided properly on the mobile version as well as on different email clients.
Apart from that, sections can be used to save whole areas of your message as reusable snippets in My blocks, that will speed up the message creation process. You can save your message introduction or your signature and then simply drag and drop it in your next message without losing any elements or time.
What types of sections can I use?
We’ve prepared a variety of predefined section templates that you can use. They come in 1-column, 2-column, 3-column, 4-column, 5-column and 6-column designs.
Each of the columns can have a different set of message blocks inside in order to present your readers with different content. You can use them to easily display your products or news. One column sections are great for images or texts that stretch to the full width of your message, while multiple column sections can be helpful in connecting images and text together in nicely organized blocks.
Combining sections allows you to add structure to your messages. If you want to showcase products under a photo, add first a single column section (for the main photo), and then 2-,3-,4-,5- or 6- column section, where you’ll add the content of your products (image, description, button).
Note: the columns inside a section will determine the width of the elements added to the column. If you choose to reduce the number of columns in the section, we will remove the columns from the right side.
How to add sections?
In order to add sections to your message:
- Go to Layout in the message editor.
- Expand the Sections menu.
- Select the type of section you want to use
- Drag and drop it to your workspace.
Sections can be added above or beneath existing sections.
How to add content to sections?
- Go to the Layout in the message editor.
- Open Basic blocks.

- Select the block you want to use and drag and drop it to your section. We will show the available spaces for dropping the block in the workspace, by showing Drop here and highlighting the chosen section.

You can add multiple content blocks to the same section by just dragging the elements within your section and deciding on the placement. The blocks will be stacked vertically inside the section or your column.
How to move, save, duplicate or delete a section?
When you click on or hover over a section, in the right-side corner you will see a toolbar that allows you to:
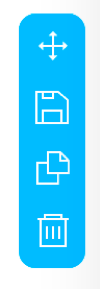
- Move the section. It’s enough to the first icon and drag your section.
- Save the section to My blocks by clicking the floppy disk icon. When saving a block, you will see a preview of what you’re saving in a pop-up. Just provide the block name and click Save.
- Duplicate the section using the third icon. The copy will always duplicate below the current section.
- Delete the section by using the trash can icon.
How to style a section?
Styling a section allows you to set the design you’d like your section to have. You can then style individual basic blocks to achieve a nicely designed message.
Each section allows you to style it by using the following options:
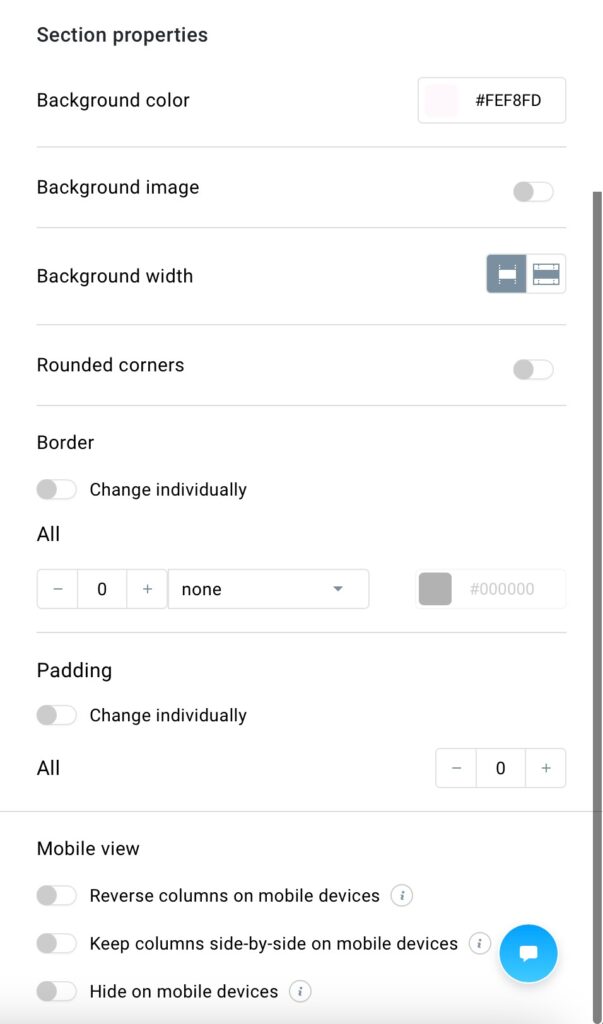
- Background color – the color of the entire section (it’s recommended to add it even if you use a background image as some email clients don’t support background images. More information here).
- Background image – the image behind your content on the section.
- Background width – you can decide if the background color or image should stretch only within the message width or to the full width of the screen.
- Border – an outline of your section (can be changed individually).
- Padding – the distance from the section contents to the section border (can be changed individually).
- Hide on mobile – allows you to hide the section on the mobile version.
Note: increasing the padding and border will make the content within the section smaller.
Additionally, you can edit each column individually by clicking on Column settings at the top of the section setting.
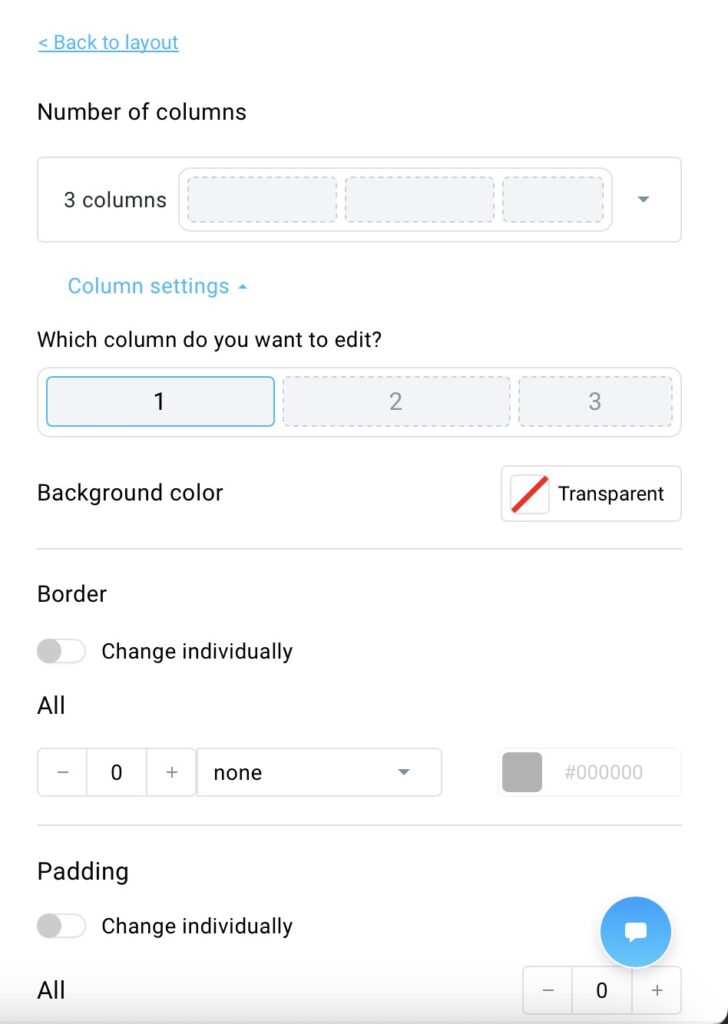
You can set:
- Column background color – each column can have different color, independent from the section colors.
- Column border – the outline of the column (can be changed individually).
- Column padding – the distance between the elements inside the column and the column border (can be changed individually).
- Column spacing – for multicolumn sections, you can edit the space between columns.
Note: increasing the padding and border will make the content within the column smaller.


