Customer retargeting
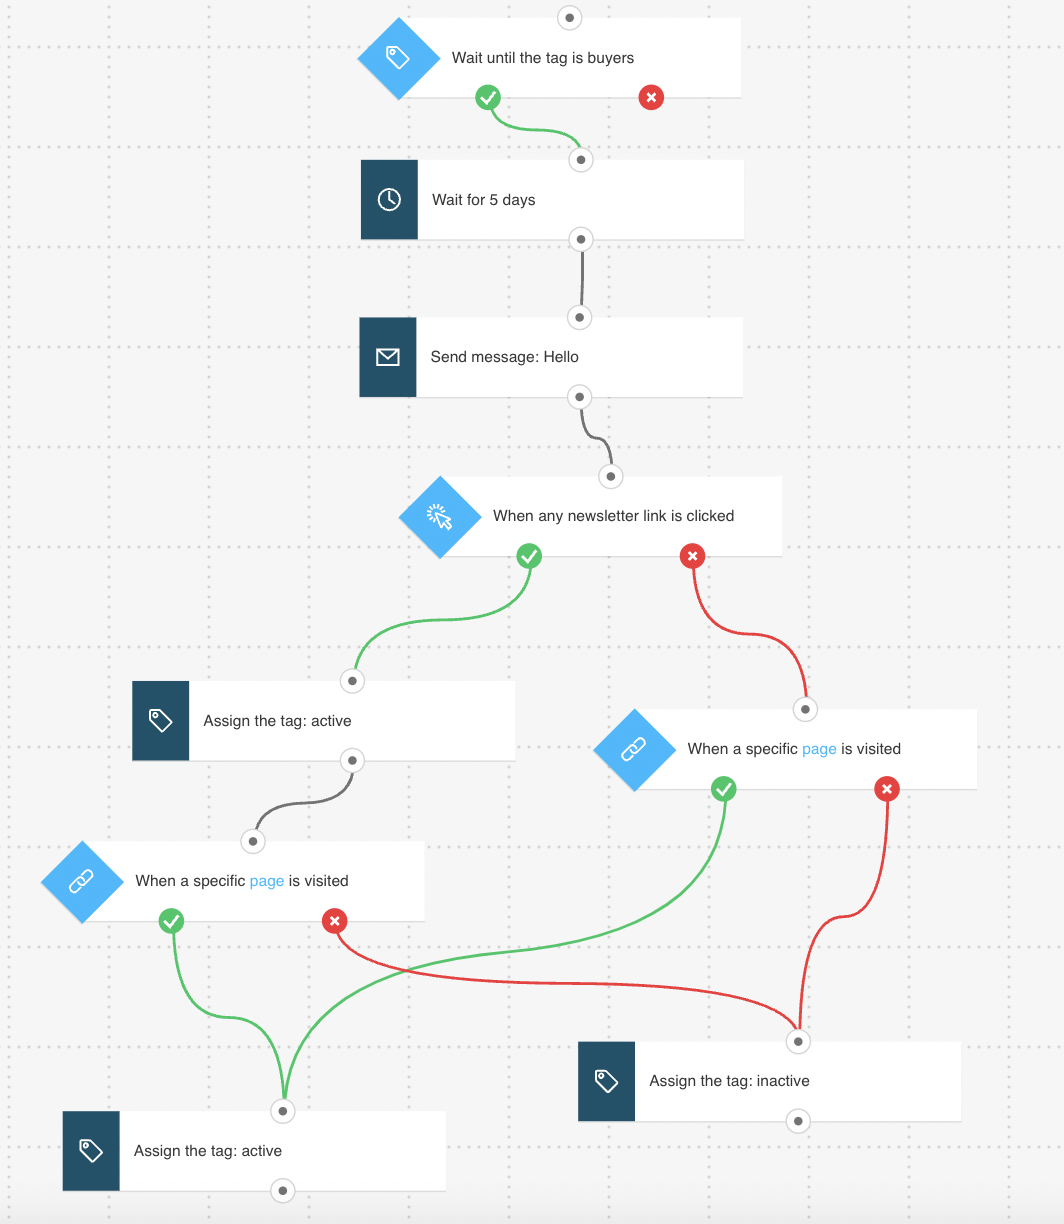
You can use the Customer retargeting template to reach customers who have already viewed or purchased a specific product. The element settings allow you to customize the template and fill it with content that works well for first-time or return buyers. This template helps build a workflow that:
- sends a message to customers 5 days after they were tagged as ready for retargeting. Note: The delay in the Wait filter has been set to a recommended value,
- lets you track sales,
- tag your customers according to how they responded to your remarketing strategy. You can use this information for planning specific campaigns for them.
Template overview
Category: Engagement and retention
Elements in template: 9
Minimum number of elements to configure: 7
Here’s what you’ll need to configure the elements and publish the template as a workflow:
- an automation message or a message (or draft) that can be used as automation message,
- tags (optional). You can create tags as you’re building the workflow but its best to have a basic tagging plan set.
Configuring the template
All greyed out elements need to be configured. The Link clicked? condition is preset to any newsletter/any link. You can modify the settings to better suit your needs. Click an element to open its Properties tab. Note: The Wait element and the time settings in the Link clicked? condition have been preset to the recommended delay.
Selecting the right target group
- For the If tag condition, select the tag starting the workflow. For example, you select a tag “not_interested” because you want to target everyone who hasn’t shown interest in your product offering. By default, this condition will work for customers who get the tag after the workflow is published. If you want to include customers who had the tag before you publish the workflow, turn on the switch that enables adding them. Keep the time settings set to Never.
- For the Send message action, use the drop-downs to select the message encouraging your customers to check out your newest content.
- For the Link clicked condition, use the drop-downs to select the message and the link it includes. (Even though this element is preconfigured, it’s best to select a specific message and any link because most likely you’ll be sending them a message with multiple links, giving your customers different options.)
The next actions will depend on whether or not your customers clicked any of the links.
Targeting the positive path
- For the Tag element attached to the “if yes” (green) connected of the Linked clicked condition, select a tag that will distinguish your retargeted contacts from the rest of your contacts. For example, you can tag them as “not_lost”.
- Configure the URL visited element to track if your contacts visited your product site:
- click the element. This will display the Get Web Connect button.
- click the Get Web Connect button, copy the snippet to the clipboard and after that click on ‘Back’ on the top left. (At this point it’s best to save it to a temporary document in case you copy something else to the clipboard).
- under Properties, enter the URL of the product site you want to track. Use a wildcard if you want to track all visits anywhere on your site. To learn more about configuring the element and using wildcards, go to How do I set properties for the URL visited condition?
Note: Once you’re done configuring the template, you’ll need to copy the snippet to your website’s management system or insert it directly into the HTML source code.
For detailed instructions on installing the tracking code, please go to How do I add the tracking JavaScript code to my website?
- For the Tag action at the end of the workflow, select tags to indicate these customers have been retargeted and are interested in your products.
Targeting the negative path
- For the of the URL visited condition attached to the “if yes” (green) connected of the Linked clicked condition, repeat Step 2 explained in Targeting the positive path.
Note: To track customers who didn’t open your message or clicked the link, you’ll need to use the gaSetUserId method. It makes it possible to properly identify the visitors who haven’t come to your via a GetResponse message link. It requires passing on a user email as a parameter to GetResponse. To learn more, go to How do I add the JavaScript code to my website?
- For the Tag action, select the tag you want to give your customers if they don’t visit the site at any point. Customers who visit the site will be automatically given the tag that marks them as “still interested”.
Finishing up
Click Save and publish when you’re done setting up the template or Save and exit if you want to finish editing the template later (it will appear as a draft on the Manage workflows page).
Related workflows
Tags assigned at the end of these workflows can be used to trigger Customer retargeting:
- Welcome new customers
- Converting contacts to customers
Note: The Wait action used at the beginning of the workflow has been preset to give your customers some time before they start receiving new offers and product suggestions in case you decide to run Customer retargeting with either Welcome new customers or Converting contacts into customers.
Related links
- How can I use the If tag condition in a workflow?
- How does a marketing automation message work?
- How can I use the Tag action in a workflow?
- Where can I assign tags or scores to contacts?
- How do I make use of tags?
- How does the Link clicked condition work?
- How do I set properties for the URL visited condition?
- How do I use the Wait action?


