How to use sections in the legacy landing page creator?
Sections are a great way of organizing the content of your page. You can think of a section as a container that groups elements. When you group elements such as buttons, labels, or images, you can move or delete them with a single click.
Sections have two main functions:
- They organize elements into logical groups.
- They allow you to manage your content in an easy way.
Most of our landing page templates are composed of sections. You can also add extra sections to your template.
How do I work with sections?
To add an extra section, drag its icon from the toolbar to the workspace.
To make things easier we’ve introduced a section highlight. Each time you move a section, you’ll see neighboring sections highlighted. The highlight also works when you want to place an element within a section.
You can move sections up and down the page. You can do this in two ways:
- Use the move controls (they become visible after you click an unpopulated section area).
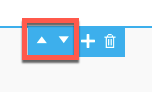
- Click and drag a section area.
You can also change the height of each section. To do this, grab the control at the bottom of the section and move up or down.
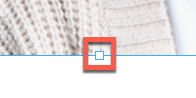
Note that this works the same for all sections, including the one at the very bottom of your page.
How do I duplicate a section?
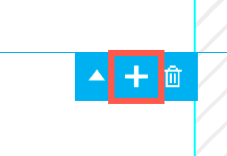
To duplicate a section, click on any empty area in the section and click + (duplication icon) in the toolbar at the top of the section. Your copied section will be placed under the original one.
How do I link between sections?
You can use clickable elements—buttons, images, and text—to link between sections. The elements work as anchor links. They bring visitors to a specific spot on your landing page. You can use this feature, for instance, to link text to a sign-up form at the bottom of your page. Or, to link buttons at the bottom of your page to a form at the top.
Create a link that helps you direct the visitors to the most important part of your landing page. For example, link a button in the last section to a sign-up form in the first section. When you do this, you make signing up easier for your visitors. They don’t have to scroll back to the top and look for the form.
You can use one of our templates, such as Active Gym and Fitness Journey, that already include linked elements (and there are more to come). You can also select another template and choose your own elements. Then, link them in a way that best suits your needs. To do this:
- Select the clickable element you want to link to your form and drop it into a section.
- Double-click the element to open the editor bar.

3. Click the link icon in the bar to view the options.
4. For Type, select Section. Then, select the section you’d like the element to link to (that’s the section where your form is).
5. Click OK.
You can now publish or continue editing the landing page. If you move sections around, element settings update dynamically. They “react” to the changes you make and link to the section in its new spot. This means that the section number in the button editor changes automatically. You don’t need to go back and make any edits.
When you publish the page, and the visitors click the button, the page scrolls to the section that contains the form.
Note: This feature doesn’t move you between sections when you’re still in the editor. To see it work, you need to publish the page.
Can I use keyboard shortcuts in the landing page editor?
There’s a number of Mac and PC keyboard shortcuts you can use to help you complete editing the landing page more quickly.
- press CMD/CTRL+S to save changes
- press CMD/CTRL+D to duplicate one or more selected elements, or a section
- press CMD/CTRL+C to copy one or more selected elements, or a section
- press CMD/CTRL+V to paste one or more selected elements
- press CMD/CTRL + left mouse click to select multiple elements
- press CMD/CTRL+Z to undo an action
- press SHIFT+CMD/CTRL+Z to redo an action
- press CMD/CTR+O – to optimize the mobile layout (only for mobile workspace)
- press key UP, DOWN, LEFT, RIGHT to move a selected element by 1 px
- press SHIFT+Key UP, DOWN, LEFT, RIGHT to move a selected element by 10 px
- press BACKSPACE – remove an element


